So I was asked awhile ago how I manage printers in our Mac environment. The old way of doing things is to install each printer manually on each computer. That’s a major pain, especially when you add a new printer and then have to go to every computer and manually install it.
I use a mixture of technologies to accomplish this from a single central place. First, I use a Mac OS X Server as a print server. Second is munki which is used to install print drivers automatically if they are not already installed, it is a general purpose “push” package installation system. Installation is done similar to how Apple’s own Software Update service works. Third, I use Workgroup Manager and Managed Preferences (MCX) to push out the list of installed printers and their settings. Lastly, I use a login script (issued by MCX) to ensure that the installed printers have the correct printer settings (pulled from MCX).
Step 1 – The Print Server
The print server is probably the easiest part to setup, but first a little background on what I do when I go to install a new printer or copier on the network. All of our printers and copiers are named and have a “-printer” or “-copier” suffix. For example, the HP printer near me is called Ralph, so it’s DNS name is ralph-printer.hdcnet.org. On the list of printers it shows up as “Ralph (Powell NW, Blk)” which has this meaning: The printer name is Ralph, It is in Powell building in the North-West corner, and it is a Black printer. People know which printer is near them by name, but if they have to print to something farther away, the location and type give them a clue of which one to use.
Once the printer is physically installed and has it’s basic network settings in place, I re-configure the printer and remove pretty much all sharing options. I turn off bonjour, SMB/Windows printing, RAW printing, LPR/LPD printing, etc. The only thing I leave on is IPP printing. I do this primarily so that nobody can accidentally connect directly to the printer, bypassing the print server. When somebody bypasses the print server and then sends a bad print job, I have to go to every computer to try and find that print job and delete it. If they send a bad print job through the print server, I just have to delete it from the print server in one central place.
Next comes installing the printer on the print server. That is pretty simple. Just install it using the IPP protocol and the DNS name of the printer. Some units, usually copiers, require a specific Queue name as well. Also give it a name and location. For the name use just the simple name, i.e. Ralph. For example:
- Protocol: IPP
- Address: ralph-printer.hdcnet.org
- Queue: <blank>
- Name: Ralph
- Location: Powell Auditorium, 2nd Floor North-West
- Print Using: HP LaserJet 4250
Once the printer is installed on the print server, make sure you can print to it. Pull up google or something and print any old page just to be sure it is working before you move on. If the printer sharing service is turned on, you should be good. Sometimes I need to manually turn sharing on for the printer, but it is usually automatic. You can tell it has been shared by going to a Mac client and seeing if it shows up in the “Nearby Printers” list in the print dialog. If it doesn’t, go to Server Admin and into the Printer service and make sure the IPP checkbox is checked on the printer.
Step 2 – Building Print Drivers
If your Mac’s are up to date, then they usually have print drivers for the printers, as long as it isn’t a brand spanking new printer. If you are installing a copier, you probably need to get the print driver as the Mac doesn’t seem to include most copier drivers.
Sadly, when you have to download and install print drivers, they usually don’t come in .pkg form. They don’t even come in simple .zip form, they usually are some custom slow as molasses installer. Don’t ask me why, I think they just don’t like playing nice, and it forces you to install all the extra crap on your computer. Normally what I do in this case is build a sandbox system (if you have VMWare Fusion, go find the hack that lets you install Mac Client and set yourself up a OS X install that you can use to do this, being able to snapshot the machine and roll back makes it a lot easier). There is a program called “Package Maker” that comes with the Apple Developer tools. You want that. It has a feature that makes it extremely easy.
If the print driver actually comes as a .pkg package already, you can skip this step, but I recommend installing it on your sandbox so you can see what else is installed with it to decide if you want that extra stuff on every computer. HP seems pretty good about not putting garbage everywhere. Epson is notorious for installing extra applications and services that suck the life out of my computer.
Anyway, if you run the Package Maker application it has an option to add a new “snapshot package”. What this does is track filesystem changes. So what I do is start the snapshot mode and then launch the print driver installer and run the installation. Once it finishes (don’t let it reboot if it wants you to), go back to Package Maker and say “done”. It will now give you a list of files that were created or modified during the installation process. If you look through it you should see pretty quickly which files you actually want. Generally the stuff under /Library is what you want. Things like /var, /tmp, /User, etc you don’t normally want.
Now that you know which files you want, you need to build a package. You can use Package Maker, but I personally can’t stand it. Too hard to make changes later on down the road. I usually use Iceberg to build my packages, I find it pretty easy to work with and extremely easy to go back later and make a change to the package if I built it wrong the first time. I can’t go into all the gritty details, but basically you just want to create a new “Package” and fill out the Settings portion. Fill out as much as you can. I fill out the Title, Version, Description; Display Name, Identifier, Get-Info string, Short version; and the Major and Minor versions. I try to match them to the print driver version if there is one, otherwise you can just make something up as long as you always increment that number. I also set the package to require a Restart just to make sure everything is synced up with the print drivers.
Next go to the Files section and add in all the files for the print driver. Then you can build the package. FYI, what I personally do is have 2 driver packages. One for HP (which I don’t use anymore since Mac comes with all the HP drivers) and one for all our Canon copiers, called “Canon Drivers”. Everytime we add a new copier that needs a new driver I just update the package and bump the version number.
Now you need to test the driver. Install that driver on your Mac sandbox (after reverting it to before you used their installation program) and then manually add the printer to the computer and make sure it picks up the driver. If it doesn’t automatically find it that is okay, as long as you can manually select it and have all the options for the printer show up. (Hint: in reality, I usually do this step before setting up the print server so that the print server uses the packaged driver too, it’s up to you). If something is wrong, go back and check the package and see if you missed something and try again, be sure to bump the version number.
Step 3 – Installing Print Drivers
I won’t go into the full installation of munki, but I will try to make a post soon on how I set it up in our environment. Basically, munki lets you install software automatically. If a user is logged in when it checks for software, it will pop up telling them there is new software and ask them if they want to log out and install. If the computer is at the login window when it checks for new software it will just install it without asking the user. The point is, on the server-side you configure what software you want installed on which clients, so it really isn’t up to the user if they want to install it, just if they want to interrupt their work to install it right now.
Munki allows you to install either .pkg, .mpkg or .app files. If you are installing a simple app (like Firefox), it just wraps the Firefox.app into a DMG for distribution (actually everything is wrapped in a DMG for simplicity) and at install time it just copies it into the Applications folder. If you are installing a .pkg or .mpkg it runs it through the normal install process as if you ran it by hand, except you don’t see the GUI, it does it in the background.
Since you now have a standard .pkg file to install, you can follow the normal steps on the munki wiki for installing packages. In the case of our print drivers, I put the print driver on every single computer. I again test on a sandbox computer and put the driver in a special catalog that only that sandbox computer can see. I force munki to check for updates (saves time) and install the print driver. After it reboots, I force munki to check for updates again. Just to make sure the print driver doesn’t show up every single time and try to re-install over and over again.
After munki has installed the print driver, once again add the printer manually to verify that the driver is working as expected.
Step 4 – Automatic Printer Installation
With a few small exceptions, every computer gets every printer/copier in their printer list. I know some places like to be very specific about only listing the printers near a person in their printer list, but we have found it is more trouble than it’s worth. It is a lot of effort maintaining all those different lists of printers and whenever somebody needs to print to a printer that is not near them (“hey can you print me a copy of such and such? Sure, I’ll print it to the printer near you.”), they can’t. So over in Workgroup Manager, I have a single computer group called “HDC Printers”. The only settings this group has is for printers. Create whatever group you want, go to the Preferences mode and into Printing. Set a few generic options, I recommend:
- Manage: Always
- Allow user to modify the printer list
- Allow printers that connect directly to user’s computer
Save those settings, don’t put anything in the User’s Printer List. Now switch over to Details mode and you should see com.apple.mcxprinting in there. Open that sucker up to install your actual printers. In the tree expand Always and you should see UserPrinterList-Raw. That is where you want to put all your printers. The screen-shot below shows what my window looks like and a sample config for the Ralph printer.
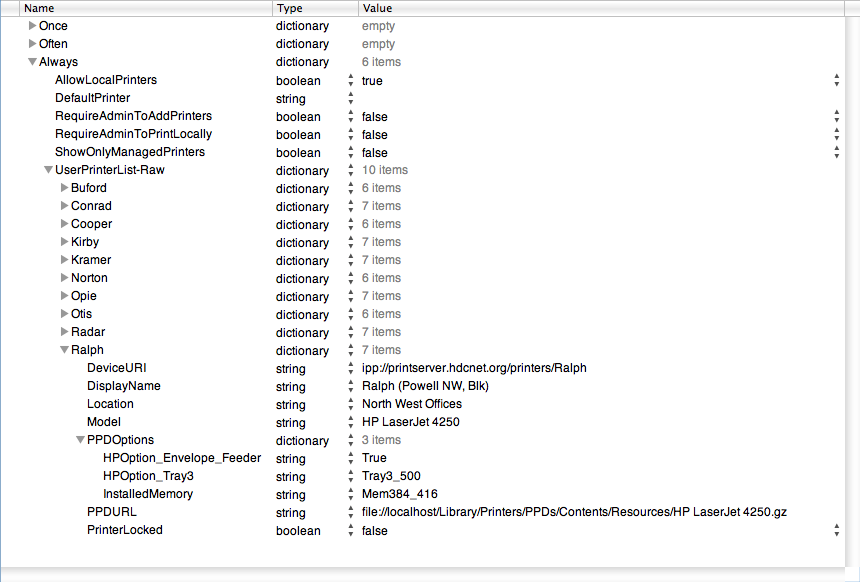
Some information on what you see there (you can click on the image to see it full-size and actually read it). The name of the printer dictionary doesn’t really matter, but I set it to the name of the printer, i.e. Ralph.
- DeviceURI – This is the URL that is used to connect to the print server for that printer. Notice it uses ipp:// instead of http://.
- DisplayName – As the title says, this is the name that is displayed to the user and what shows up in the print dialog.
- Location – If you mouse-hover over the printer name, this will be displayed for it’s location.
- Model – This must exactly match the PPD information. 99% of the time it is the model of the printer as shown in the Print & Fax System Preferences dialog. If that name doesn’t work, you’ll have to open up the PPD and take a look.
- PPDURL – This doesn’t matter. I always include it hoping one day Apple will actually start using it.
- PrinterLocked – Umm, not a clue, set to false. 🙂
- PPDOptions – This is used by the printer script (see later) to set the default options for the printer.
Normally, MCX printers are just plain and generic, no options installed. So if you have, for example, installed an envelope feeder, extra tray and more memory, you will need to set those options somehow. I get these options via the command line. If you run, on the print server, “lpoptions -p PRINTERNAME -l” it will give you a list of all the printer options and their current values. Any option that you had to turn on when installing the printer should be listed here. For example, the three options I list above are displayed as follows by lpoptions:
HPOption_Tray3/Optional Tray 3: False *Tray3_500 Tray3_1500
HPOption_Envelope_Feeder/Envelope Feeder: *True False
InstalledMemory/Total Memory: Mem48_63 Mem64_79 Mem80_95 Mem96_127 Mem128_159 Mem160_191 Mem192_223 Mem224_255 Mem256_287 Mem288_319 Mem320_351 Mem352_383 *Mem384_416
Another useful thing printer options can be used for is setting default output tray, or color/grayscale mode. For example, our Color copier costs a lot more for color copies than it does for black and white copies, and most people who print don’t care if it is color or not. So we use this method to set the color option to default to grayscale. This requires people to actually choose the color option when printing if they want color. You would not believe how many people were printing e-mails in color just because.
At this point, you should be able to assign a computer to this group for testing, reboot the client and it should be populated with the printer list. The options will not be set, but that is handled next.
Step 5 – Setting Printer Options
This step assumes you already have some method in place for running login scripts via MCX (again, I will try to do another post on how we set this up very soon). The script looks through the /Library/Managed Preferences/USERNAME/com.apple.mcxprinting.plist file and parses through each defined printer. For each printer, it looks for a PPDOptions key and uses the associated key/value pairs to set options on the printer. Because nothing is hardcoded, I have not had to modify this script since I originally wrote it. Each time I install a new printer/copier it just works.
One thing this script does not do that I would like to modify it for at some point is fix the printer’s driver. If you add a printer to Workgroup Manager before a client has the print driver installed then it will be installed as a Generic Postscript printer. Snow Leopard may have fixed this, I’m not positive. I haven’t had the problem lately so I assume they fixed it, but I would still like to modify the script at some point to check if the print driver is correct and if not set it based on the PPDURL setting.
#!/usr/bin/perl

use Foundation;

#
# This is a helper function to get the value as a string.
#
sub perlValue {
  my ( $object ) = @_;
  return $object->description()->UTF8String();
}

#
# Load up the user's managed printer preference file.
#
$file = "/Library/Managed Preferences/" . @ARGV[0] . "/com.apple.mcxprinting.plist";
$plist = NSDictionary->dictionaryWithContentsOfFile_( $file );
if ( $plist and $$plist) {
  #
  # Get the list of printers that are defined.
  #
  $printerList = $plist->valueForKey_( "UserPrinterList" );
  if ( $printerList and $$printerList ) {
    #
    # Go through each printer and process any options it has.
    #
    $allKeys = $printerList->allKeys();
    for ($i = 0; $i < $allKeys->count(); $i++) {
      #
      # Get the short name of the printer, the printer property list,
      # the display name and the printer options.
      #
      $mcxPrinter = $allKeys->objectAtIndex_( $i );
      $printer = $printerList->valueForKey_( $mcxPrinter );
      $printerName = perlValue ( $printer->valueForKey_( "DisplayName" ) );
      $printerOptions = $printer->valueForKey_( "PPDOptions" );
      @lpOptions = ();

      #
      # If we found printer options then convert the dictionary into
      # something useful.
      #
      if ( $printerOptions and $$printerOptions ) {
        $optionKeys = $printerOptions->allKeys();
        $newOptions = "";
        for ($k = 0; $k < $optionKeys->count(); $k++) {
          $optionKey = perlValue( $optionKeys->objectAtIndex_( $k ) );
          $optionValue = perlValue( $printerOptions->valueForKey_( $optionKey ) );

          push( @lpOptions, '-o' );
          push( @lpOptions, $optionKey . '=' . $optionValue );
        }
      }

      #
      # If there are options to set, set them.
      #
      if ( scalar( @lpOptions ) > 0 ) {
        my @sysargs = ( '/usr/sbin/lpadmin', '-p', perlValue( $mcxPrinter ), @lpOptions );
        system(@sysargs);
      }
    }
  } else {
    die "Could not find the value.\n";
  }
} else {
  die "Error loading file.\n";
}
Final Steps
Test Test Test! Do lots of testing, especially on your first printer or two. Once you have done it a few times all the little quirks you run into are expected and no big deal, but when you are still trying to figure out those quirks you’ll miss one little thing and then it won’t work right. So test early and test often. Test each little step if you can. It may take awhile, but when your finished you will have a system that lets you roll out printers to all your workstations with only about an hour of work involved.
Our staff has been very happy with all these changes we’ve made to the way printers are setup and installed and it makes my job a lot easier.
One other thing to note, as I said above, with a few exceptions every computer sees every printer. Now those 3 exceptions. Two of the printers are “dedicated use” printers of a sort. One is in our custodial office so they don’t have to walk upstairs. So only their 2 computer see that printer. The other is in our coffee-house for the same reason. The third exception is our wide-format printer. We don’t want anybody else to print to it on purpose or accidentally, so nobody sees that printer except I.T. and our Communications department. We accomplish this by having extra groups for the other printers laid out in a tree view.
Example: The “HDC Wide Format Printers” is a member of the “HDC Printers” group and is setup the same way, except it only has one printer: The HP Wide format we have. Then I put the communications team computers in the “HDC Wide Format Printers” group instead of “HDC Printers” and the final printer list they get is a combined list from the “top down”. In theory, I could override settings. For example I should be able to duplicate the color copier settings into the “comm team” printer list and switch it from grayscale to color for them. I haven’t tested this.