Overview
Most processes of the plugin are done automatically, once you perform the initial configuration. The primary exception is the Table Compression feature. This requires you to manually pick which tables will be compressed. But it does make recommendations for you and provides you with the information you will need.
Configuration
A Rock job will be installed that handles all the automated processes for you. You can find the configuration for this job on the Installed Plugins > Database Thinner > Automation Settings page. Each automation step can be either enabled or disabled. You will need to enable the ones you want to use.
The installed job, Database Thinner Automation, is configured to run nightly. You can change the frequency the job runs, but you should probably have it run at least once a week.
Compress Communications
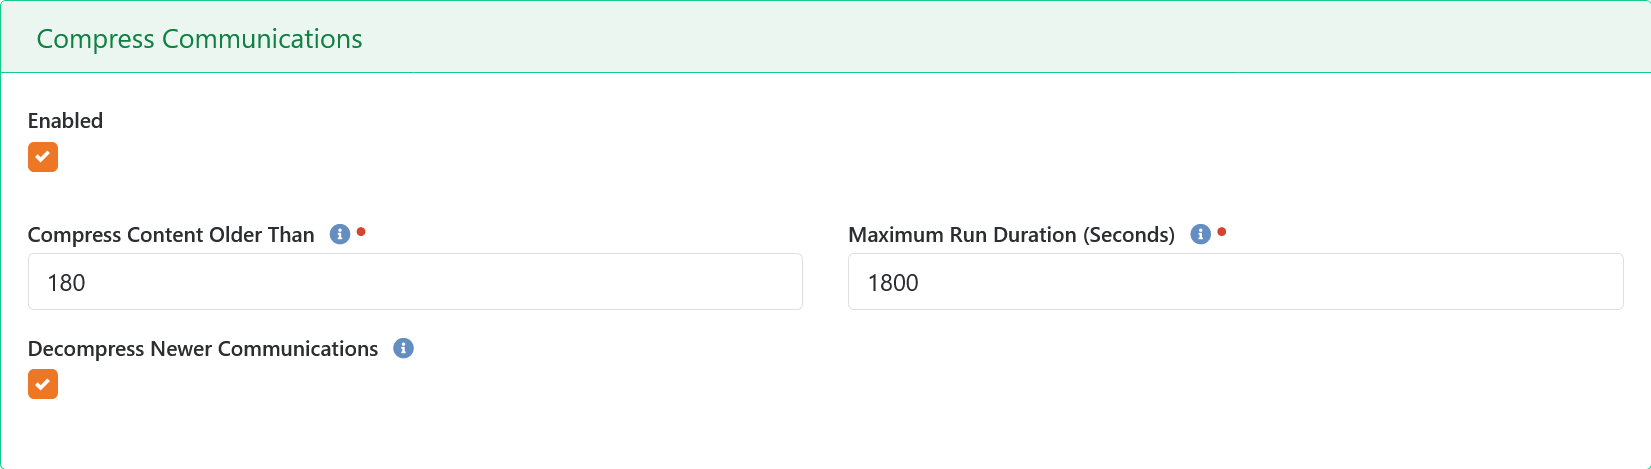
The primary configuration setting is how many days old a communication must be before it is compressed. The default setting is for 6 months, which means any communication that was created within the past 6 months can be viewed just as they are now. Once they reach an age of 6 months (or whatever number of days you specify) they will be compressed. When that happens, the actual message content is compressed and archived. In it's place will be a button that users can click to decompress the message and view it. When the automation job next runs the communication will be re-compressed.

The Maximum Run Duration option specifies the maximum number of seconds the job will process compressed communications in a single run. A large church can easily have over 200,000 communications so it may take a number of runs before everything is compressed.
Decompress Newer Communications has two primary uses. First, if you decide to change the Compress Content Older Than to a larger value, then when this is enabled it will decompress the communications that have been previously compressed but should no longer be compressed. Second, if you ever decide to completely disable this plugin, you can set the Compress Content Older Than value to 10,000 days and then run the job a few times to ensure that everything has been decompressed. Once that is done you can disable this action.
This plugin installs a new file type in your system called Database Thinner Files. This is where compressed communication data is stored. By default, it will be stored in your database. Feel free to configure this file type to store the compressed data elsewhere, such as cloud storage.
Delete System Communications
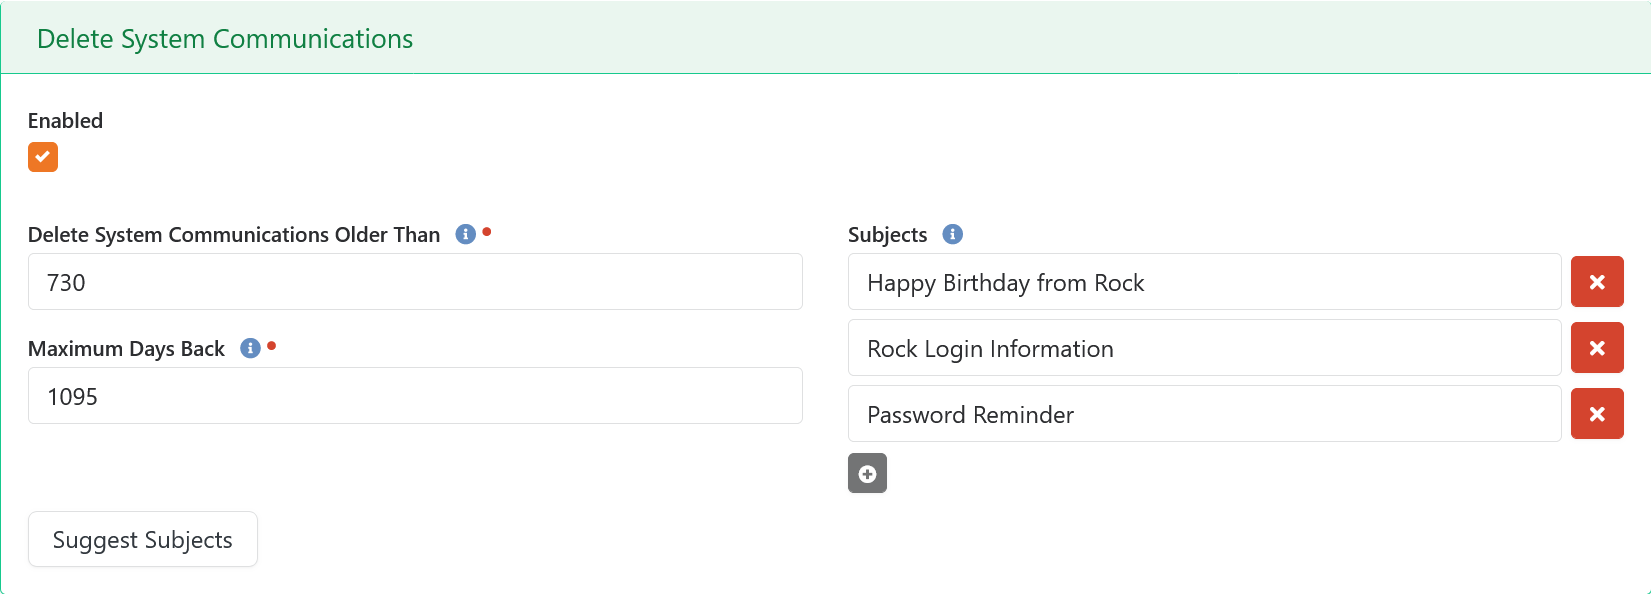
Three different qualifications must be met for a system communication to be deleted. The first is that it must be older than the Delete Communications Older Than value, in days. The second is that it must be not be older than Maximum Days Back. The third is that the subject must exactly match one of the Subjects values. You can manually enter subjects yourself, but why bother doing it manually? The Suggest Subjects button will scan the database and make recommendations on which subjects are likely system e-mails and might be good candidates for deletion.

The dialog that opens will give you information about subjects that might be system e-mails. Not all system e-mails should be deleted. That is why these are only suggestions. It's up to you to decide if you need to keep them forever or not. The list will only be looking at communications that are older than the Delete Communications Older Than setting, so you may want to temporarily lower that value (don't worry you don't need to save) if your database is fairly new.
Along with each subject found, the number of communications will be displayed and the (estimated) storage space that is being used by all those communications. Tic any check-boxes on the rows you want to include and then click the Save button in the dialog to add those selections to the subject lines already entered.
Delete Transaction Images

There is only one thing you need to configure here. How many days to keep scanned check images around before they are deleted. Make sure you verify with your finance team how long you need to keep these around. Once they are deleted, they are gone and you can't get them back.
Jobs
Database Thinner Automation
This job processes the automation actions that you have configured above. You can configure it to run as often as you like, though you probably shouldn't run it more often than once per day, and at least once a week.
Reduce Binary Images
Recent versions of Rock added the ability to automatically compress uploaded images so that they are within a specific resolution size. However, it will not compress images that have already been uploaded. This means that if you have 1,000 images that existed before this option as added, you are out of luck. It also means that if you decide to turn that feature on after a bunch of files have been uploaded, you are also out of luck. Finally, you might also later decide to reduce the maximum size even more, but again all those previously uploaded images will stay at the old resolution.
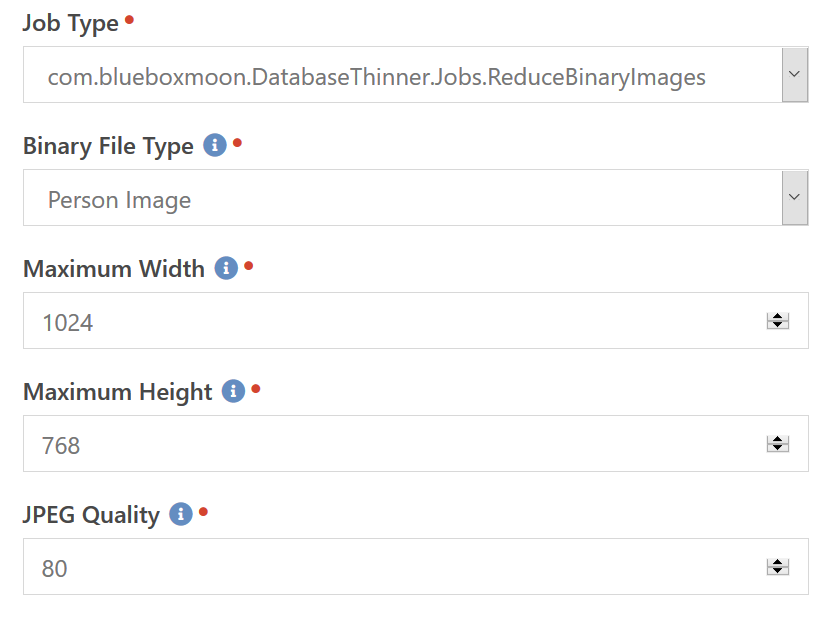
This job allows you to take care of those images that have already been uploaded. Add as many of these jobs as you need to handle compressing various file types. Each job instance allows you to specify the file type and the maximum resolution. If any file is beyond these dimensions then it will be shrunk down to fit within these maximum dimensions.
Additional Pages
In addition to the Automation Settings page, there are a few others installed next to it that provide various features and functions for you.
Database Growth
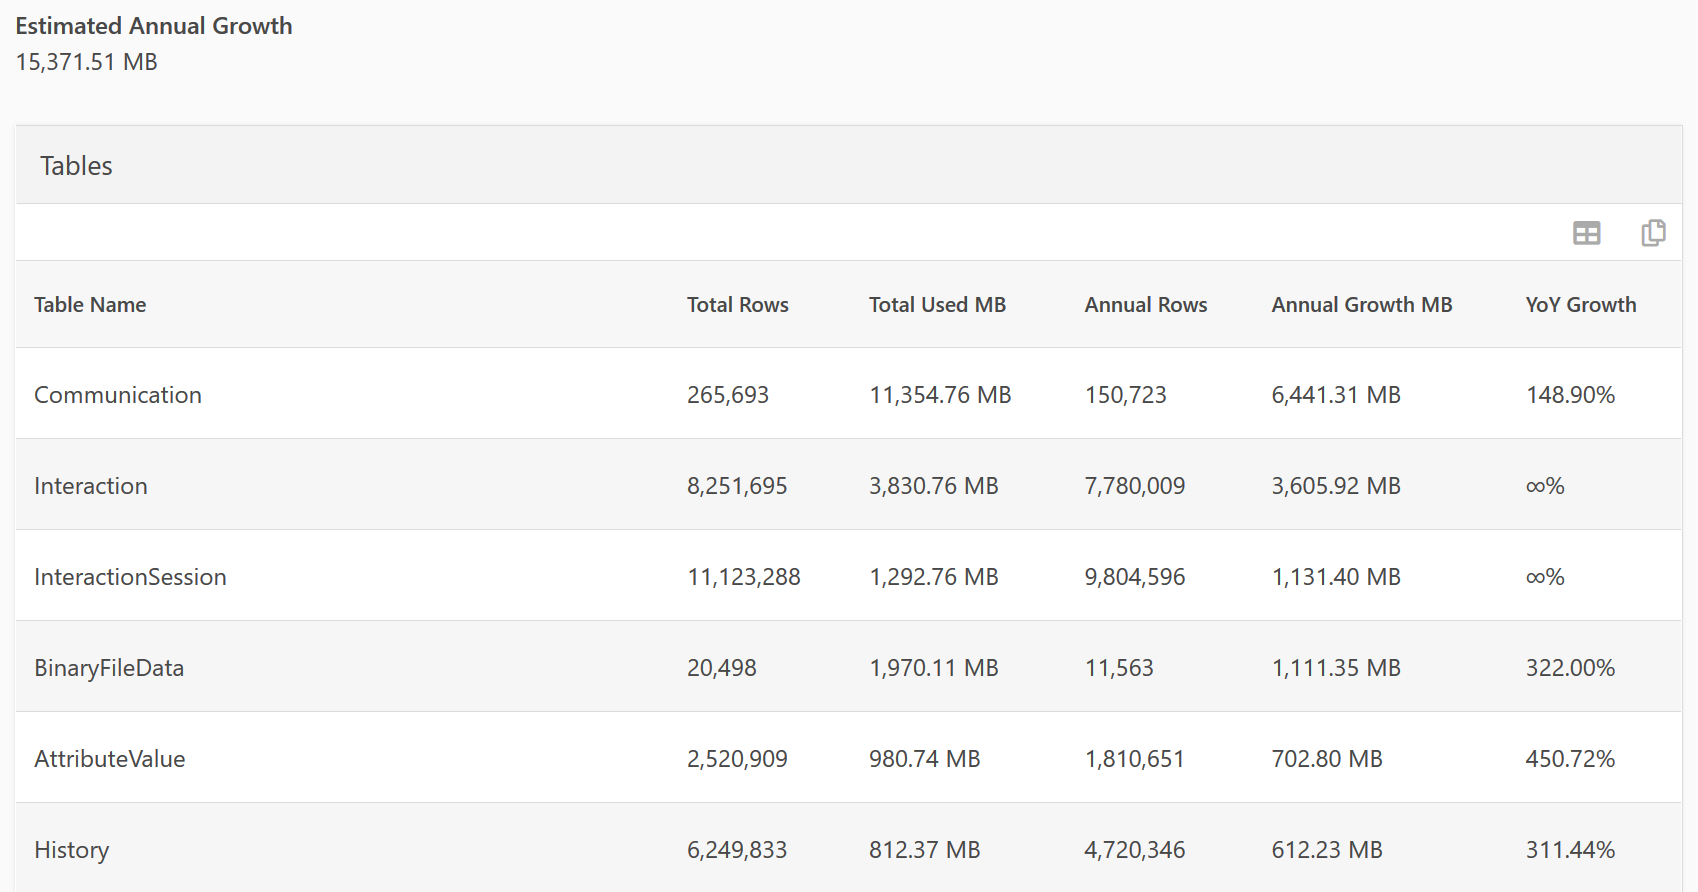
On this page you can see estimated growth patterns of the various tables in the database. This is really just informational and you would probably only want to run this scan every few months to see if anything seems like it's spiking more than normal. The information above tells us some important things about the growth of this database.
- We should expect our database to grow by roughly 15GB over the next year.
- We send a lot of communications, which makes the Compress Communications job a good option.
- Even though we don't have enough data in the Interaction tables to calculate a YoY growth, we can assume they will be growing rapidly as well based on the annual growth rate.
Any YoY Growth that is infinity, means there is not enough data to estimate the Year over Year growth. In the example above, the "Interaction" and "InteractionSession" tables are newly added to Rock and we can't calculate the Year over Year values, because the data has not been around for two years.
Compression Statistics
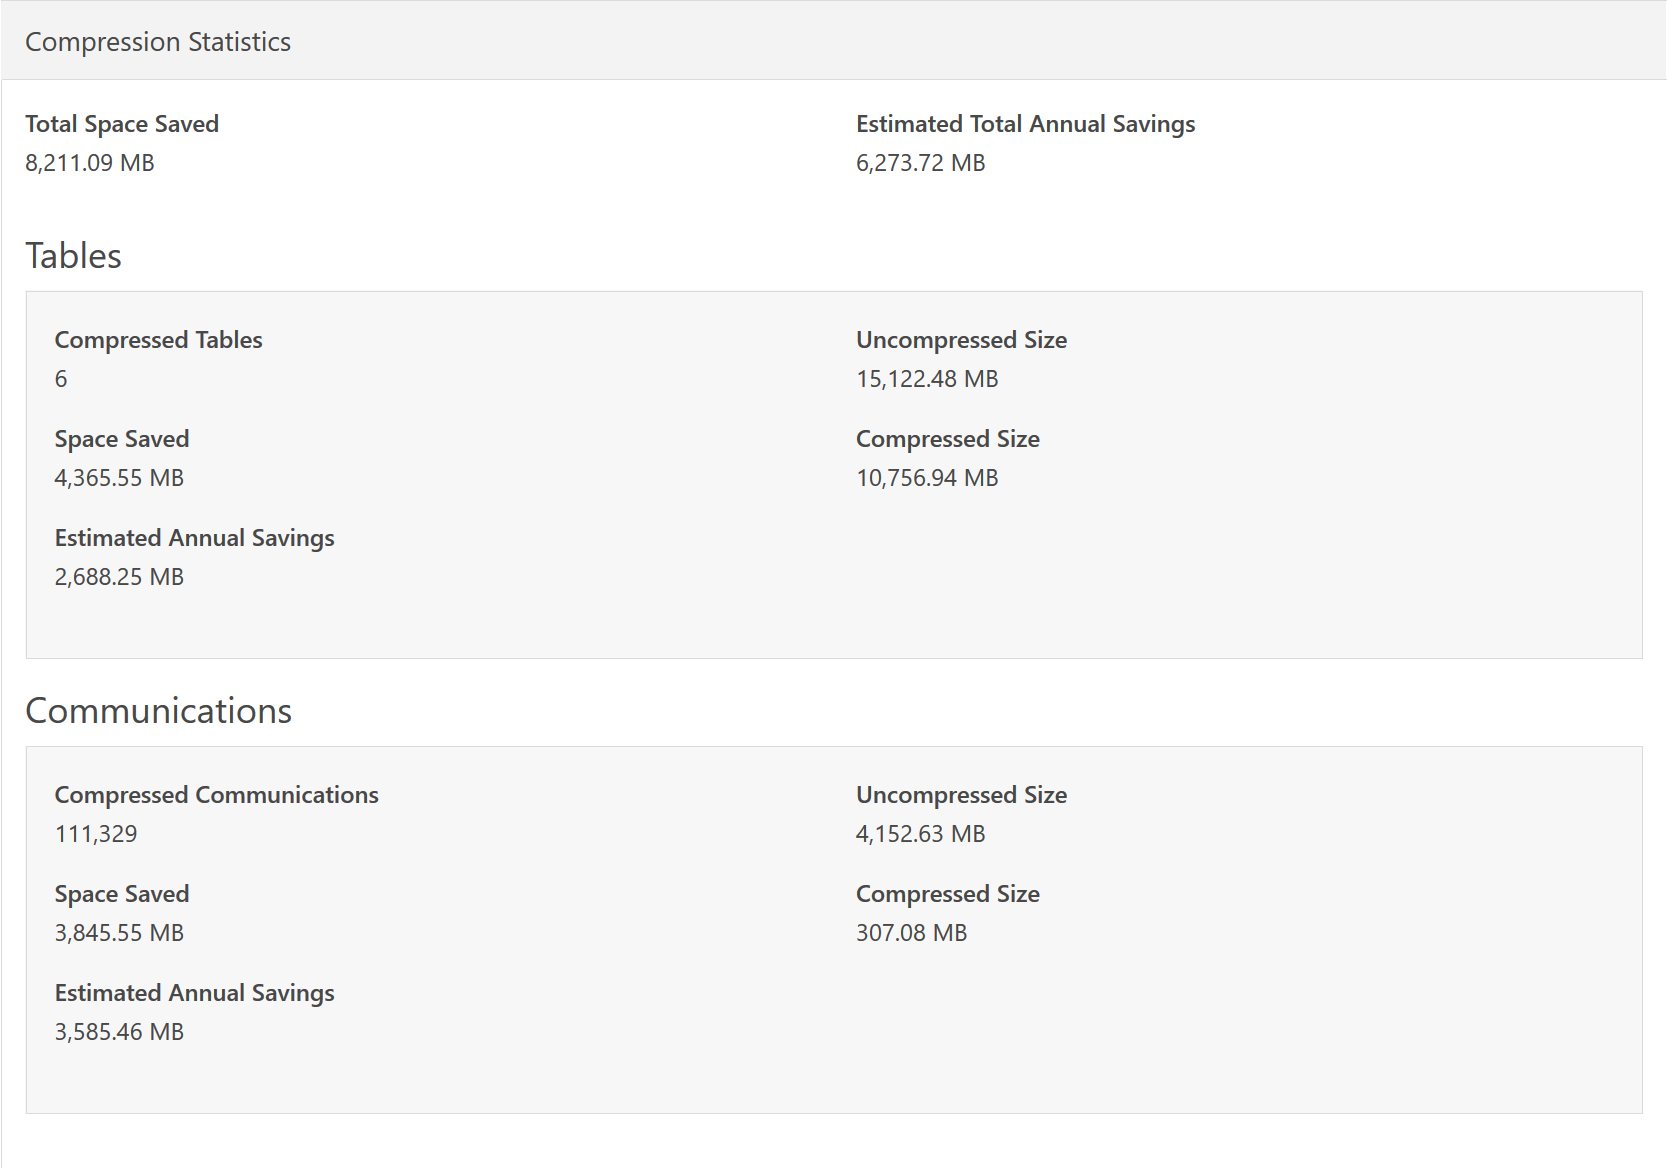
This page will scan the compressed data and display savings information. The two pieces that are scanned are the compressed Communications and any compressed SQL tables. While the Communication numbers are exact, the table numbers are estimated. The only way to display exact numbers would be to decompress and then re-compress the tables to find out the exact sizes. So while the Compressed Size values are exact, the Uncompressed Size values are only estimates.
Compress Tables

This feature is only available on Azure SQL or on-premise SQL Server 2016 SP1 or later.
This is another page that you will probably only visit once or twice a year. But on here you can see how big each table is, whether it is compressed or not, and the size it would be after it was compressed. As mentioned above, some of these numbers are exact and others are estimates. If a table is currently uncompressed then the Uncompressed Size will be an exact number and the Compressed Size will be an estimate. Conversely, if the table is currently compressed then the Compressed Size will be exact and the Uncompressed Size will be an estimate.
While compress or decompress operation is being performed on a table, it is taken offline and unavailable for other parts of Rock to use. Therefore you should only change the compression state of a table during times when your Rock server can be offline. Scanning the tables will not take them offline.
Each table will include various statistics to help you make informed decisions if you are the kind of person that likes to know all the nitty gritty details. For the rest of us, there is just a Recommended flag on each table that makes a recommendation on if compressing the table will be worth it. Basically, this recommendation is made for any tables that provide more than 200MB.
Quarantined Files
Important
This feature will be removed in the next major version. The Unused File feature is no longer considered safe. As Rock has matured, it has gained more and more ways to reference files. Many of these are not detectable.

It could happen. You might have your Delete Unused Files task configured and then get a call that some image has vanished from your website. This means two things. First, your website was referencing a file incorrectly. A Binary File needs to be referenced by an attribute value. So likely it was originally referenced and somebody did a copy and paste of the hyperlink to the file. Then later that attribute was replaced or deleted and it is only now that somebody is noticing the file is gone, even though it should have vanished long ago.
The second thing it means is that you need to find a way to put that file back if possible. This page lets you restore that file. The grid will show the name of the file and, more importantly, the Id and Guid of the file - which is what you will see in the link that is no longer working.
You can then use the Preview button (eye icon) to view the original file. The way you would normally fix this issue is to download the original file and upload it somewhere on your server and then fix the link to point to the file correctly, rather than as a binary file that might end up deleted again. Sometimes this isn't an option as the link may not even be on your site.
The other way to fix a missing file is to restore it with the recycle button. This will put the file back in the database with the same Id and Guid values so that existing links will start working again. In order to prevent the file from being deleted the next time the job scans for unused files, a reference to the file will be added as a Defined Value. This Defined Value is created inside the Database Thinner Restored Files Defined Type. If you want to later delete a restored file, you can go into the Defined Type and delete the Defined Value and it will eventually appear on your unused files list again.
Finally, you can also manually delete quarantined files after you have decided they are no longer in use and safe to permanently delete. Normally the automation job will delete the quarantined files after the configured number of days. However, that only works if you actually enable that step.