Once the plugin is installed, there are a few extra steps that must be performed before the two systems are fully linked together.
FreePBX Configuration
Module Installation
A module must be installed in FreePBX to allow Rock to get to the call logs as well as initiate calls between two parties. To find this module, go to your Admin Tools > Installed Plugins > FreePBX page. On here you will see the link to the module that will be installed into the PBX server.
To install this module, login to your PBX server. Then go to your Admin > Module Admin menu. Near the top you will see a button allowing you to Upload modules. Once you click on that you will be able to upload the module into FreePBX. There are two ways to do this. The easy method is to set the Type dropdown to Download (From Web). Then you can past the link provided on the Rock page and click the Download button.
If for some reason this does not work, such as a firewall issue preventing the PBX from opening connections to Rock, you can use the alternate method. This method requires you to download the file linked to by Rock. To do this you must right click the hyperlink and choose the Download or Save option. This will download a zipfile containing the module. In FreePBX you can then set the Type dropdown to Upload (From Hard Disk) and upload the zipfile.
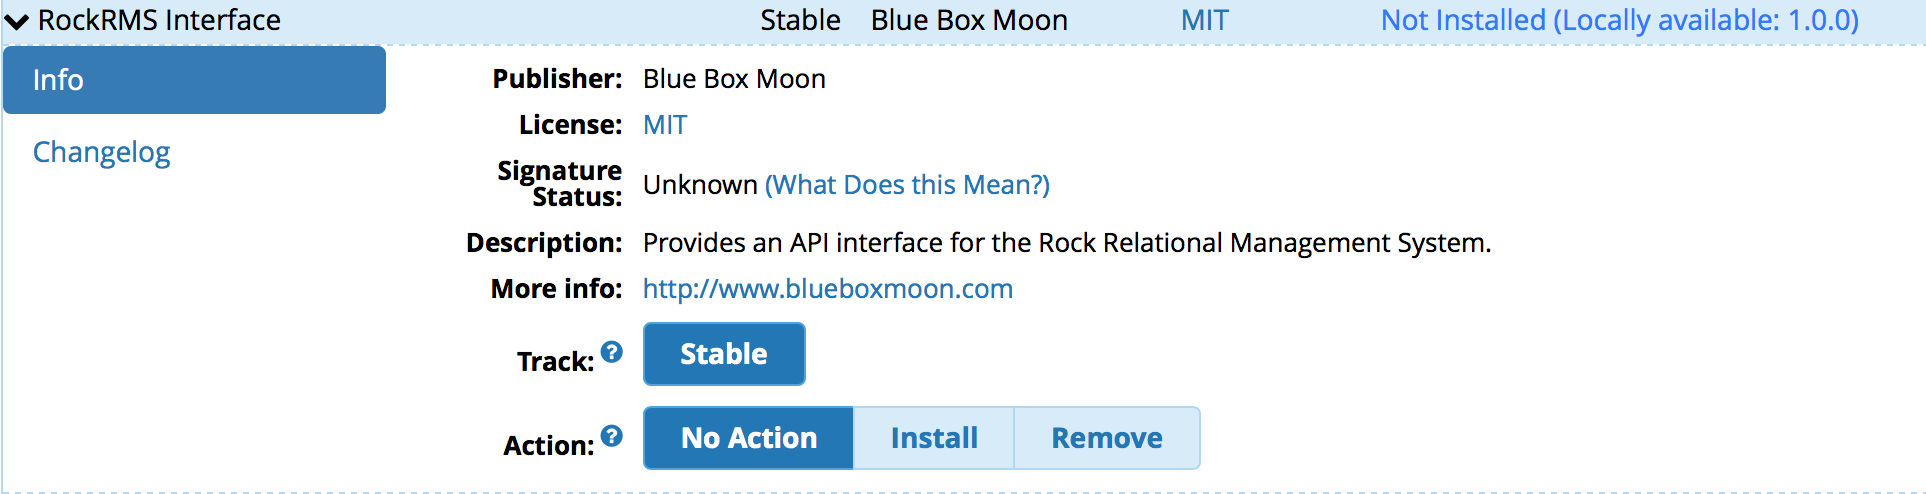
Once the module has been loaded into FreePBX it still needs to be activated. You should be provided a link back to the Module Admin area where you can activate the module. The new module will be listed in the Admin section of modules and have the title RockRMS Interface. Click the name to expand the details section. Once expanded, select the Install button and then back at the top of the page click the Process button to begin installation.
Installing the module may take a few minutes, depending on the size of your existing call logs. This may also cause a heavy load on your PBX server so it is recommended you install the module after hours or during another off-peak time.
This module is currently not signed by FreePBX and will display a warning on your admin dashboard stating that you have an unsigned module. We are looking into getting the module signed but we do not know how long that will take. In the mean time, you may want to disable the daily e-mail that FreePBX will send about unsigned modules. It is in the Advanced Settings and titled Send unsigned module email notifications. Setting this to "No" will disable the e-mail it would otherwise send daily but still display a warning on the dashboard.
User Creation
Rock needs access to login to the system to perform specific actions. While you could technically use your existing admin username and password to do this, we highly recommend creating a user specificly for this. In this way you can limit what access Rock has to the system.
Rock has two different authorization systems. Depending on which version of FreePBX you use and which system you have enabled you will need to add the new user in one of two different places. The easy way to determine which is to try adding to the older location first and seeing if there is a warning.
Older Systems
Older FreePBX versions had adminstrator users defined in the Admin > Administrators. If you go to this page and see a warning up top about the authorization type being set to "usermanager" then you will need to skip this section and proceed to the "Newer Systems" section below. Otherwise continue here and you can skip the following section instead.
On the right side there is a small menu with an Add User link. Click on this to create the new user for Rock to use.
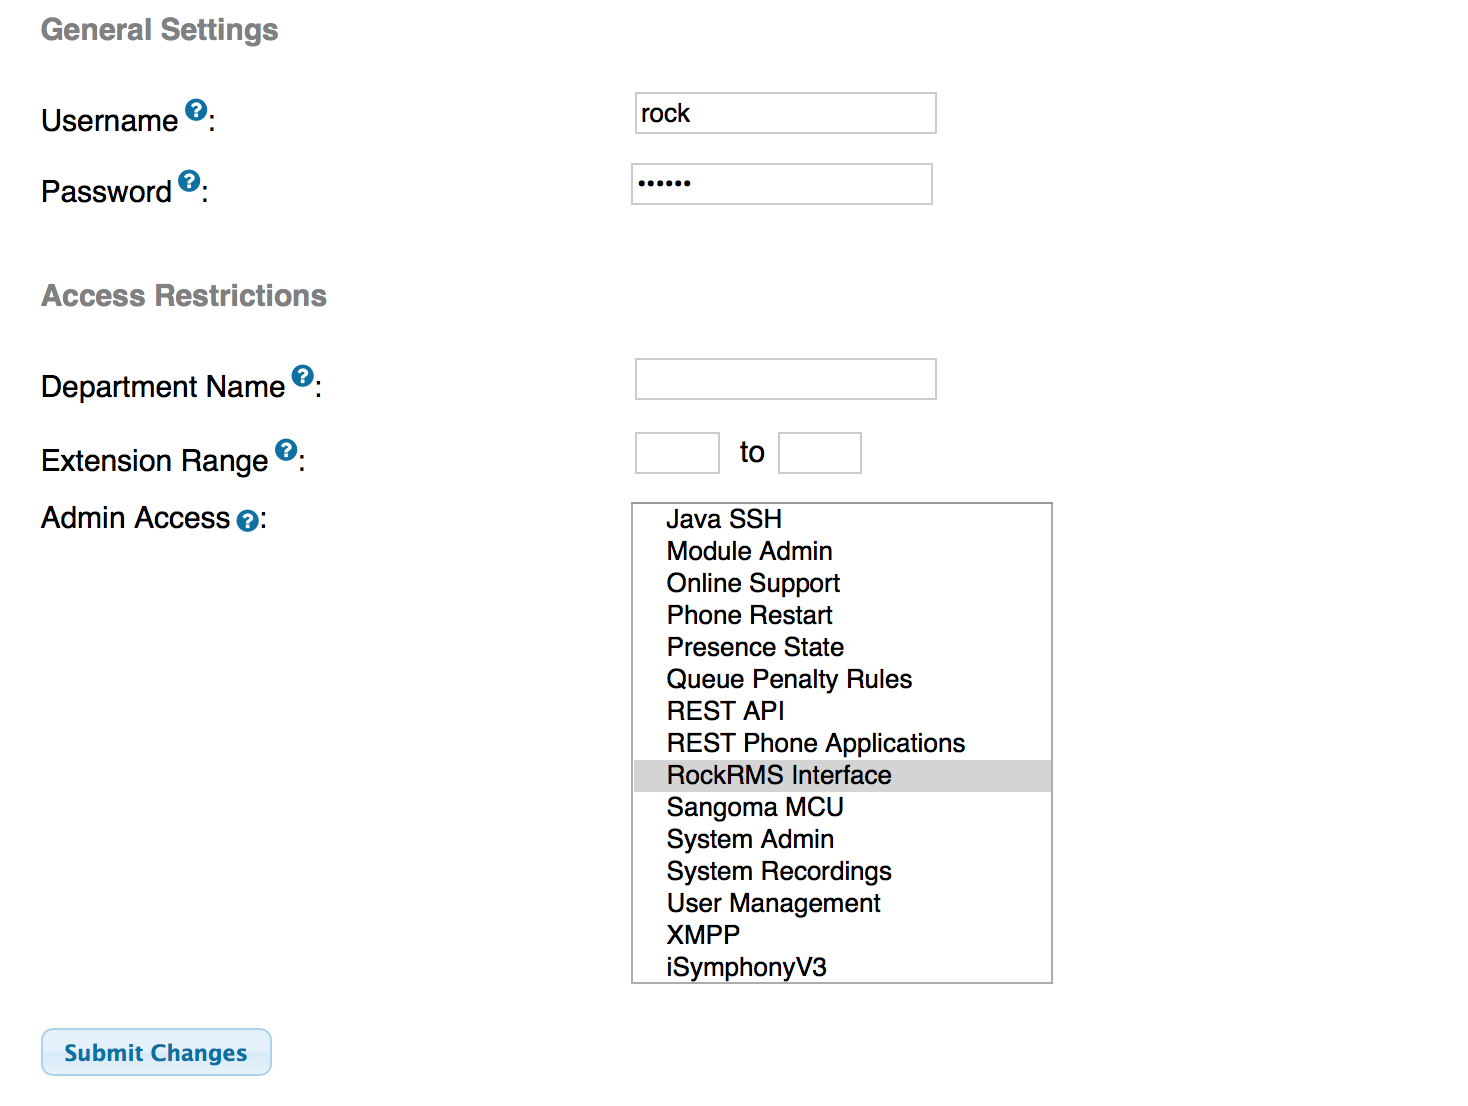
You will need to enter a username and password for the new administrative user. Under the Admin Access section you should only select the "RockRMS Interface" option. This will provide this user access to the call logs and initiating calls, but not anywhere else. Once you save this new user be sure to click the Apply Config button at the top of the screen to make the user available for login.
Newer Systems
If your FreePBX system is configured to use the newer User Manager system you will need add the new user under the Admin > User Management menu. You will need to switch the users dropdown from "All Directories" to "PBX Internal Directory".
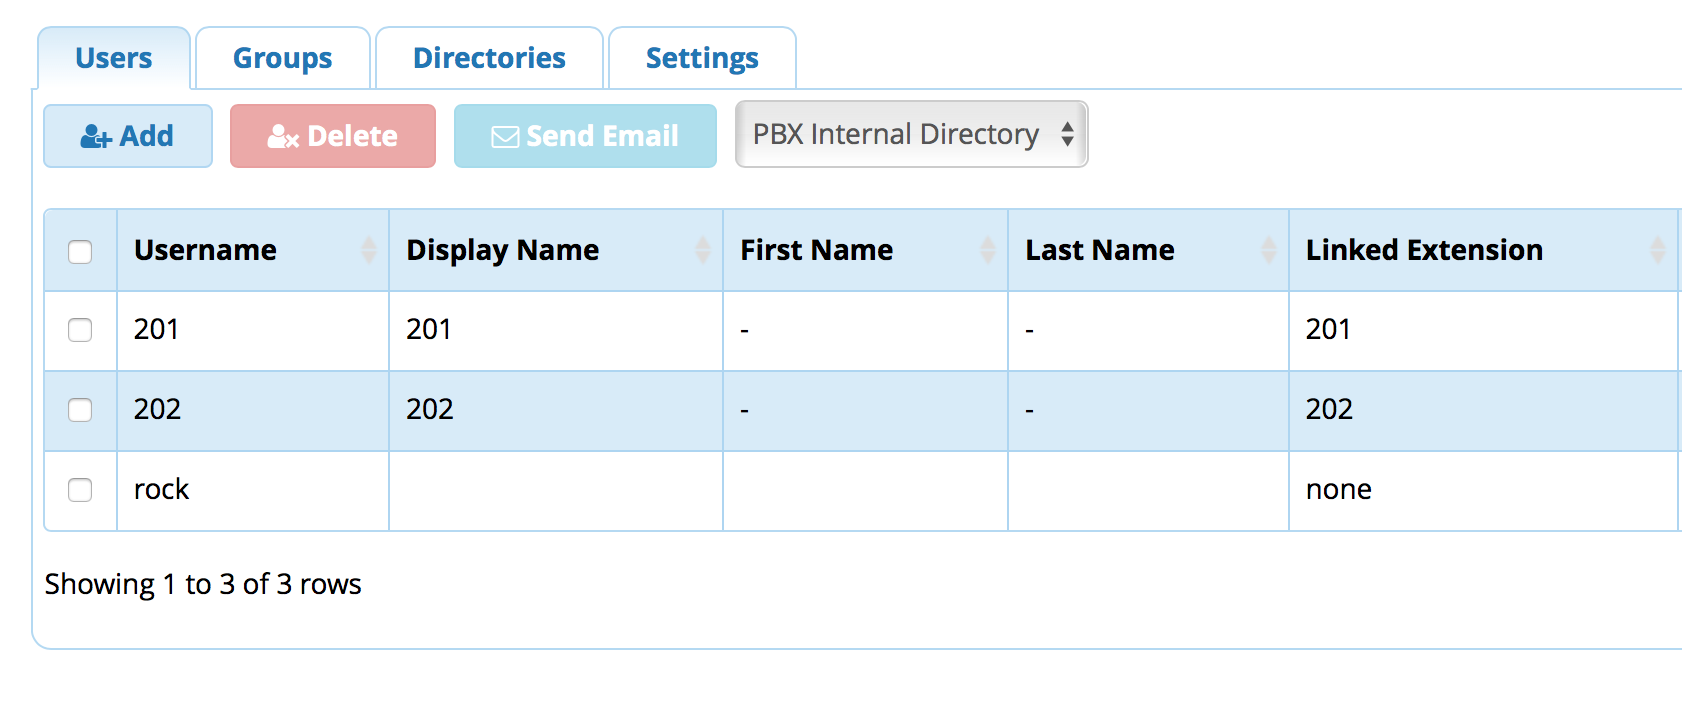
Click the Add button to create a new user. Under the Login Details tab you will need to provide a username and password. Then under the FreePBX Administration GUI tab you need to set the Allow FreePBX Administration Login to Yes and then select RockRMS Interface for the Administration Access option. Click Submit to save the user. Finally at the top of the screen you will need to click the Apply Config button to make the user available for login.
Rock Configuration
To fully utilize the FreePBX plugin, you need to configure a few things in Rock.
Internal Extensions
It is highly recommended that you create a new Phone Type that will store the internal extension of your staff. It will be critical that you keep these up to date so make sure that you amend your procedures for assigning and re-assigning extensions to include updating the Person Details in Rock.
You can create a new Phone Type by going to the Admin Tools > General Settings > Defined Types page and selecting the Phone Types defined type. Once there you can add a new phone type that will contain the internal extension. In our documentation we will refer to this new type as "Internal Extension".
What you store in this phone field is up to you. If you have a Dial-In-Direct system where each extension has a 10-digit phone number associated with it you can store the entire 10-digit number if you wish. If, on the other hand, you do not have a DID system then you can simply store the 3 or 4-digit extension number.
Phone System
To begin configuring the PBX for use in Rock, navigate to your Admin Tools > System Settings > Phone Systems page. Once there you should see an entry for FreePBX that you can click on to begin configuration.
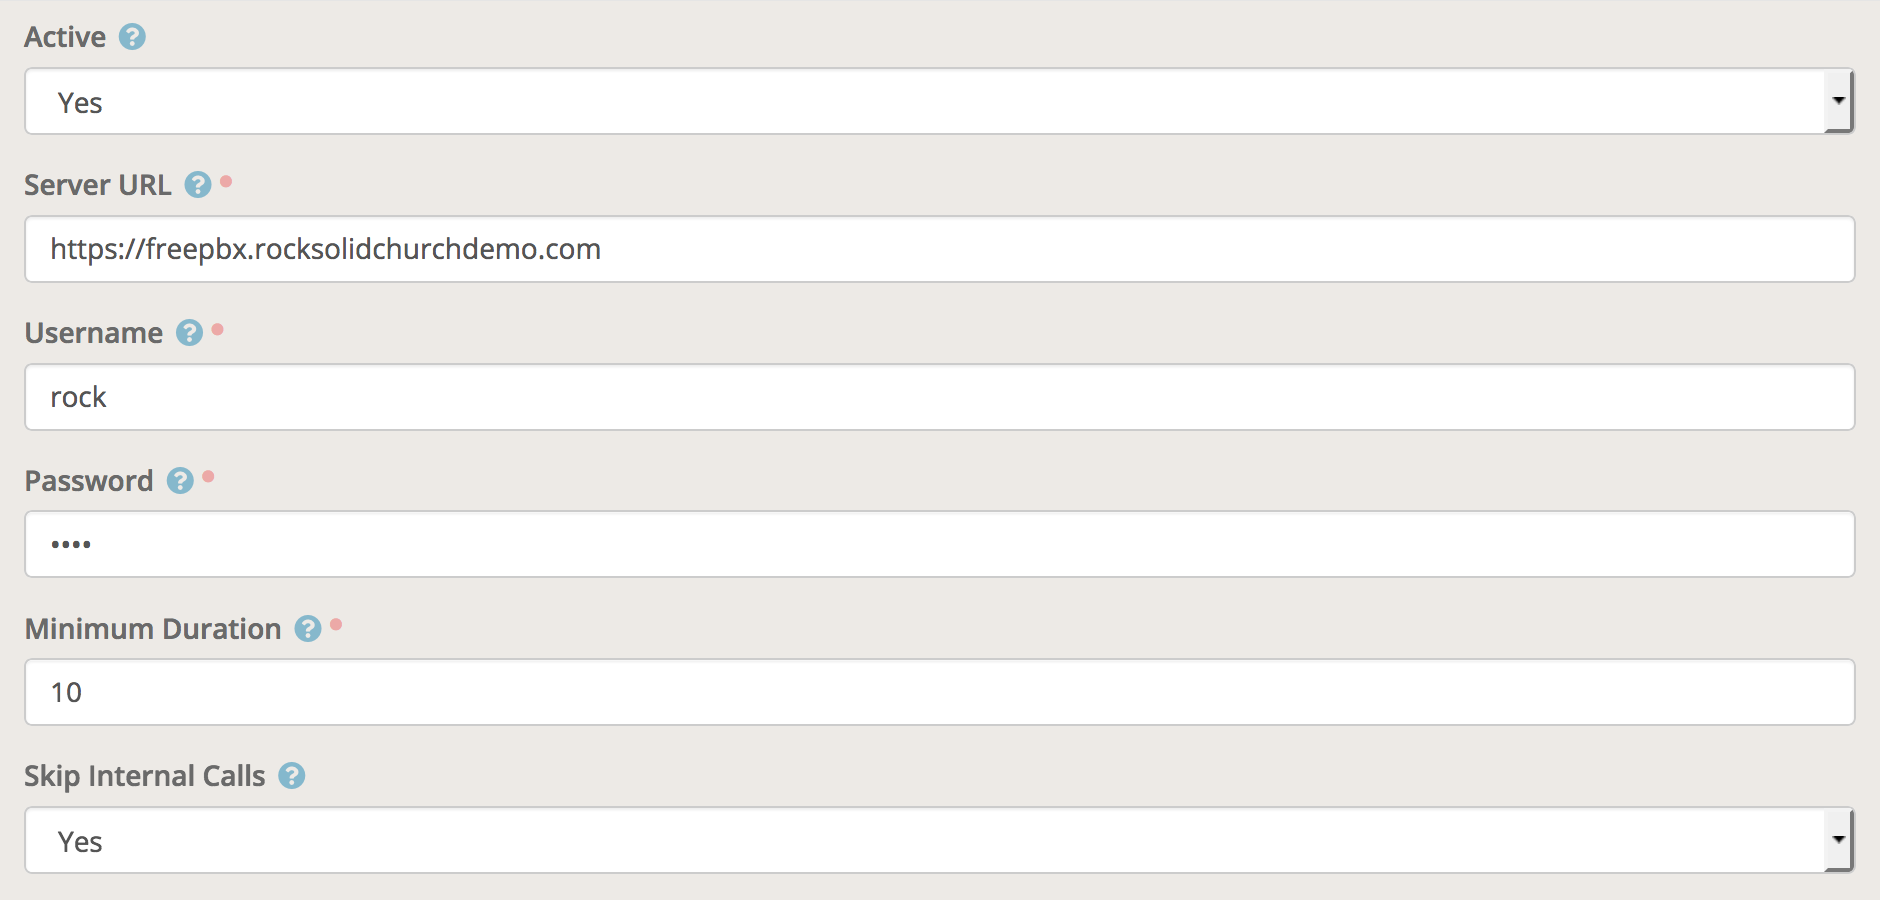
At the risk of sounding obvious, the first things you need to set is Active to Yes and then enter the Username and Password you created in FreePBX previously. The Server URL should be set to the base URL you use to reach the web interface. For example, if https://freepbx.rocksolidchurchdemo.com/admin/config.php is the URL in your browser when viewing the dashboard, then you would want to enter https://freepbx.rocksolidchurchdemo.com as the server URL.
FreePBX generates a self-signed certificate by default so it can accept SSL connections. This plugin will always treat the certificate recieved as valid to ensure that the username and password you provide will be encrypted before transmission. Therefore, please be sure to use an https URL.
The Minimum Duration setting is the number of seconds that a call must last in order for it to be imported. If your receptionist takes a call for 5 seconds, just long enough to ask who they want to talk to, you probably don't really need to associate that call with their record.
If you do not want internal calls, that is extension-to-extension calls, then you can set the Skip Internal Calls setting to Yes. Depending on what data you want to see in your call records the internal calls might add lots of clutter you don't need.
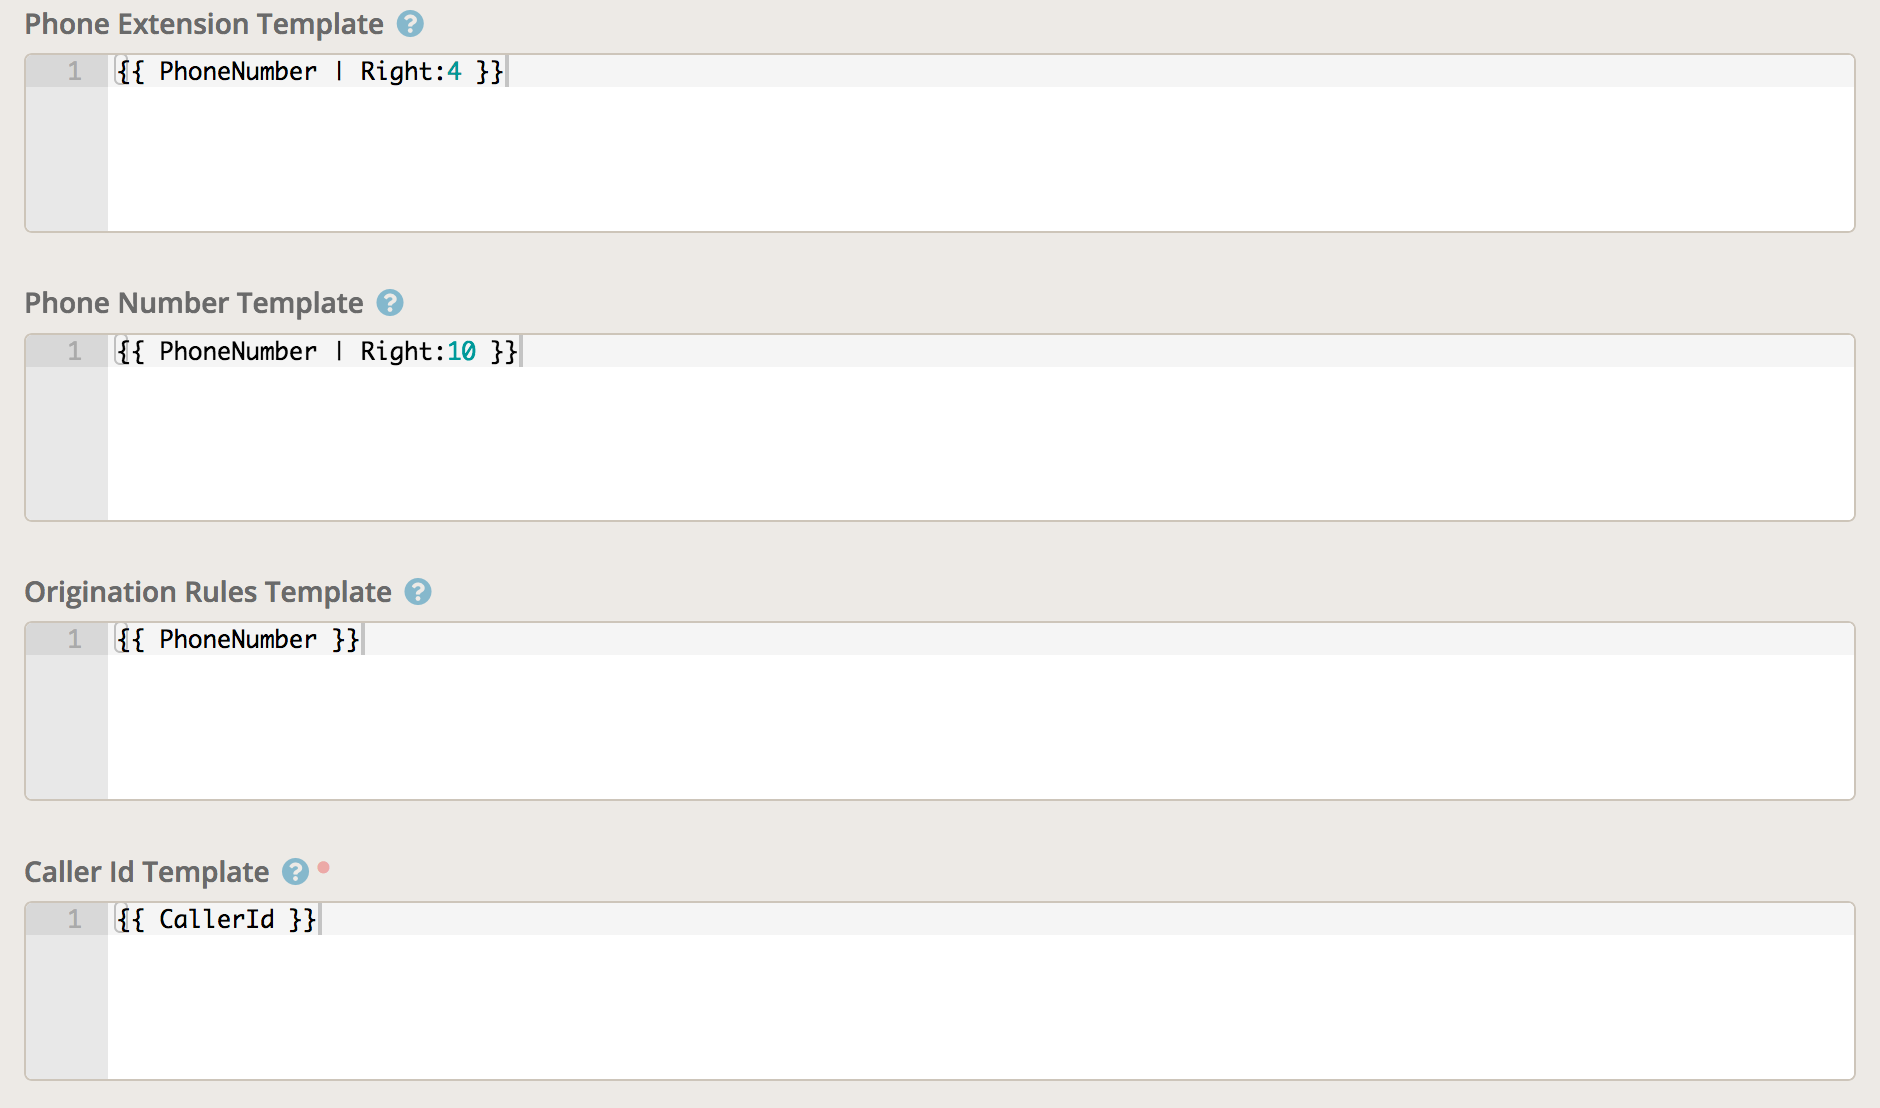
The Phone Extension Template allows you to translate the "Internal Extension" phone number into what is reported by the PBX. In our Dial-In-Direct example, lets say all your staff extensions have 10-digit phone numbers like 555-555-23xx. Internally, all your extensions begin with 2. So the number recorded in the "Internal Extension" for Ted Decker might be 555-555-2302 but his actual internal extension is 202. This Lava template allows you to translate that full 10-digit number into the 3-digit extension and you could do so with the following: 2{% raw %}{{ PhoneNumber | Right:2 }}{% endraw %}.
The Phone Number Template is used to modify the phone number returned by the PBX. For example, if your phone system requires you to dial 9 to get an outside line, it probably records the 9 in the call record. Additionally, Rock does not store the leading 1 when dealing with long distance numbers so that must be stripped as well. The number returned by the PBX will automatically have any non-numeric characters stripped out. So if your phone system records the number as +18885551234 then the number passed to this template will be just 18885551234. The default value will take only the right-most 10 digits leaving you with 8885551234 which is compatible with how Rock matches phone numbers.
Origination Rules Template works similar to the above but for a different purpose. When you click a number to perform a click-to-call action, both your own "Internal Extension" number as well as the number you clicked on will be used in the dial command. You might need to convert that 10-digit number into a 3-digit number for calling the staff extension first. Or you might need to prepend a 1 to the 10-digit number depending on how your dial plan is configured. This allows you to translate the dialed numbers any way you are required.
The Caller Id template allows you to override the default caller Id that is used when calling the staff extension. For example, to clarify to your staff what is happening you might use the following Lava to prefix the caller id: Rock: {% raw %}{{ CallerId }}{% endraw %}.

If you want to get really inventive and create a custom handler for call origination (that is, click-to-call) then you can enter the URL to be used in the Origination URL field. The following Lava variables will be defined for you: FromPhoneNumber, ToPhoneNumber, CallerId.
Internal Phone Type should be set to the phone type you created to store your internal extensions. Yes I know, we are stating the obvious again. Just be sure not to use an existing common phone type like Mobile or Work as that could have a dramatic impact on performance when it tries to import call records.
Rock Job
You will need to add a new Rock Job under Admin Tools > System Settings > Jobs Administration in order to have Rock import the call log data from your PBX. Create a new job to match the information below.
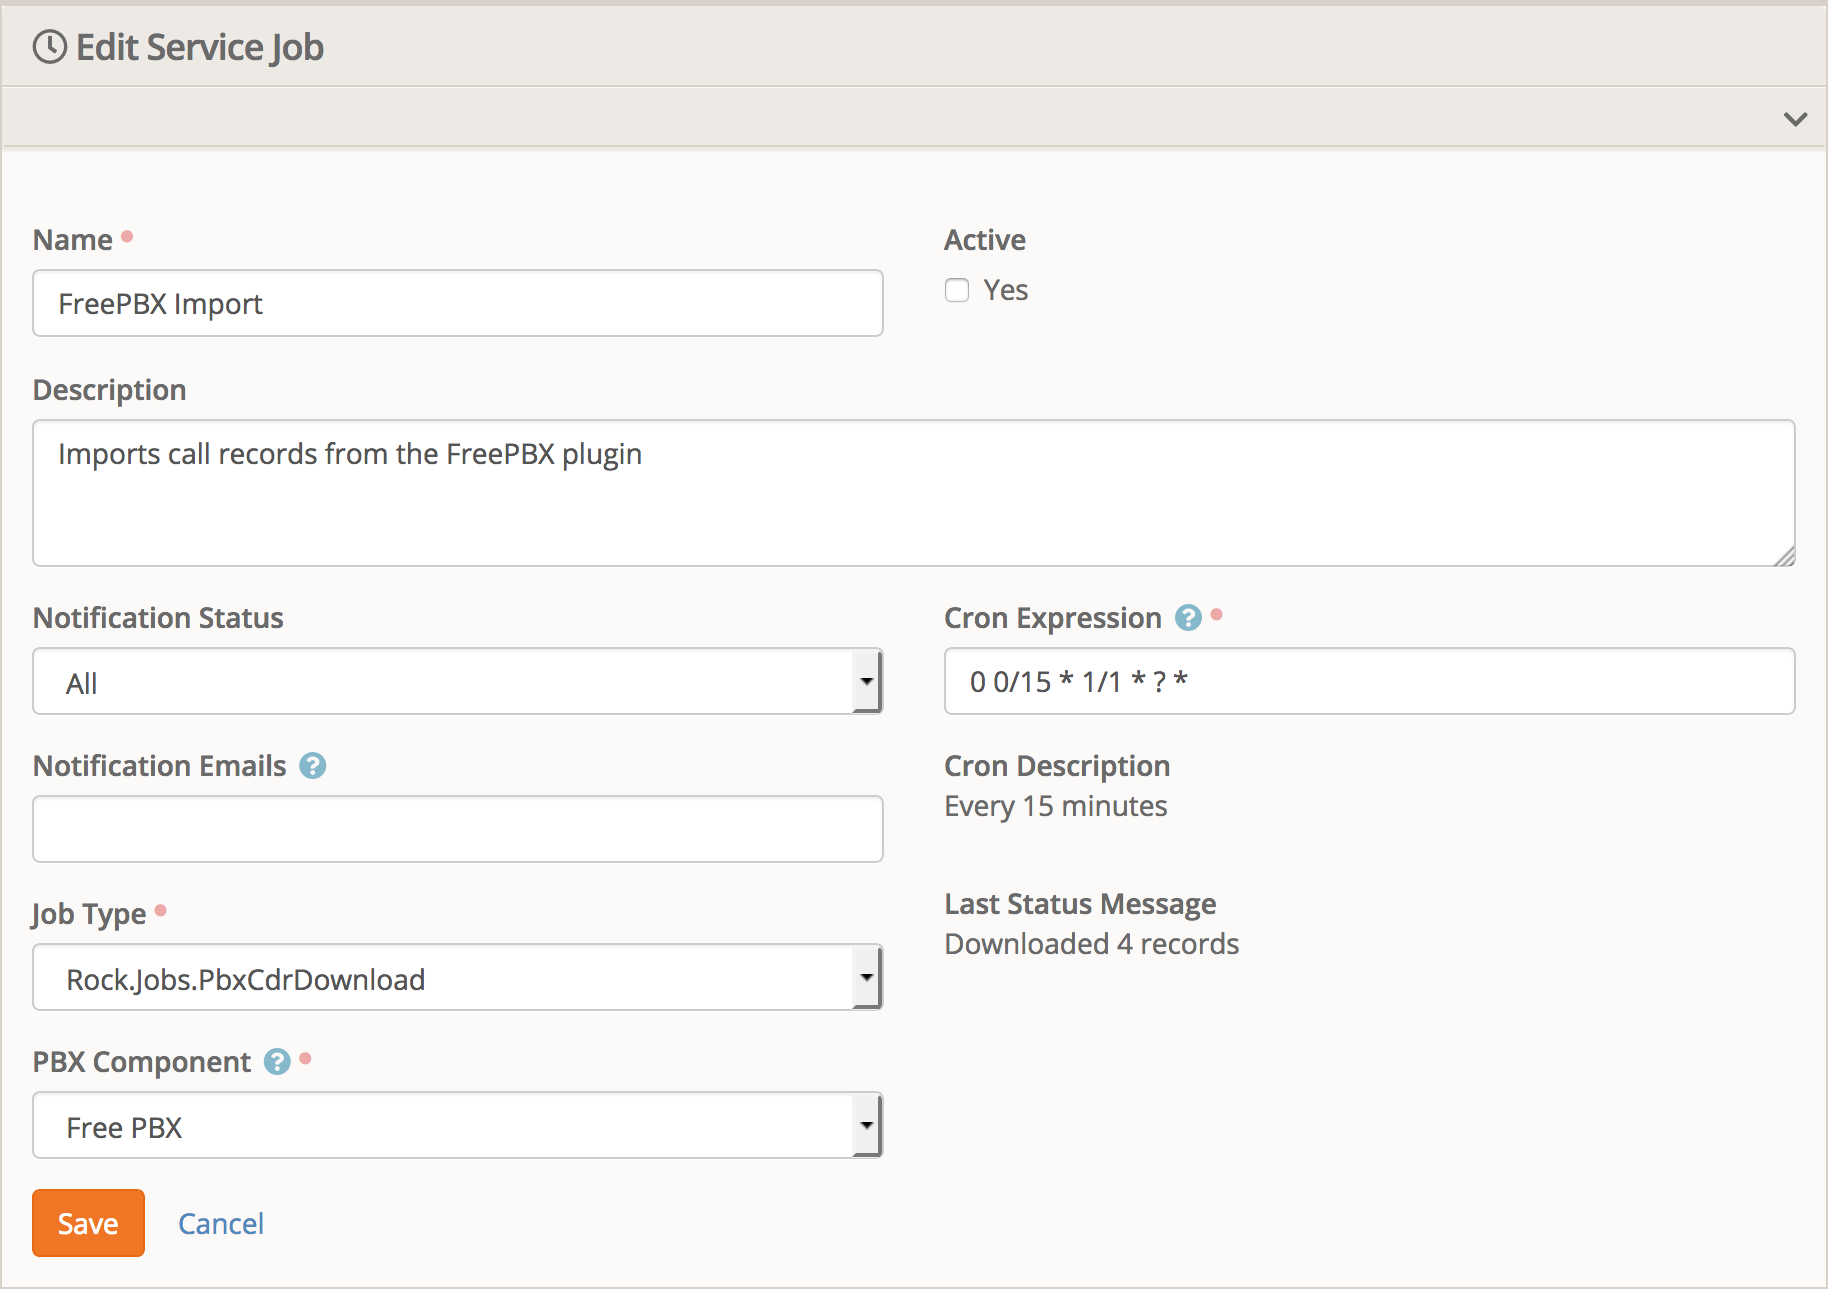
The important parts are the Job Type and PBX Component settings. This will create a job that runs every 15 minutes and imports any new call logs. It is highly recommended that you mark the job as not Active initially. After you have run it one time manually to do the initial import you can change it to Active.
Caution: It is suggested that you run the job manually one time before marking it Active, and that you do so after normal business hours. This initial import can take a long time. On a test system with 2 years worth of call history, this import took 20 minutes. During this initial import the database on the PBX is hit pretty hard so there is a slight chance it might affect call quality while this first import is running.
Viewing Interactions
As of Rock 7.4 there is currently no existing block to view interactions on the Person Profile page. You can get most of the functionality you would need by adding a Dynamic Data block to the History tab. Once it is all setup it will look something like this.
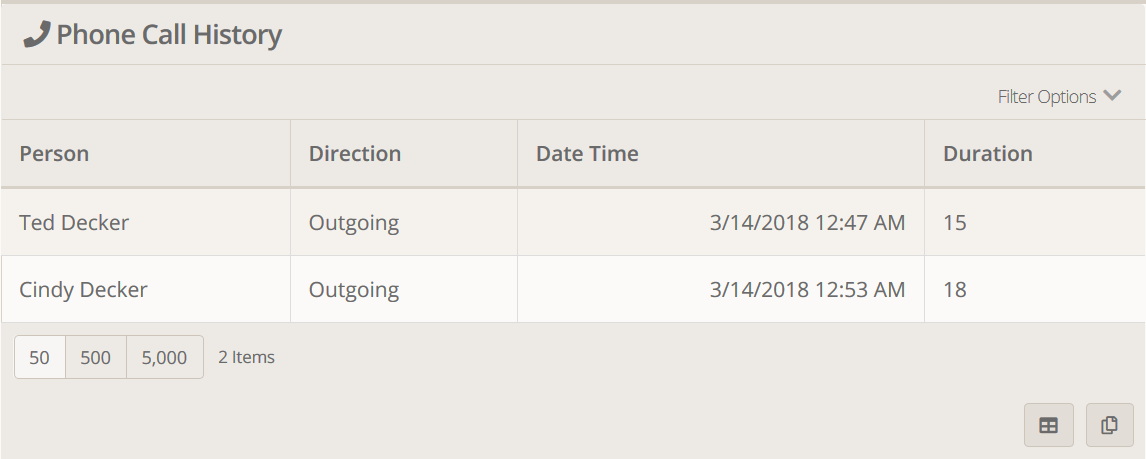
To start, go to the Person Profile page and flip over to the History tab. Add a new block wherever you want it to show up, for example the C1 section. The block we will be adding is the Dynamic Data block. Give it the name Phone Call History.
Once it's added, edit the Block settings (the Gear icon) and change the Update Page setting to "No". Flip over to the Advanced Settings tab and add this to the Pre-HTML:
<div class="panel panel-block">
    <div class="panel-heading">
        <h1 class="panel-title"><i class="fa fa-phone"></i> Phone Call History</h1>
    </div>
    <div class="panel-body">
And then add this to the Post-HTML:
    </div>
</div>
Save those settings. Now edit the block's custom settings (the Pencil icon). Set the Parameters to the value PersonId=0. Then set the Query to the following select statement:
SELECT
    EP.[NickName] + ' ' + EP.[LastName] AS [Person]
    , I.[Operation] AS [Direction]
    , I.InteractionDateTime AS [DateTime]
--    , JSON_VALUE(I.[InteractionData], '$.Duration') AS [Duration]
FROM [Interaction] AS I
INNER JOIN [InteractionComponent] AS IC ON IC.[Id] = I.[InteractionComponentId]
INNER JOIN [PersonAlias] AS PA ON PA.[Id] = I.[PersonAliasId]
LEFT JOIN [PersonAlias] AS EPA ON EPA.[Id] = I.[EntityId]
LEFT JOIN [Person] AS EP ON EP.[Id] = EPA.[PersonId]
WHERE IC.[Guid] = '6218513A-EA23-4505-9E91-CC951FBF6C00'
  AND PA.[PersonId] = @PersonId
ORDER BY I.[InteractionDateTime] DESC
There is a line in the query that begins with --. If you are running SQL Server 2016+ or Azure SQL then you can remove those -- and it will include the duration of the call. That JSON_VALUE on that line doesn't exist on SQL 2012 so you must be running SQL 2016 or later, or be using Azure SQL.
Calling Numbers
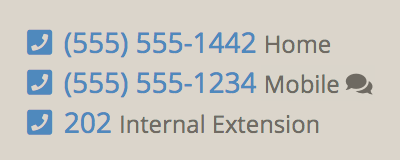
To use the new click-to-dial functionality, simply click on one of the phone numbers on the person profile page. The extension tied to the phone type you selected for the "Internal Phone Type" will be called first and then once you answer the phone the number you clicked on will then be dialed automatically for you.