Out of the box, no configuration is necessary to begin entering projects. A default category and project type is created for you to use. But not to worry, you can create as many or as few categories and project types as you need.
Categories
As was mentioned earlier, categories are only used for organizing projects. However, they are still very important. You may, for example, want to have a category for all Media projects. Even though the different projects in that cateogry might be of different project types. For example, Video Requests and Graphics Requests might be two different project types, but the projects for all of those may get put in the same Media category.
Categories can be added through the System Settings > Category Manager page. Set your Entity Type filter to Project and you can add any additional categories you want.
Project Types
Project Type configuration is done through the Installed Plugins > Project Management > Project Types page. From here you can add, edit and remove project types from the system. You can also view a list of all projects for a given project type.
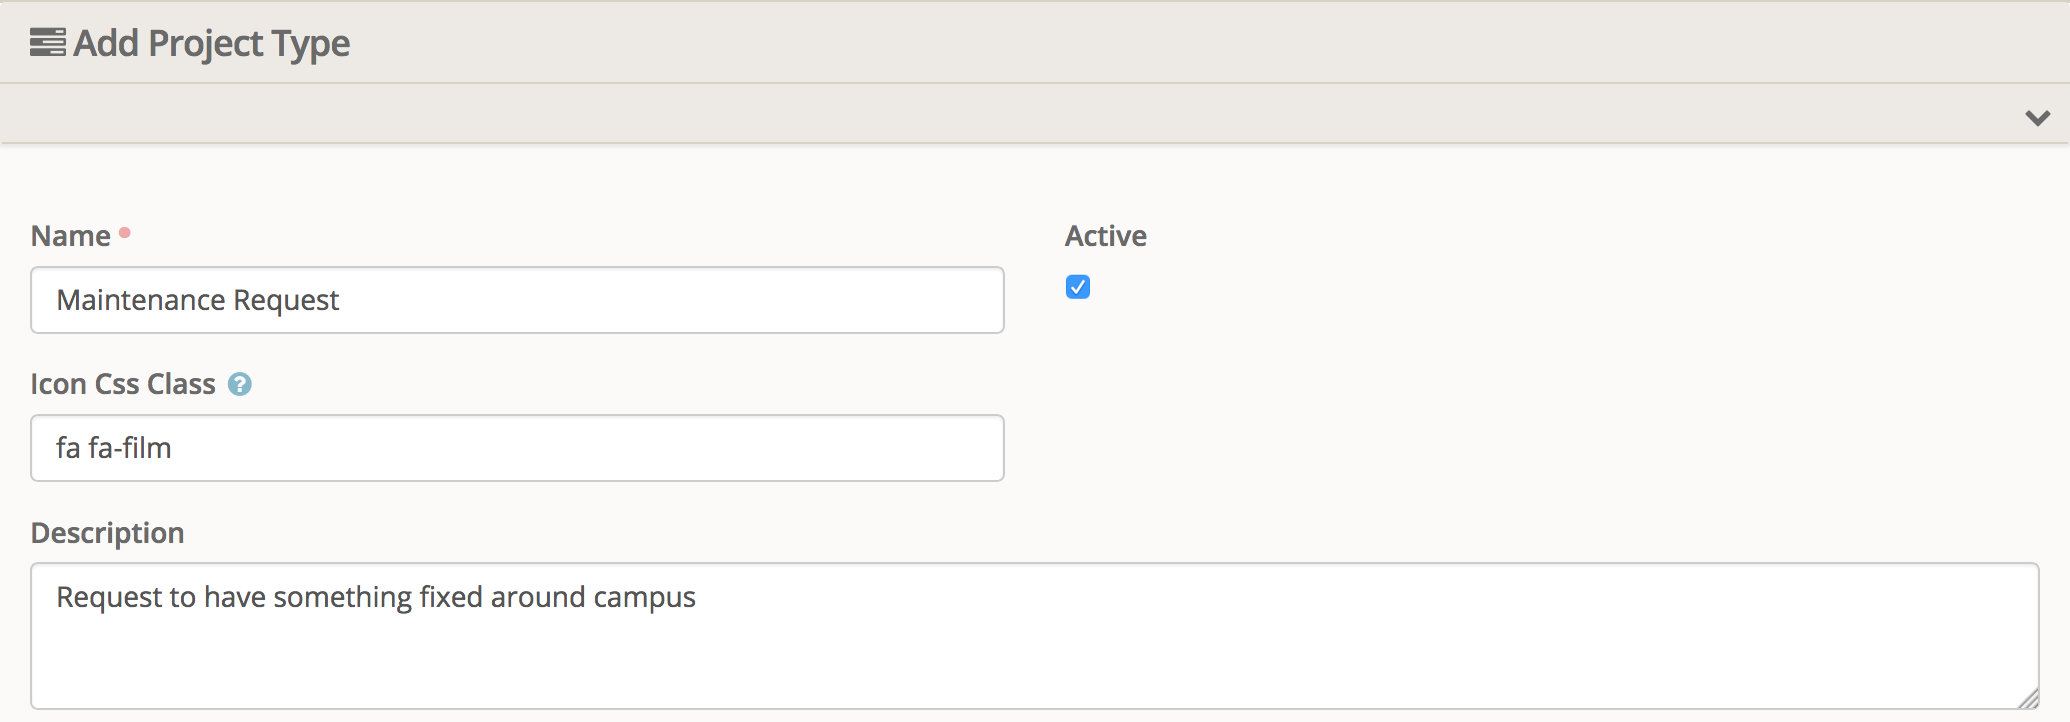
If you have used Rock for any period of time, you should be familiar with these various fields. The name is what will be displayed in the UI whenever this project type is referenced. A project type can be marked not-active and this will prevent users from being able to create new projects of this type. The icon class is used on various pages to help identify projects of this type visually. Finally the description is an internal field that you should use to describe in as much detail as you can when this project type is to be used.
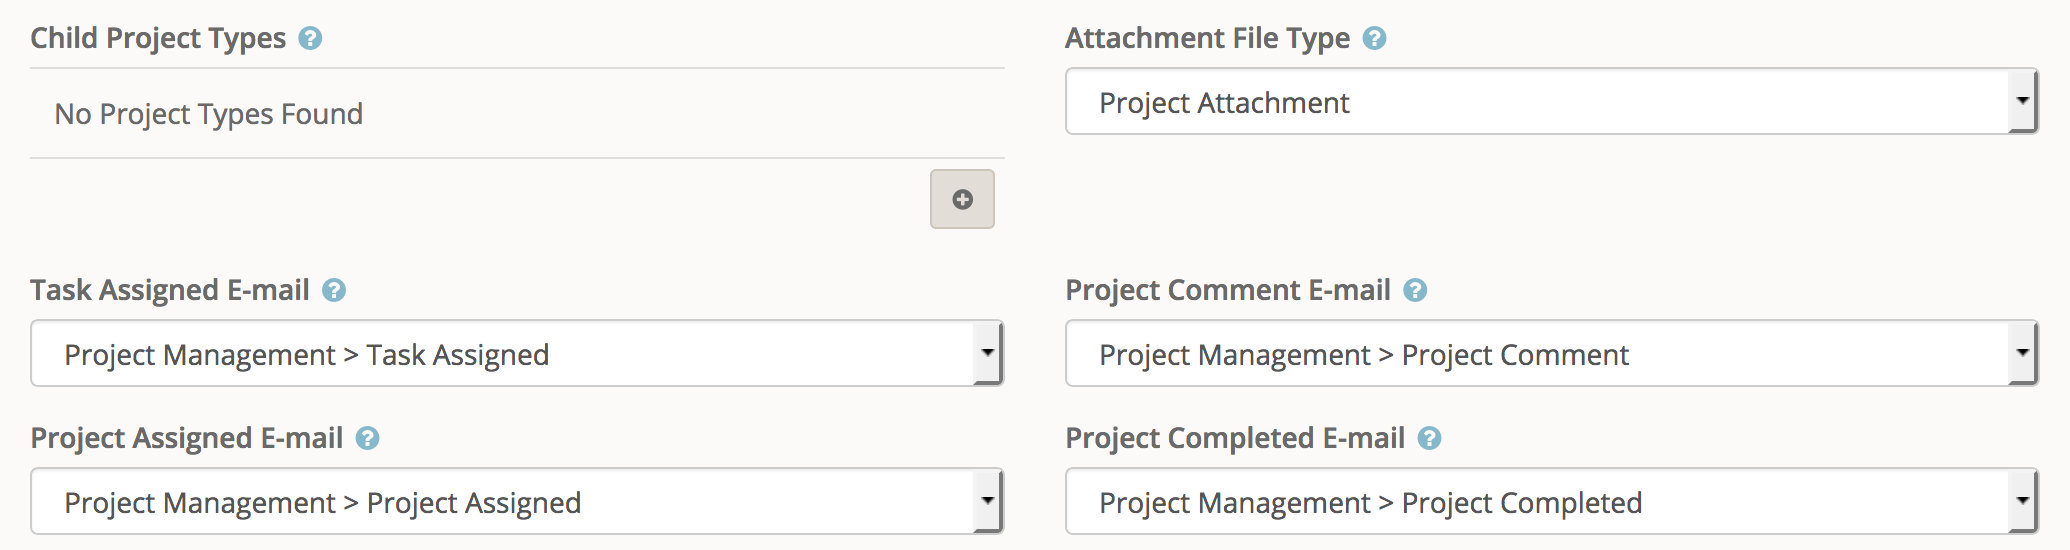
Anytime a file is uploaded and attached to a project description or a comment it will be saved using the file type that is specified here. This does not set the file type of any attributes you add below. This is only for files that are attached via the text editors.
The four e-mail fields let you specify the system e-mails to use for any projects of this type. If you leave the field blank then that specific e-mail will not be sent for this project type.
The Child Project Types behaves similar to the child group types with your group structure. This field specifies which project types can be made sub projects to a project of this type. Sub projects will be discussed in more detail further below in the documentation.
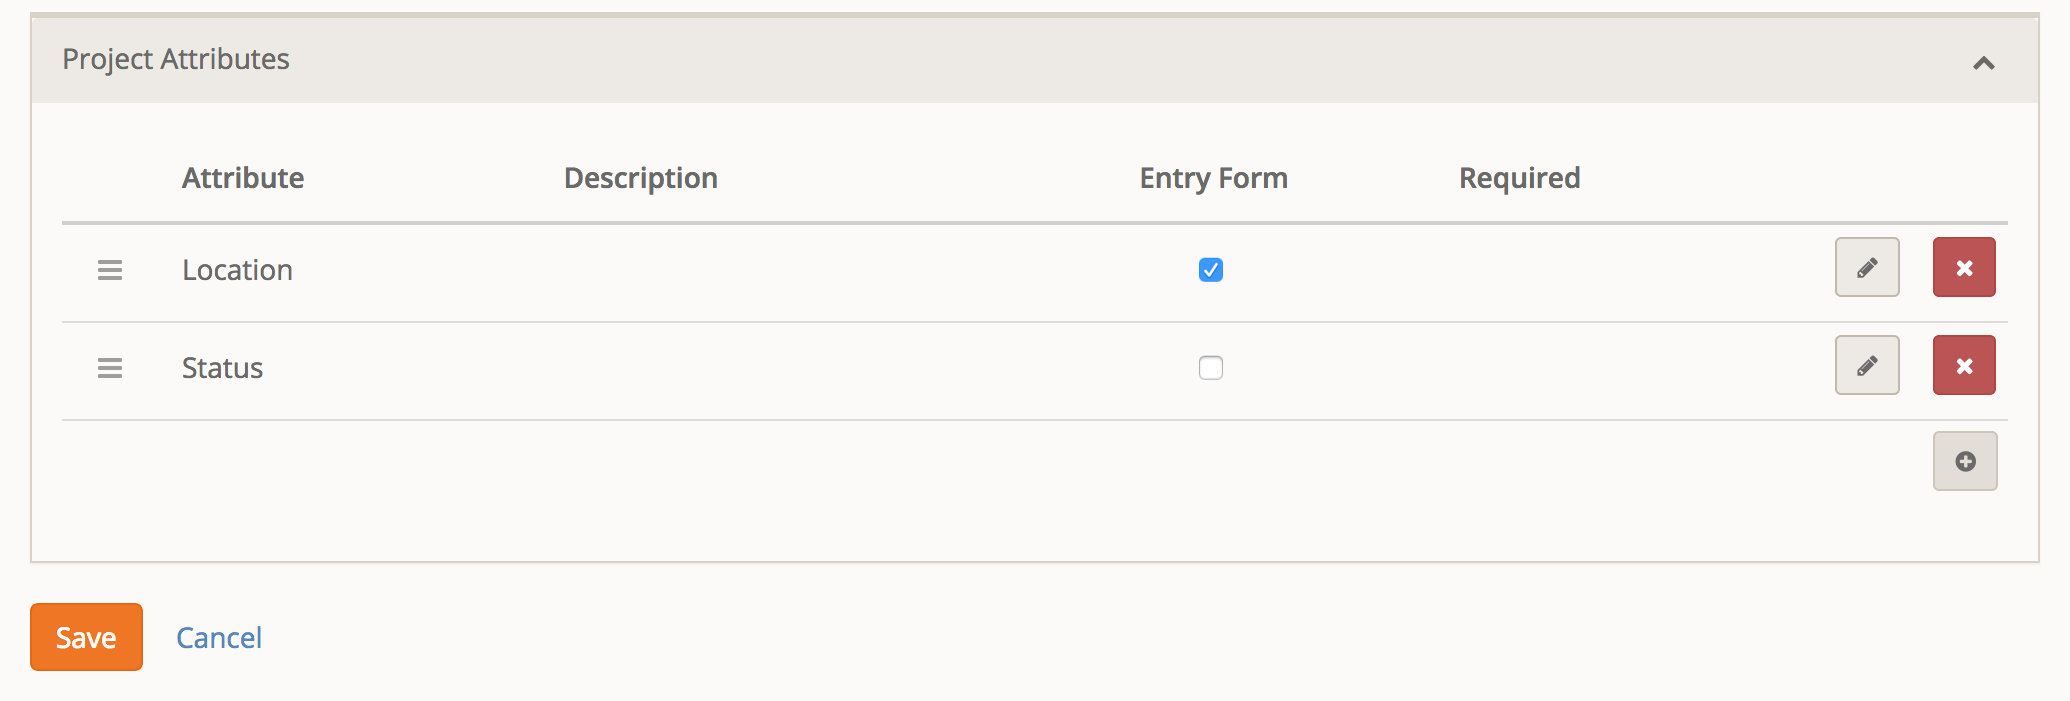
You know about properties. You've made a few. You probably even wish you hadn't made some of the attributes you've made. Project attributes work just like attributes on any other entity. The only thing you will probably notice different is the additional checkbox for "Entry Form". Any attribute that is flagged for "Entry Form" will be visible on the project entry screens. This allows you to have attributes that are available to the user when they enter a new project and other attributes that are only available to those that can edit an existing project.
Project Entry
Project entry normally happens through a dedicated page. This page hides a number of fields that normally shouldn't be visible to the requester. A few examples are the project type, category and due date to name a few.
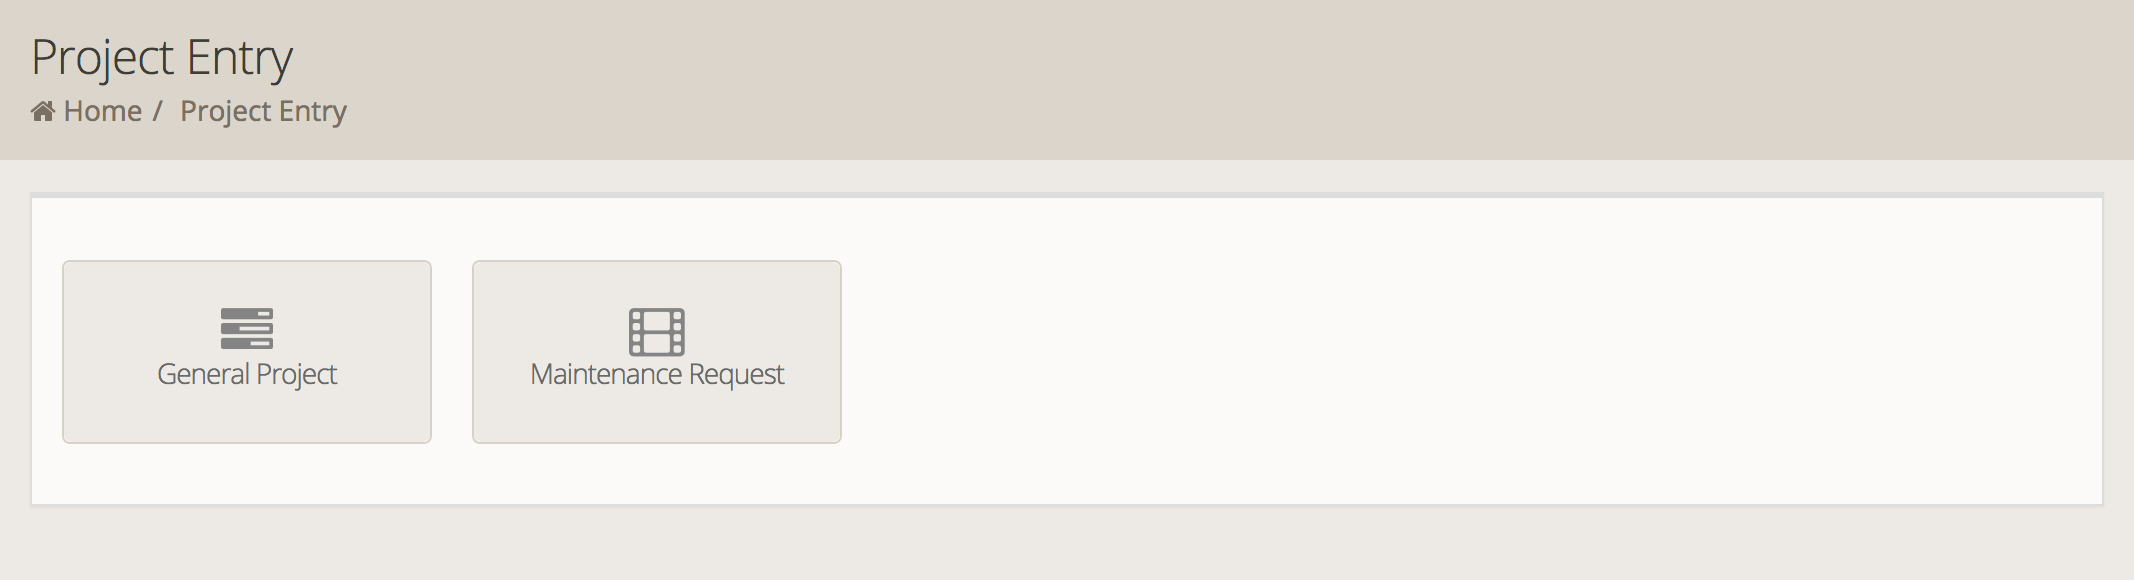
To enter new projects, you should direct users to the Tools > Project Entry page. This pages shows any configured projects that can be requested by the users. Each button is essentially a combination of the Category, Project Type and Default Assignees. For example, you may have multiple buttons for the project type of General Projects, but each button creating the project in a different category and a different person assigned by default.
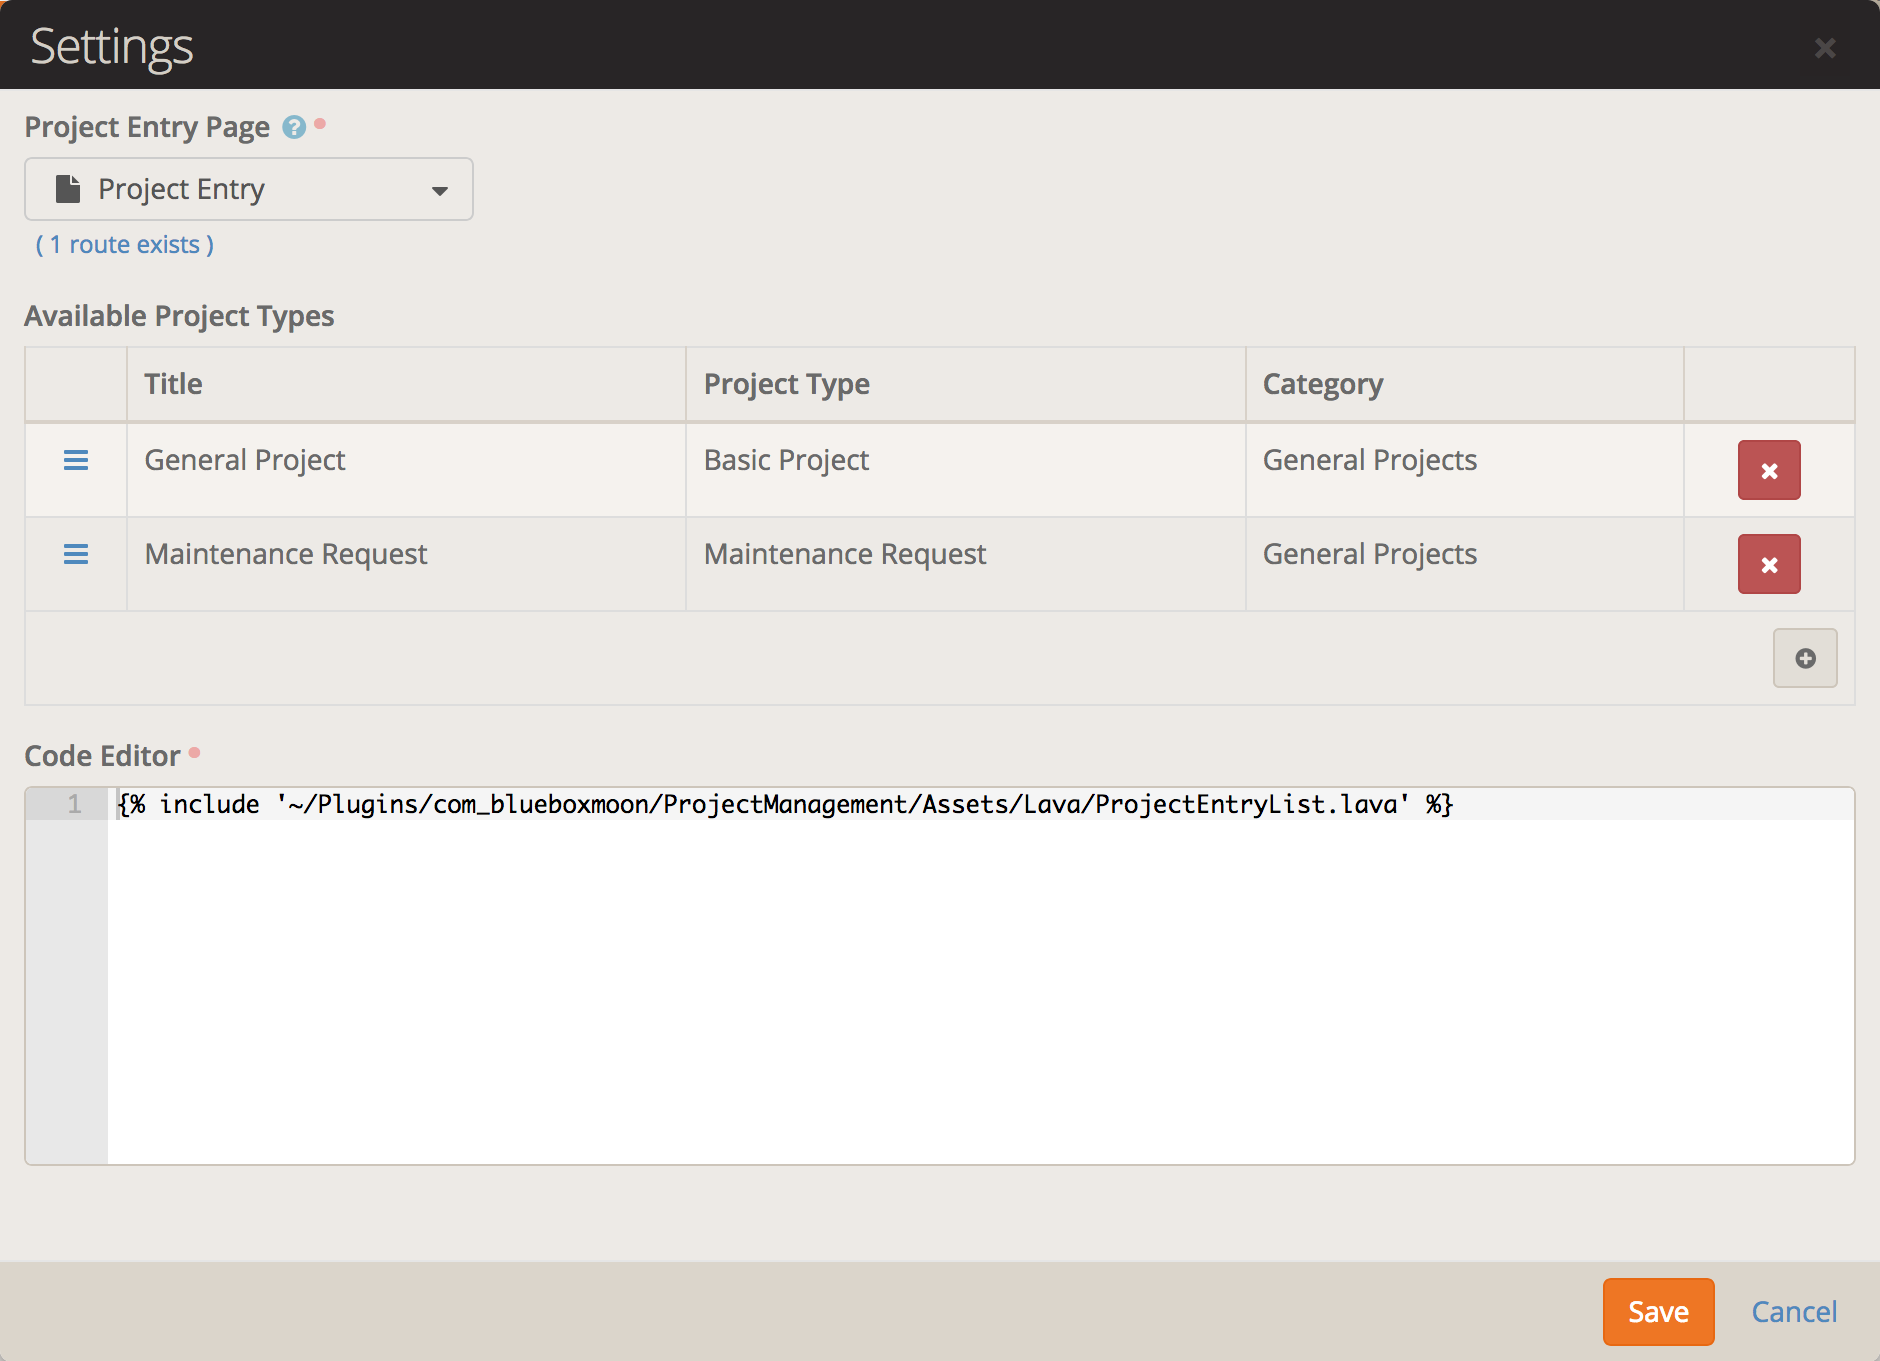
The list of which buttons are available is available in the block settings. The settings allows you to specify the Lava Template used to render the buttons, in case you want to override the default layout. Finally, each button is configured as a line item in the settings. You can have a project automatically assigned to either an individual person or a group of persons. Because this is all done as a block setting it means you could create additional pages to further divide up the buttons.
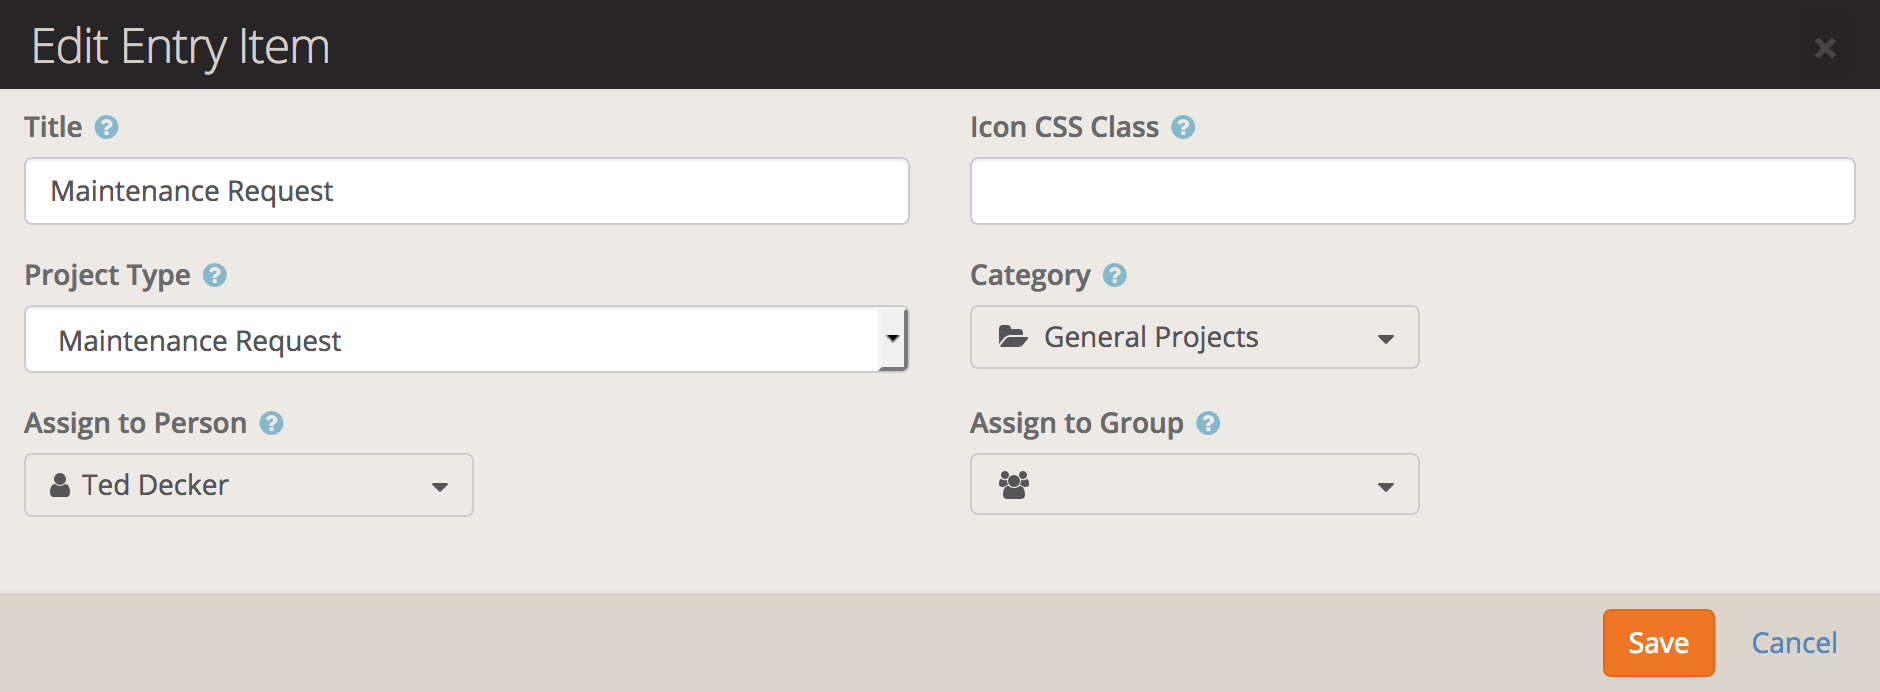
Adding a new item to the project entry list is straightforward. Give the button a title, project type and a category. By default the button will use the icon from the project type, but you can provide your own icon class for this button.
If the project should be automatically assigned to a person then you can select the person here. They will be assigned and receive an e-mail (if configured) automatically. If you need to assign multiple people you can place them in a group and select the group. Each member of the group will be assigned to the project.
[!NOTE]
A project can only be assigned to people. When using the Default Assignee Group then the project gets assigned to any active members of the group when the project is created.
Dashboard Blocks
There are two blocks that can be added to your users' dashboard page if you want to put them in. One shows projects for the user and the other shows tasks.
My Projects
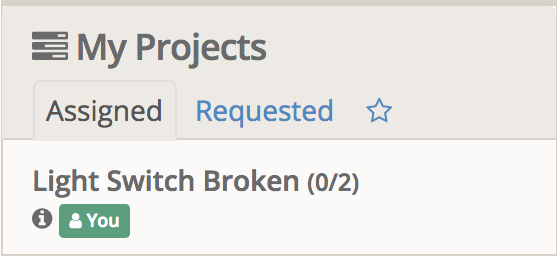
The My Projects block alows the user to view three different collections of projects: Assigned to them, Requested by them, and Followed by them. Clicking on the project name will take them to the project detail page. Each item contains a summarized version of the details of the project:
- Project Name
- Number of completed/total tasks
- Description of project (by hovering over the info circle)
- If project is currently blocked
- Due date (if any)
- Who project is assigned to
My Tasks
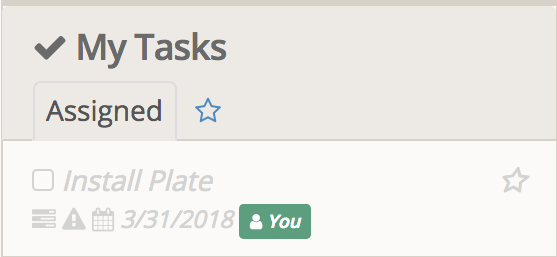
The My Tasks block alows the user to view two different collections of projects: Assigned to them, and Followed by them. Clicking on the task name will take them to the project detail page for that task. Each item contains a summarized version of the details of the task:
- Task Name
- Description of project (by hovering over the info circle)
- Name of project this task belongs to
- If task is currently blocked
- Due date (if any)
- Who project is assigned to
Email Notifications
If you use either Mailgun or SendGrid then you can configure Rock to let you leave comments on a project simply by replying to th e-mail notification. The only configuration in Rock you need to do to support this is to ensure that your e-mail templates have the correct subject line (see templates below) and then to set a From Address for each template.
The From Address can be anything, but it must correlate to the address you setup in either Mailgun or SendGrid. So for example, if you setup Mailgun and use project-comment@mg.rocksolidchurchdemo.com as the e-mail address, then you will need to update the four out-of-the-box System Emails as well, as any custom system e-mails you setup, to use project-comment@mg.rocksolidchurchdemo.com as the From Address.
After ensuring the e-mails are being processed correctly, we recommend one final change to the e-mail templates. Telling users by word of mouth that they can reply to an e-mail and have the comment saved is all well and good, but wouldn't it be easier to just include that information in the e-mail itself? Out of the box, the e-mail templates contain this at the end of the messages:
<small><a href="{{ Project.Id | BBM_ProjectRoute }}">view it online</a>.</small>
We suggest changing it to the following to make it clear to the user they can just hit reply:
<small>Reply to this email directly or <a href="{{ Project.Id | BBM_ProjectRoute }}">view it online</a>.</small>
Mailgun
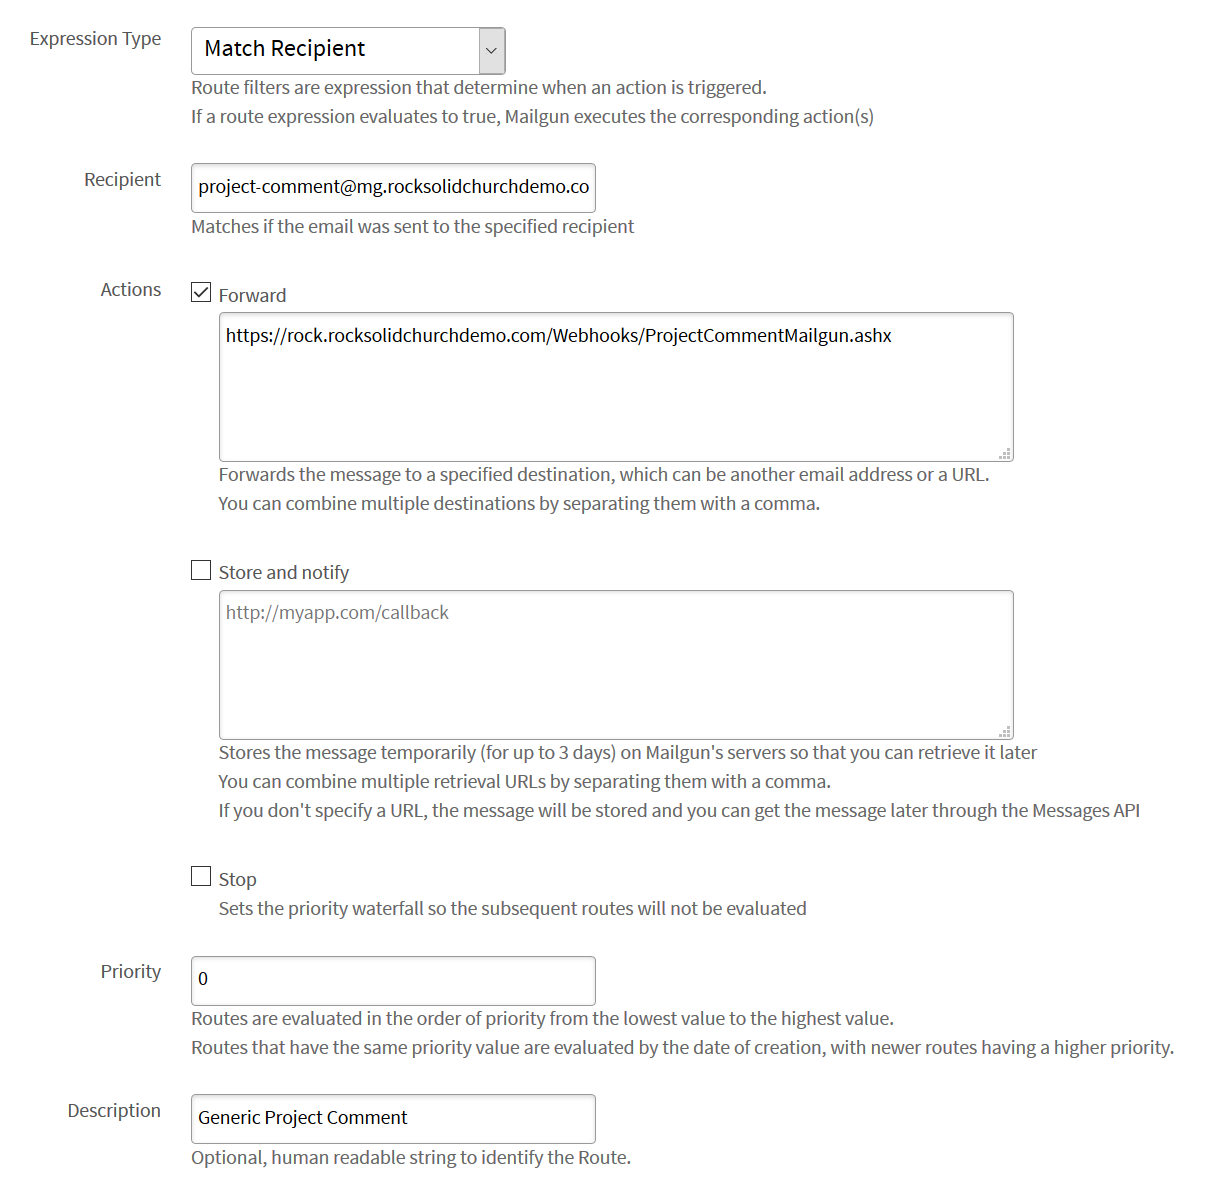
Mailgun allows you to configure individual e-mail addresses to be delivered to different API endpoints. You will need to configure a single e-mail address and have it deliver those to Rock. We suggest something simple, such as project-comment@mg.rocksolidchurchdemo.com, but you can use anything you want as long as it gets to Rock. The important part is the Subject line. When you configure the API endpoint you should enter the following (putting your Rock domain name instead):
https://rock.rocksolidchurchdemo.com/Webhooks/ProjectCommentMailgun.ashx
To configure Mailgun, go to your Routes menu and add a new route. Expression Type should be Match Recipient. Next put the e-mail address you want to use in the Recipient text box. Finally turn on the Forward action and enter the URL to the Rock Webhook (see above).
SendGrid
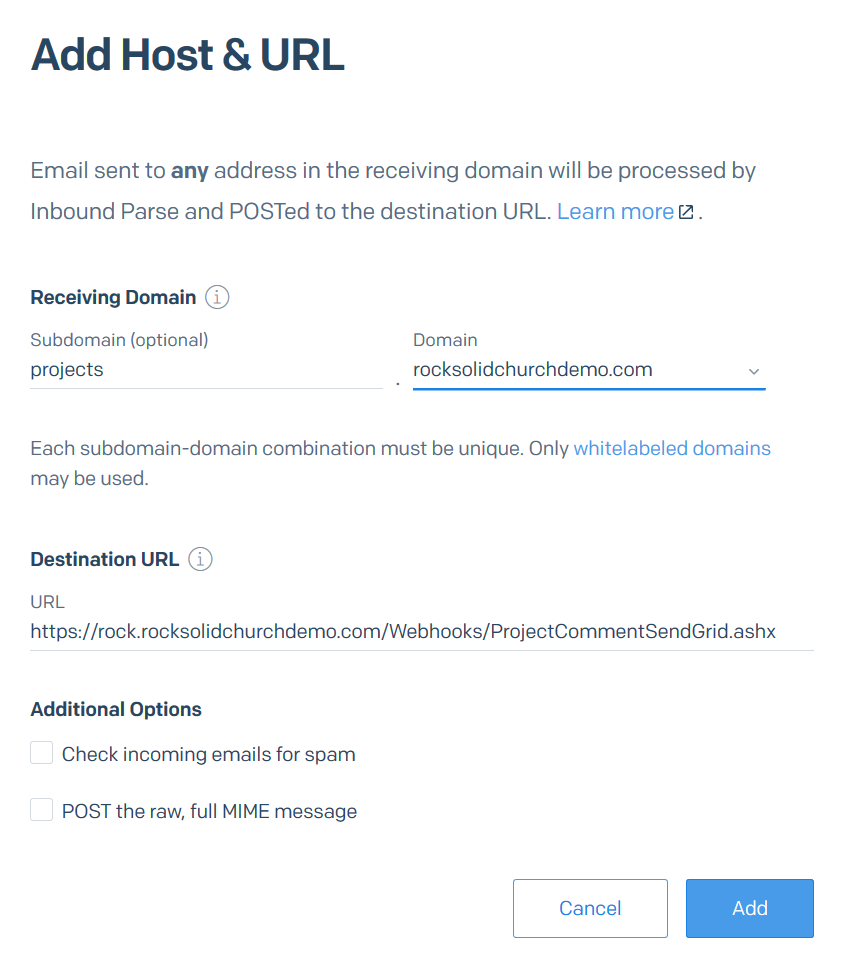
SendGrid forwards all e-mails to a specific domain to a single API endpoint. This means you will need to configure a subdomain to use for project comments. For example, we would recommend that you use something like projects.rocksolidchurchdemo.com for the domain and then comment@projects.rocksolidchurchdemo.com for the actual e-mail address. The important tracking details are in the Subject line so you can use any e-mail address and domain name you want as long as it's configured correctly in SendGrid to send those to Rock. When you configure the API endpoint you should enter the following (putting your Rock domain name instead):
https://rock.rocksolidchurchdemo.com/Webhooks/ProjectCommentSendGrid.ashx
To configure SendGrid, go to your Settings > Inbound Parse and add a new entry. Select your verified domain name and enter the subdomain you want to use, then enter the URL to the Rock Webhook (see above).
[!IMPORTANT]
Remember you will need to setup your DNS to have MX records for the subdomain selected and point them to SendGrid.
Templates
Out of the box, you are provided with a system e-mail for each of the four e-mail types below. Hopefully these will provide everything you need.
Occasionally the standard e-mail templates are updated. We will only modify them if you have not made changes yourself already. If you have made changes but want to incorporate the latest e-mail templates then you can find their contents below.
The subject for each template is as follows. There is some special syntax at the end which includes the Project Id and the Primary Alias Id of the person receiving the e-mail. This is required to support leaving comments by replying to a notification e-mail.
[Project] {{ Project.Name }} (#{{ Project.Id }}/{{ Person.PrimaryAliasId }})
Project Assigned
{{ 'Global' | Attribute:'EmailHeader' }}
<p>Hello {{ Person.NickName }},</p>
<p>
The project <a href="{{ Project.Id | BBM_ProjectRoute }}">{{ Project.Name }}</a>
was just assigned to you{% if CurrentPerson %} by {{ CurrentPerson.NickName }}{% endif %}.
</p>
<div>
<strong>Details:</strong>
<br />
{{ Project.Description | BBM_FromProjectMarkdown }}
</div>
<hr />
{% for attribute in Project.ProjectAttributes %}
{% if attribute.Value != '' %}
<div>
<strong>{{ attribute.Name }}:</strong><br />
{% if attribute.Url and attribute.Url != '' %}
<a href="{{ attribute.Url }}">{{ attribute.Value }}</a>
{% else %}
{{ attribute.Value | NewlineToBr }}
{% endif %}
</div><br />
{% endif %}
{% endfor %}
<p>
—<br />
<small><a href="{{ Project.Id | BBM_ProjectRoute }}">view it online</a>.</small>
</p>
{{ 'Global' | Attribute:'EmailFooter' }}
Task Assigned
{{ 'Global' | Attribute:'EmailHeader' }}
<p>Hello {{ Person.NickName }},</p>
<p>
The task <a href="{{ Project.Id | BBM_ProjectRoute }}">{{ Task.Name }}</a>
was just assigned to you{% if CurrentPerson %} by {{ CurrentPerson.NickName }}{% endif %}.
</p>
{{ Task.Description | BBM_FromProjectMarkdown }}
<p>
—<br />
<small><a href="{{ Project.Id | BBM_ProjectRoute }}">view it online</a>.</small>
</p>
{{ 'Global' | Attribute:'EmailFooter' }}
{{ 'Global' | Attribute:'EmailHeader' }}
{% if Comment %}
<p>New comment by @{{ Comment.CreatedByPersonAliasId | PersonByAliasId | Property:'FullName' }}:</p>
<div>
{{ Comment.Text | BBM_FromProjectMarkdown }}
</div>
{% else %}
<div>
{{ Project.Description | BBM_FromProjectMarkdown }}
</div>
{% endif %}
<p>
—<br />
<small><a href="{{ Project.Id | BBM_ProjectRoute }}">view it online</a>.</small>
</p>
{{ 'Global' | Attribute:'EmailFooter' }}
Project Completed
{{ 'Global' | Attribute:'EmailHeader' }}
<p>Hello {{ Person.NickName }},</p>
<p>
The project <a href="{{ Project.Id | BBM_ProjectRoute }}">{{ Project.Name }}</a>
has been completed {% if CurrentPerson %} by {{ CurrentPerson.NickName }}{% endif %}.
</p>
<p>
—<br />
<small><a href="{{ Project.Id | BBM_ProjectRoute }}">view it online</a>.</small>
</p>
{{ 'Global' | Attribute:'EmailFooter' }}
Lava Fields
The lava fields available in each e-mail are below.
All E-mails
"Project": {
    "Id": 3,
    "Name": "Light Switch Broken",
    "Description": "The plastic plate for the light switch has cracked.",
    "RequestDate": "2018-03-17 13:42:36",
    "RequestedByPersonAliasId": 7,
    "RequestedByPersonAlias": { ... },
    "ProjectTypeId": 2,
    "ProjectType": { ... },
    "ParentProjectId": null,
    "ParentProject": null,
    "DueDate": null,
    "CompletedDateTime": null,
    "CancelledDateTime": null,
    "BlockedDateTime": null,
    "CategoryId": 1,
    "Category": { ... },
    "Projects": [ ],
    "ParentProject": null,
    "Assignees": [ { ... } ], /* PersonAlias records */
    "BlockingProjects": [ ],
    "BlockedProjects": [ ],
    "Watchers": [ { ... } ],
    "Tasks": [ { ... } ],
    "IsBlocked": false,
    "IsActive": true,
    "ProjectAttributes": [
        {
            "Name": "test",
            "Key": "test",
            "RawValue": "Test value 1",
            "Value": "Test value 1",
            "IsEntryForm": true,
            "IsRequired": false,
            "Url": null
        },
        ...
    ]
},
"Person": { ... } /* The person object who is receiving the e-mail. */
"CurrentPerson": { ... } /* The person object who initiated this action, if known. */
Project Assigned
No extra fields.
Task Assigned
"Task": {
    "Id": 1,
    "Name": "Order New Plate",
    "Description": "",
    "ProjectId": 3,
    "Project": { ... },
    "AssignedToPersonAliasId": null,
    "AssignedToPersonAlias": null,
    "Order": 0,
    "DueDate": "2018-03-24 00:00:00",
    "CompletedDateTime": null,
    "CancelledDateTime": null,
    "BlockedDateTime": null,
    "BlockingTasks": [ ],
    "BlockedTasks": [ ],
    "IsBlocked": true,
    "IsActive": true
}
"Comment": {
    "Id": 1823,
    "NoteTypeId": 92,
    "NoteType": { ... },
    "EntityId": 3,
    "Text": "@Cindy Decker[15] can you check if this is a single or double wide plate?"
}
This e-mail type is also used when a project is first created if there was a mention to a person that would not otherwise receive an e-mail (such as project assigned). In these cases the Comment variable will be null.
Project Completed
No extra fields.