Entering Projects
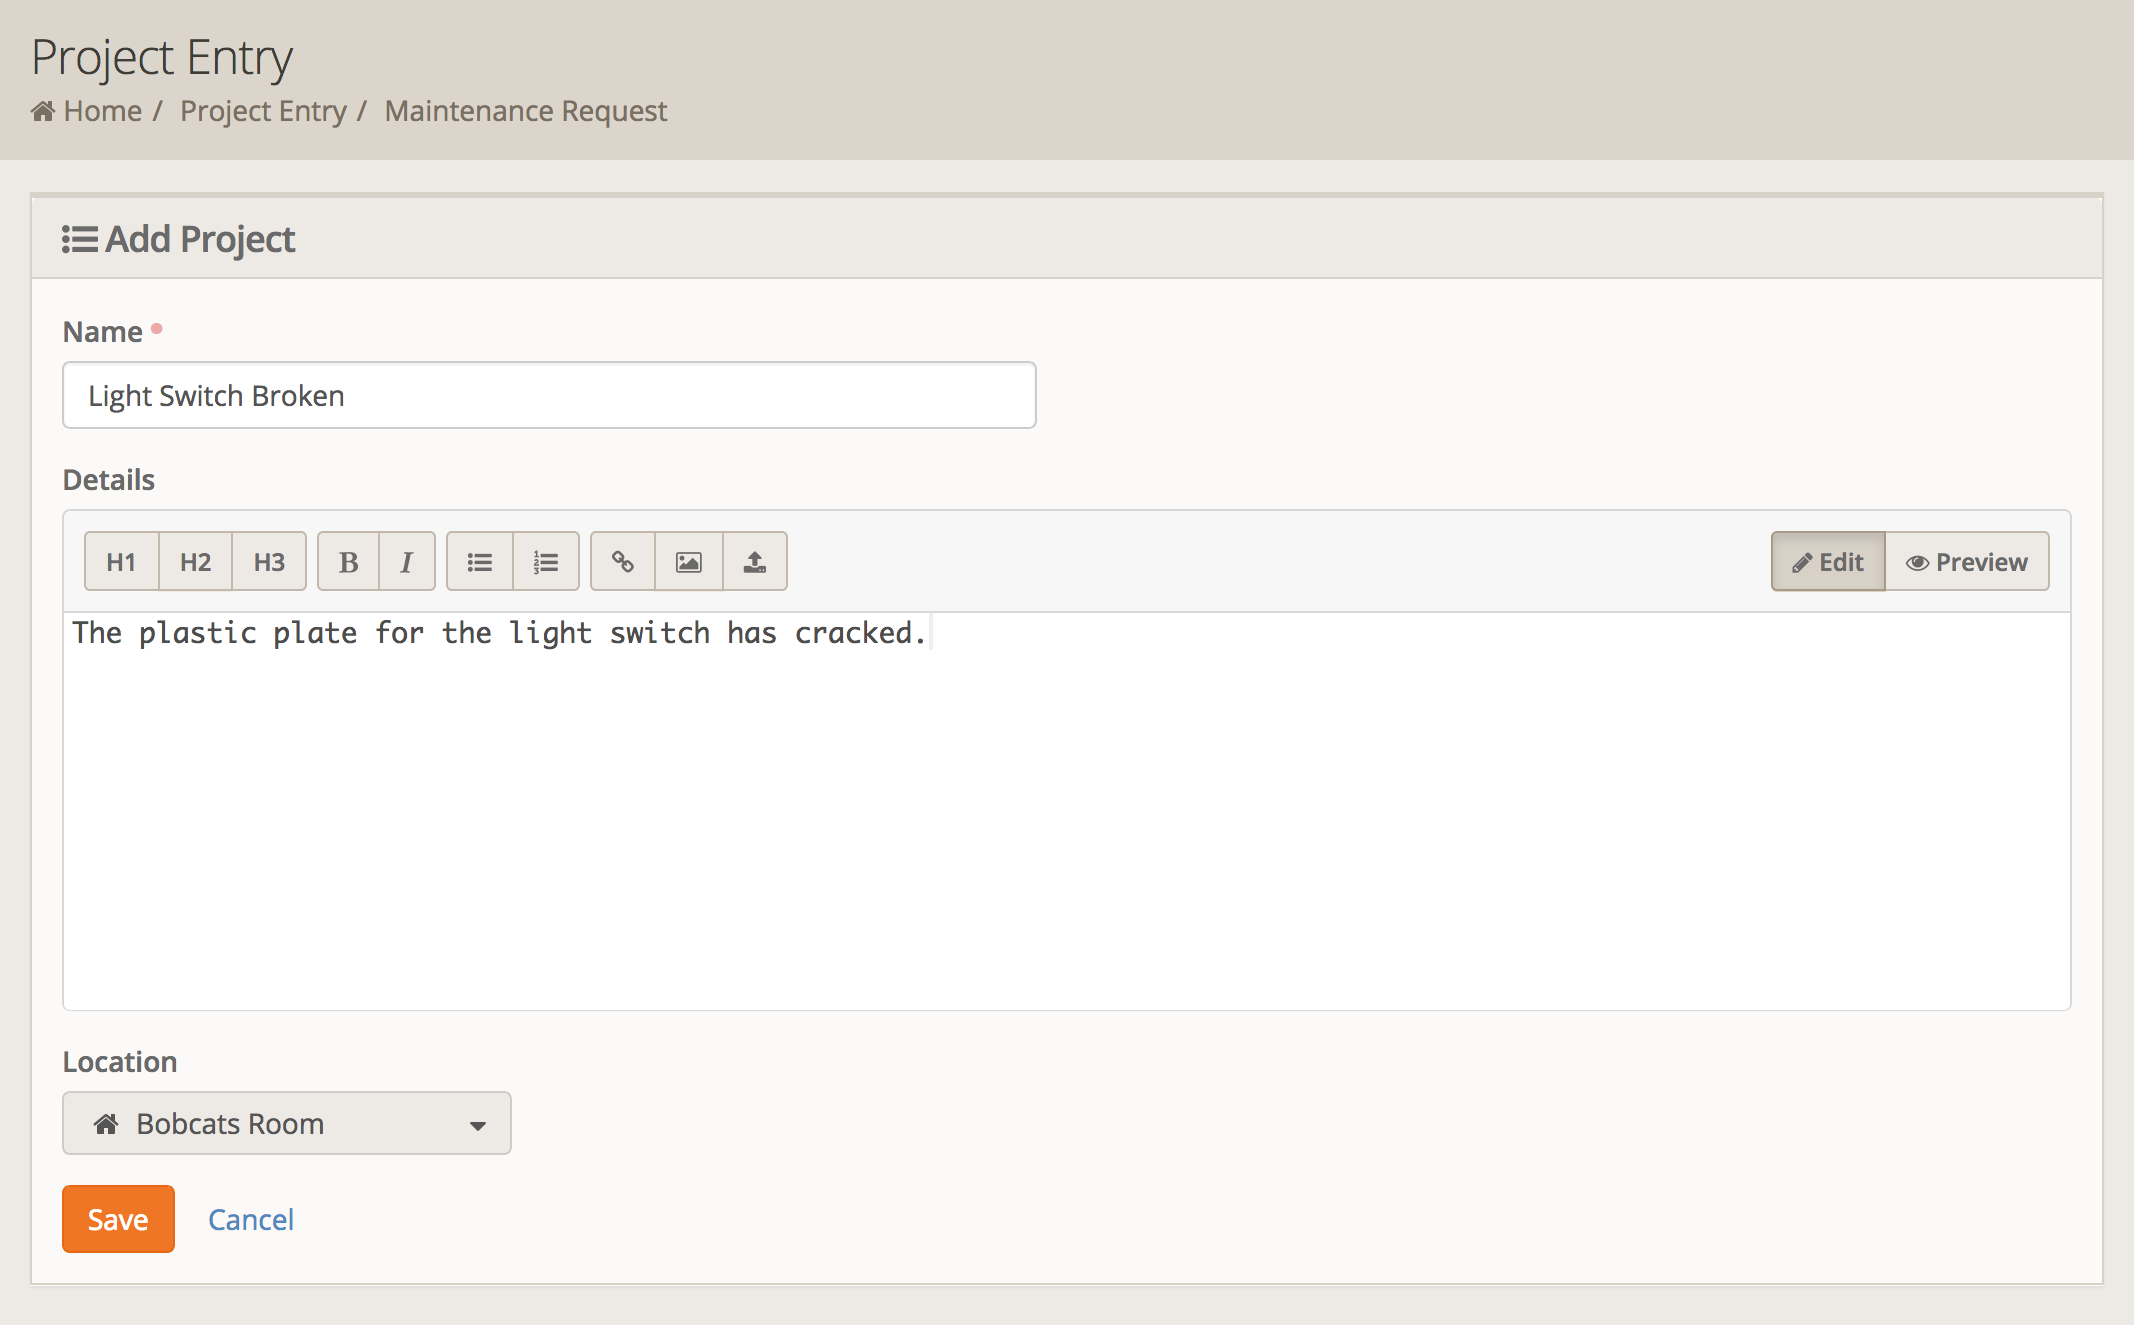
Once you click one of the buttons on the Tools > Project Entry page you will be on this page to actually enter a new project. If you compare this page to the Project Edit page we will talk about later, you can more readily see the fields that are hidden from the requester. Specifically, take note that earlier we had defined two attributes for this Maintenance Request project type. However, only the one flagged for "Entry Form" actually shows up on this page.
When entering a new project, the requesting user normally only gets to enter a Name for the project and a description of the project. Plus any attributes that were flagged as "Entry Form". This keeps the page very easy to understand for the user and allows them to quickly enter in new requests without having to wade through a cluttered screen.
Viewing Projects
The project screen is broken up into different sections:
- Project Details
- Tasks
- Sub Projects
- Participants
- Comments
Project Details
This section contains what you would expect, the general details of the project. We won't bore you with covering every item, but here is a quick overview of what each piece is for.

- The title of the project.
- Identifier of the project. This can be used to reference the project when leaving comments.
- State of the project: Active, Cancelled, Completed.
- Watching project indicator. When highlighted you will receive e-mail notifications for this project.
- Follow project. You can flag a project so that it will show up in the followed section of the My Projects dashboard block.
- Contains the basic details of the project.
- Any custom attributes for the project will show up here.
Tasks
A project can contain any number of tasks, each of which can be individually assigned to a single person and have their own due dates. By doing this you can have a single project with a final due date and then smaller tasks with staged due dates. Additionally, you can mark one task as being blocked by another task. In this way you only need to worry about tasks that are ready to be worked on. An example of this would be one task to order parts followed by a second task to install the parts. The second task cannot be be started until the first has been completed. So the install parts task would be marked as blocked by the order parts task.
Tasks can be ordered one of two ways. The first and default ordering method is manually. You can drag the tasks into any order you wish. The second is to order the tasks by due date.
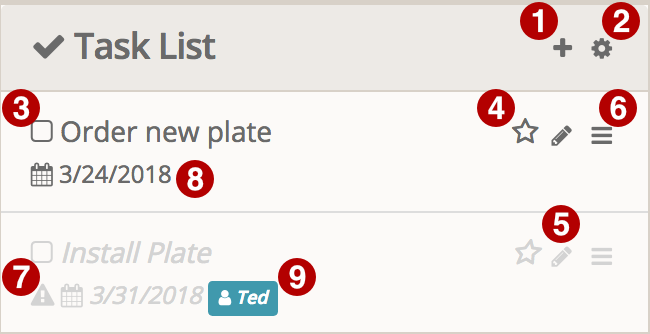
- Add a new task to this project.
- Configure task view options. This lets you change ordering options and show completed tasks.
- Complete a task. If checked this indicates that a task has been completed. Clicking on it will toggle the completed state.
- Follow task. When a solid icon then this task is being followed. Clicking on it will toggle the followed state.
- Edits the task.
- When manually ordering tasks, you can grab the hamburger icon and drag it to change the order.
- The caution icon indicates that the task is blocked by another task. Hovering over this icon will give a list of tasks that are currently blocking this task.
- Task Due Date. If the task has a due date then it will show here.
- If the task is assigned to a person, their name will show up here.
Sub Projects
A project can have any number of sub projects. When a task becomes too complex you may wish to convert it into a sub project so that it can have tasks of it's own. In this way you can manage extremely large and complex projects.
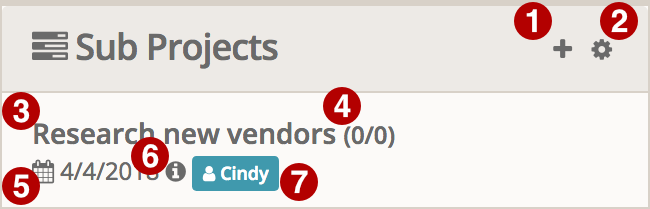
- Add a new sub project to the main project.
- View options to the sub project list. Currently allows viewing completed sub-projects.
- Title of sub project.
- The number of completed tasks and the total number of tasks in the sub project.
- The due date of the sub project.
- Indicates the sub project has a description, on mouse over shows a snippet of the description.
- Who the sub project is currently assigned to.
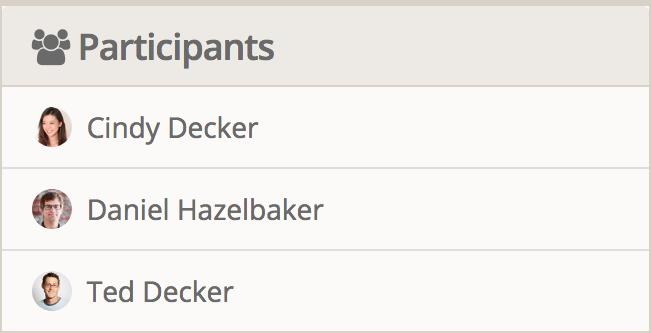
Participants
The list of participants simply shows everybody who has participated in the project. This is a summation of the requester, assigned persons and anybody who has commented on the project.
A rich commenting and discussion system has been built into projects.
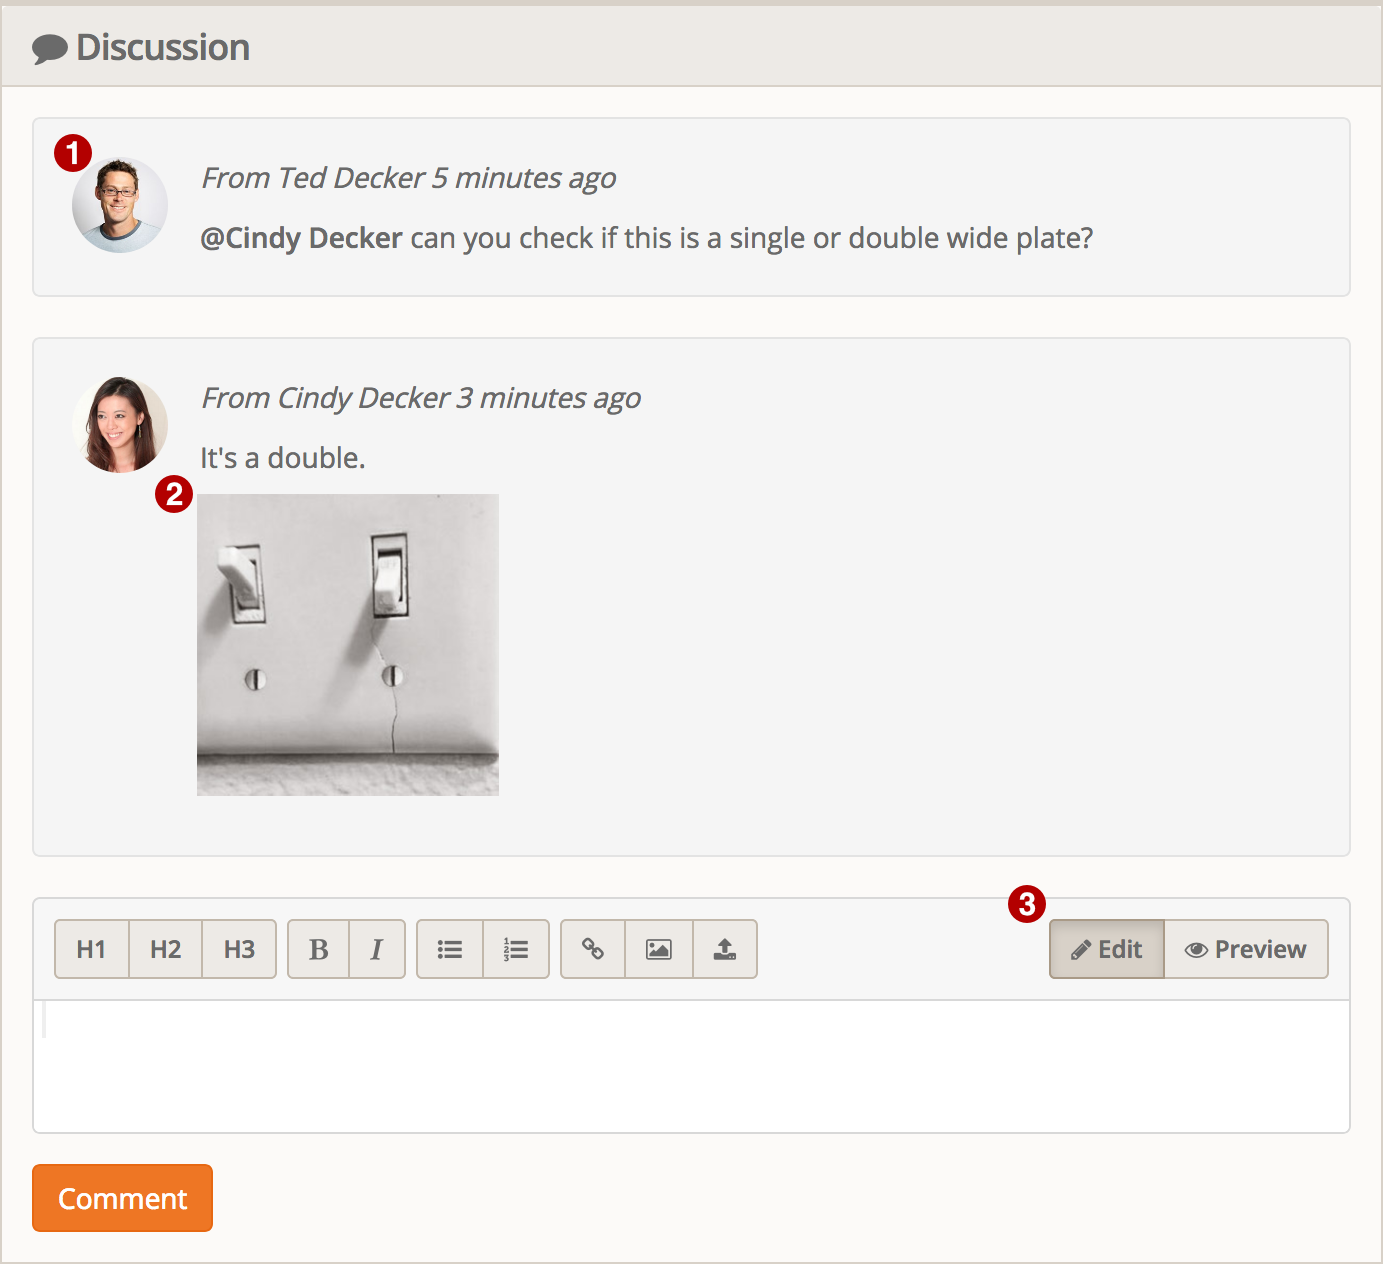
- Each comment shows the picture and name of the person that left it. The date and time the comment was left is also shown above the text of the comment itself.
- Comments can contain rich text, including images and file attachments as seen here.
- Switch between editing the new comment and previewing what the comment will look like when saved.
As we just mentioned, comments can contain rich text. This is done using what is called Markdown Syntax. We chose markdown because of it's ease of use for simple formatting. When having a discussion of this nature usually the only formatting is bolding some text and maybe some bullet lists. But markdown does allow for some fancier editing that even a novice user can quickly learn. In addition, the editor has some buttons for some of the most common formatting choices.
While markdown has specific syntax for creating links to web pages, you do not need to strictly use this syntax. The markdown syntax allows for having custom text associated with the link. However, if you simply type in a URL it will be rendered as a clickable link.
The editor also supports uploading images and files as attachments. You can use either the upload button in the editor or simply drag a file into the editor to upload. Images are rendered inline and non-images are rendered as links to download the files.
Finally, the editor also supports mentioning other users. When you mention somebody who is not already receiving notifications for this project they will receive a special e-mail so that they can see they were mentioned. This allows you to bring people into the conversation without having to assign them to the project itself. To mention a person simply type the @ symbol followed by their name. You must enter at least 2 characters of both their first and last name to begin the matching.
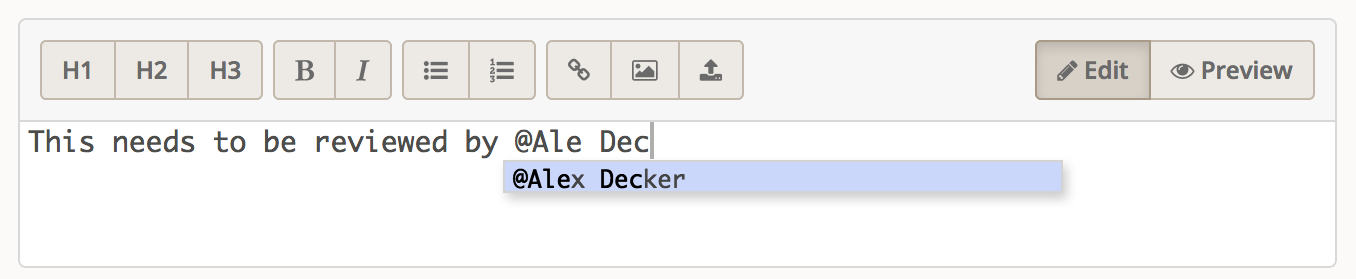

As you can see, you will get a small popup that will contain the full name found and their e-mail address (if available) to help identify the correct person. Once you accept the match it will replace the text you have already typed with their full name followed by a number in brackets. This number is their person alias identifier and is used to track specifically which person you mentioned.
You can also reference other projects by typing the # character followed by the project identifier.
[!TIP]
Everything we have discussed regarding the editor for comments also applies to the editor for project details.
Editing Projects
By clicking the Edit button on the project details page you can make changes to the project itself, including the internal fields.
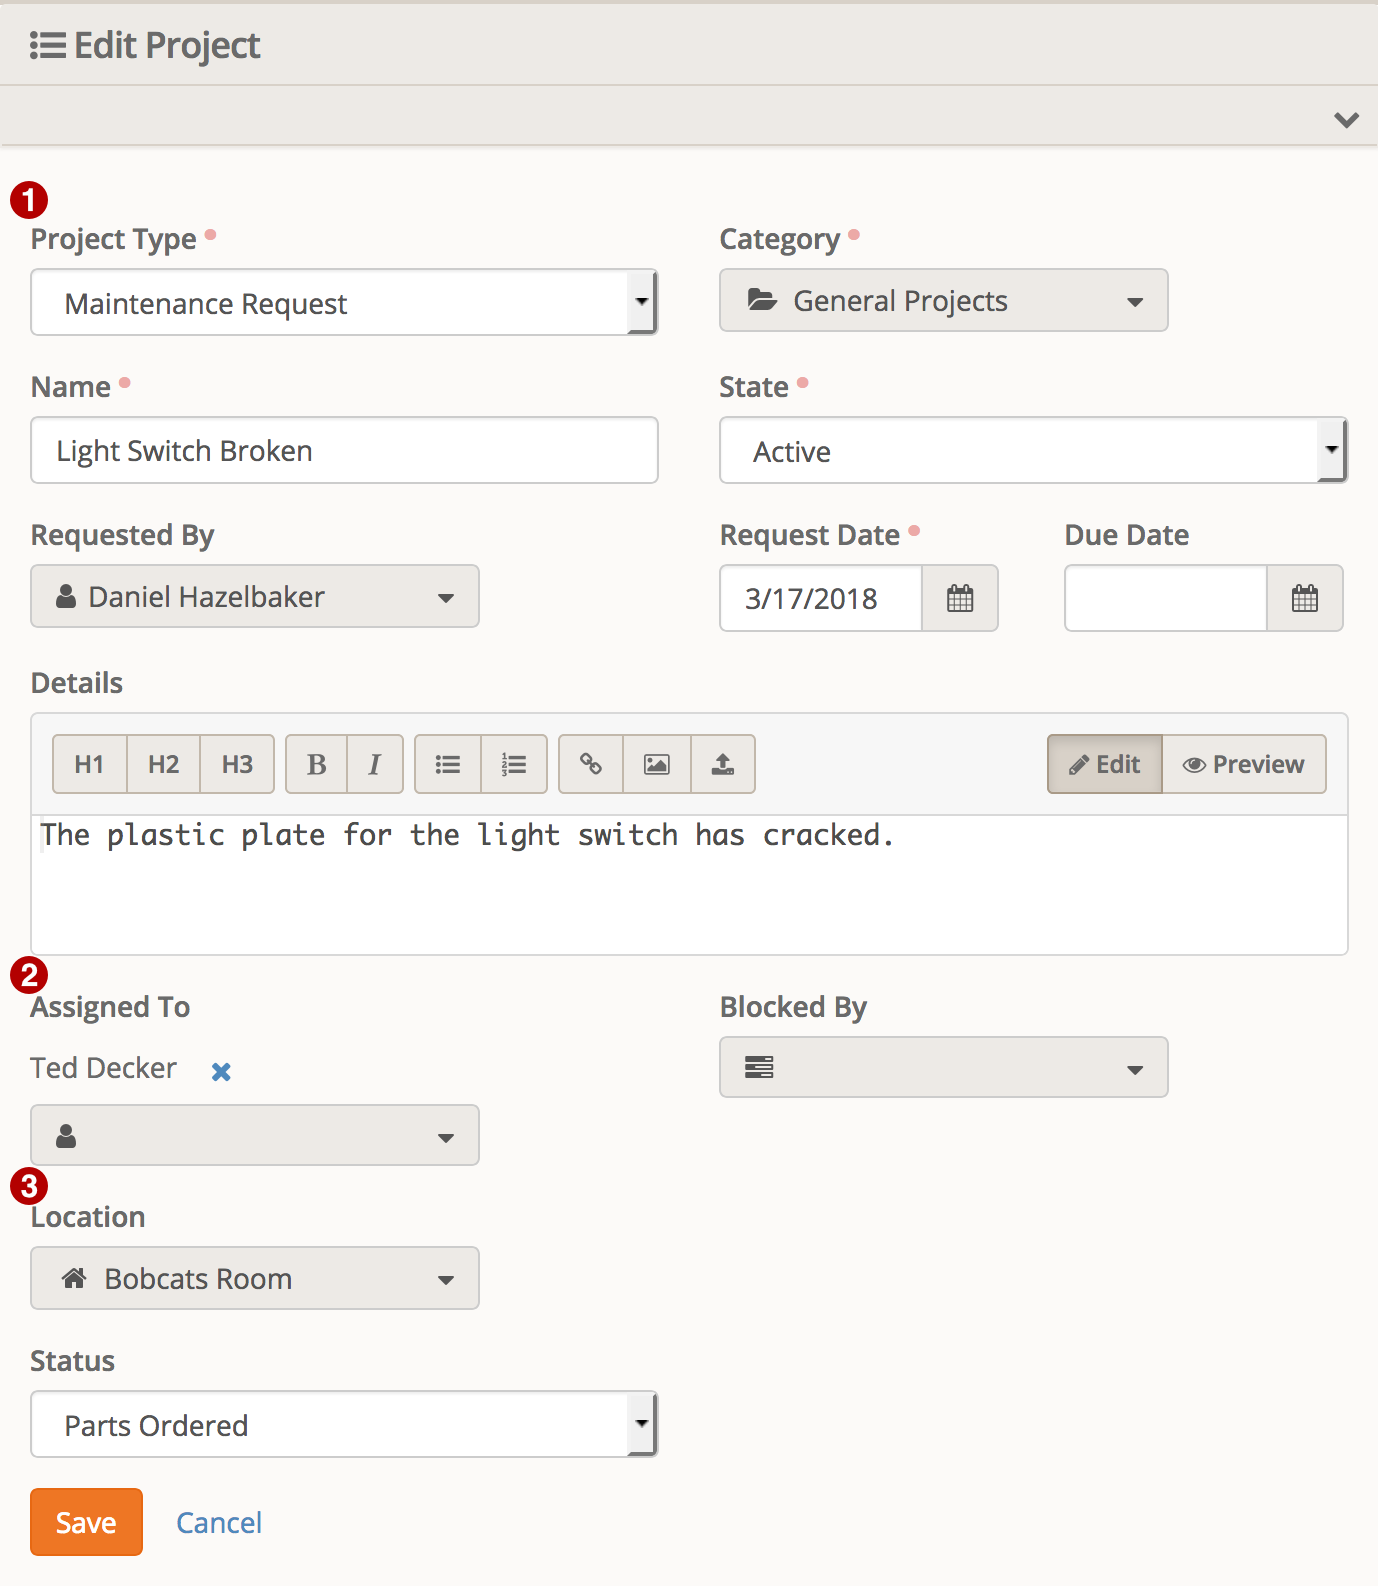
- The top section allows for editing the normal information about a project. The things you would normally edit would be the Due Date and possibly the Name to make it more clear.
- Next comes the assignment and blocked by controls. These allow you to add or remove people to the list of those assigned to this project. The blocked by control allows you to add or remove other projects that are blocking this project from being worked on.
- Any attributes defined on the project type will show up here to be edited. Unlike the Project Entry screen, this screen allows you to edit all attributes.
When saving the project, any new assignees will automatically be e-mailed that they have been assigned to the project, assuming the e-mail template has been configured.
Calendar
If a project or task has been given a Due date, then you can view them on a calendar. On the main Projects page there is a button at the type titled Calendar. This button, oddly enough, will take you to the calendar view where you can see various projects and tasks on a month or week layout to get a birds eye view of what is coming.
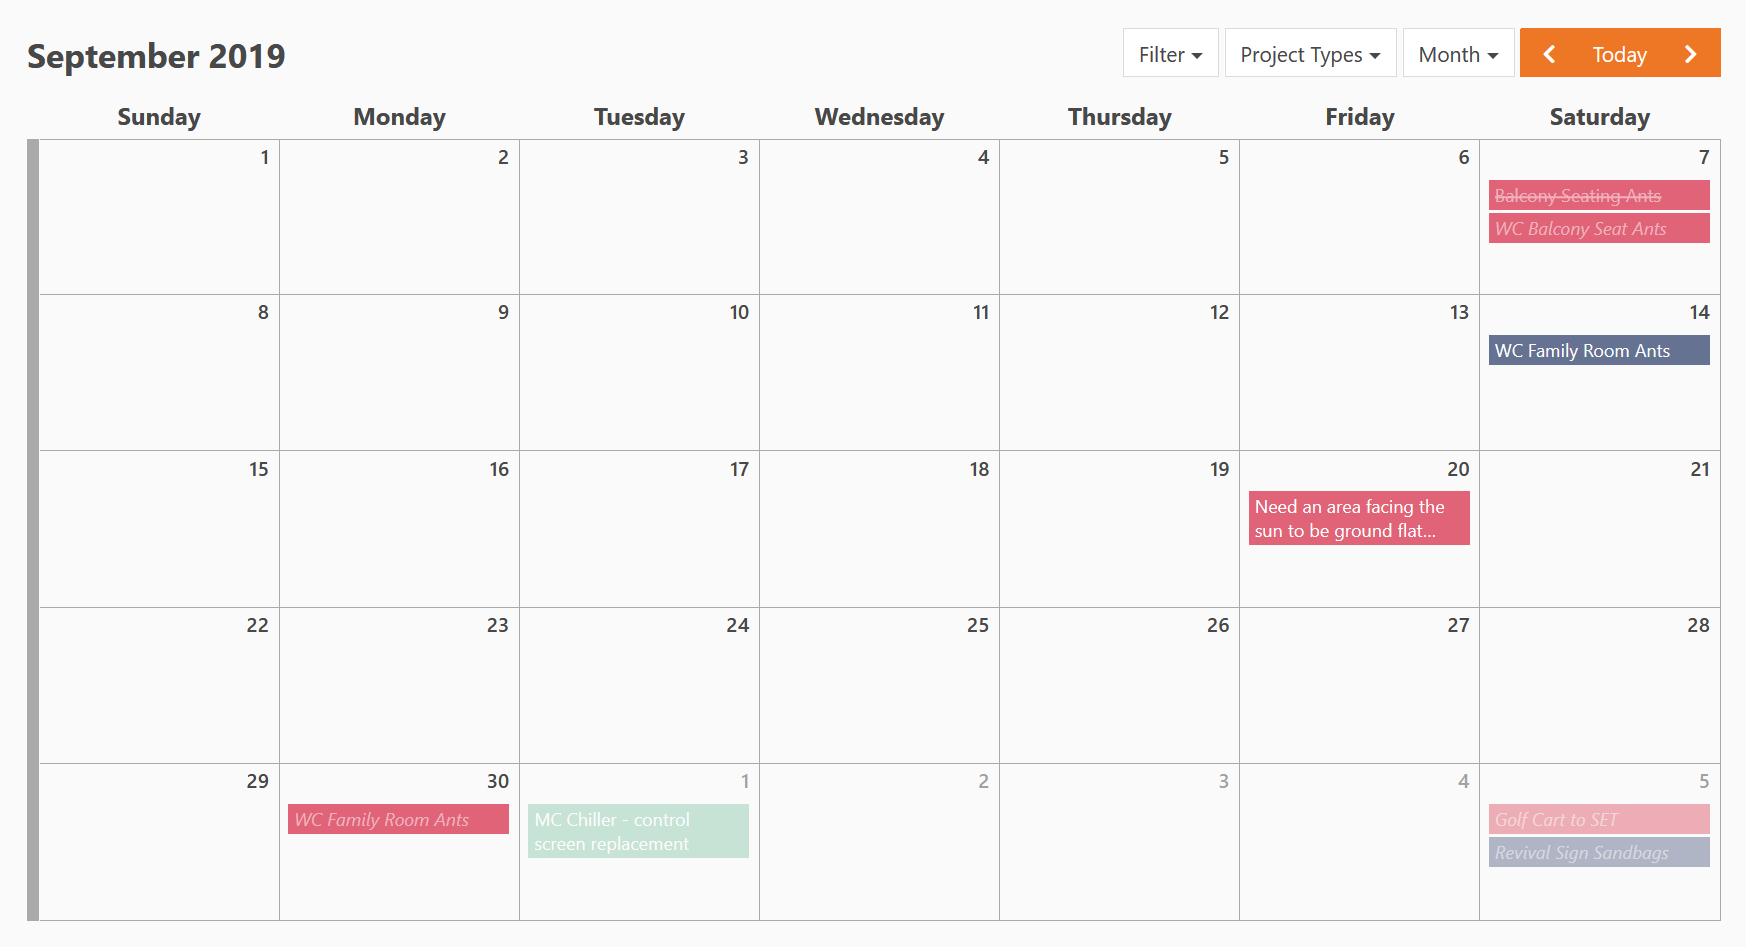
At the top of the calendar page is a row of buttons. These are your filter and navigation buttons.
The Filter drop down will let you filter which projects and/or tasks you want to see. By default everything will be shown to you but you can select to show just projects, or just tasks. You can also specify that you only wish to see those projects and tasks assigned to your or requested by you. Since tasks do not have a Requested By field, it will use the owning project's Requested By for filtering purposes.
Next in your bar is another drop down that contains all the project types to be displayed. This drop down also acts as a color legend so you can tell what project type an item on the calendar is based on it's color.
Moving on to the next drop down, this lets you change your view between a full month view and a week view. The month configuration is great but sometimes it might be too much information and just become a distraction. If you are just interested in knowing what is coming up this week, you can do just that and view only a single week at a time.
[!TIP]
When viewing the calendar a month at a time, you will notice the left edge has a rather thick border. If you hover on this border you will see it change color. Clicking on a week's left-edge border will instantly switch you to week-view for that week.
Finally you have the navigation buttons. These work just like you would expect, they move to the previous and next months (or weeks) and also have a Today button in the center that quickly takes you to a view that includes today.
And don't worry, you can quickly go to the details of a project or task by simply clicking on it!
Each item on the calendar has a few styles associated with them to help you understand the state of that task or project. First off, in the month style view any item that exists in a different month will have both it's background and foreground colors dimmed. For example, if you are looking at November and the calendar includes October 31, then any tasks or projects on October 31 will show as dimmed out.
Additionally, if an item has been completed the text color will be dimmed out and show as italicized. An item that was cancelled will have it's text color dimmed out and show a strike-through in the text.