Workflow Actions
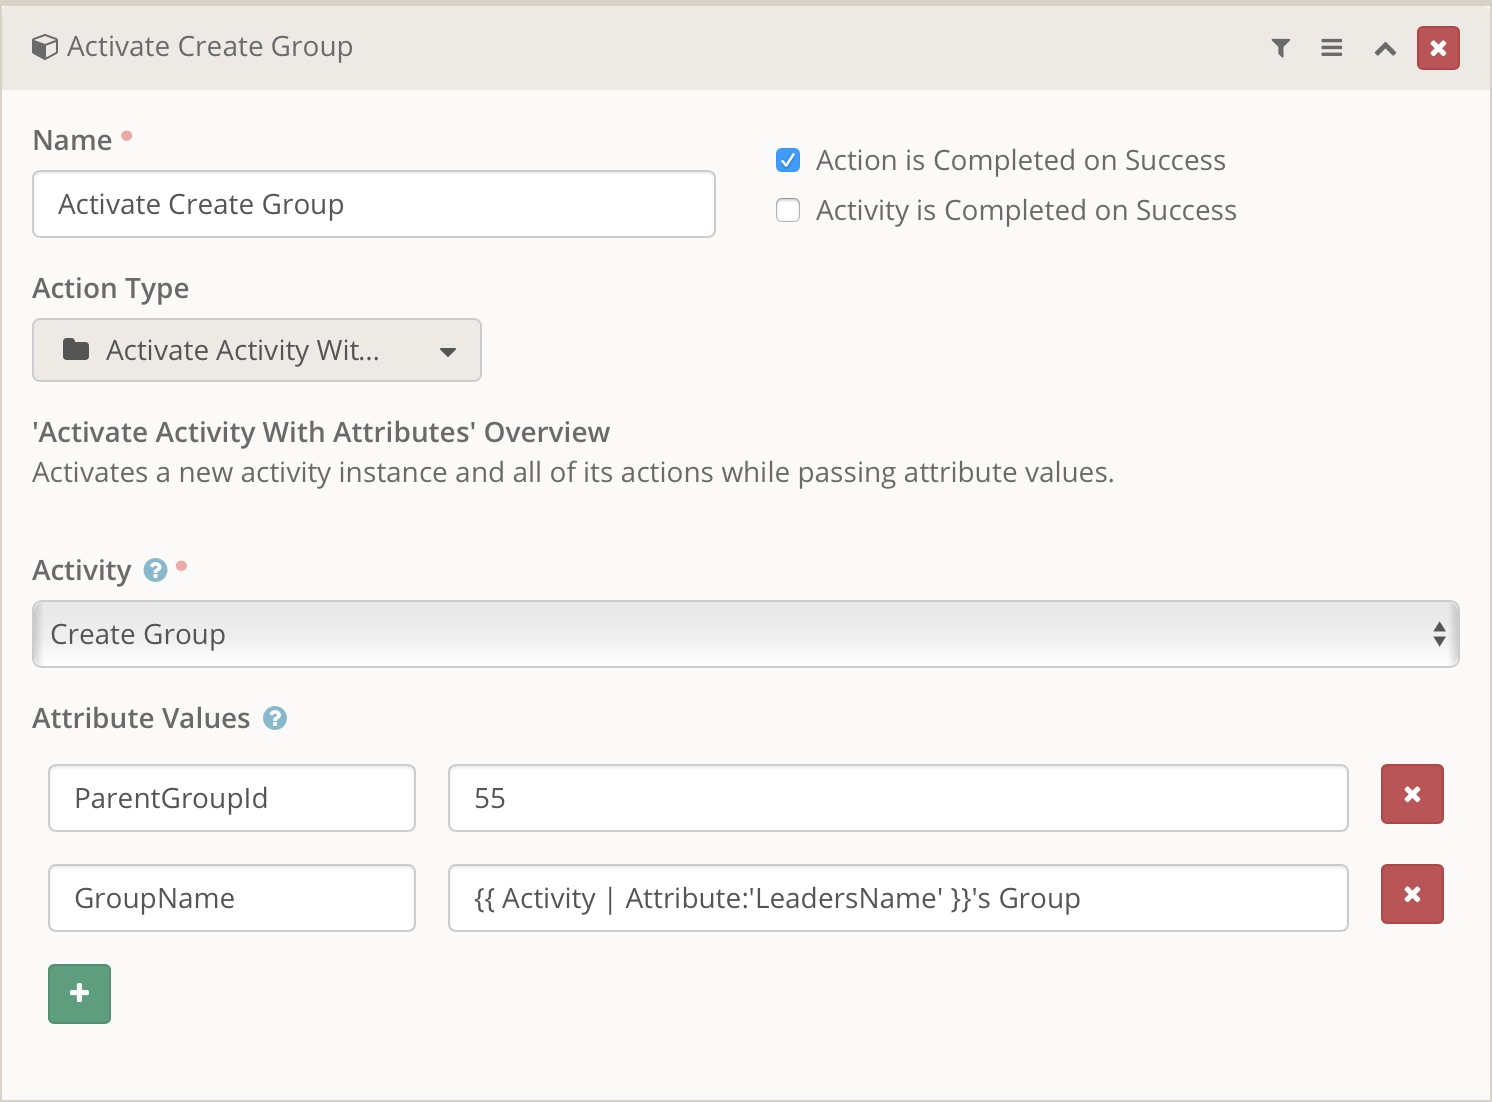
Activate Activity With Attributes
This action provides very similar functionality to the Activity Activity except it provides the ability to also pass in initial values for any Activity Attributes. Much like the Activate Workflow can already do.
For example, let's say you have an activity that performs a specific set of actions which you need to do multiple times. Each time you do those actions they are almost identical except for a different value that will be used. In a more specific example, lets assume these actions are creating a Group and adding a leader to the group. Well the most common values that would change would be the the parent group and the name of the new group.
Using this action would allow you to put all the actions involved in creating a group into a single activity. This activity has now become, in programming terms, a self contained function. But for simplicity, think of it like a Lava Shortcode. You've created something that can be reused multiple times in your workflow. You just need to call it and pass in different values to let it do it's work.
Certainly, creating a group and adding a leader to it is only two steps. But imagine an activity that does even more. Such as setting security, which could take multiple actions to get all set correctly. When you have a "process" that takes 5 or more actions, you don't want to keep duplicating those. Each time you do so it's even more work later when you are asked to make a "small change" to it.
Below is a sample image of this activity in action and an example of how to use it.
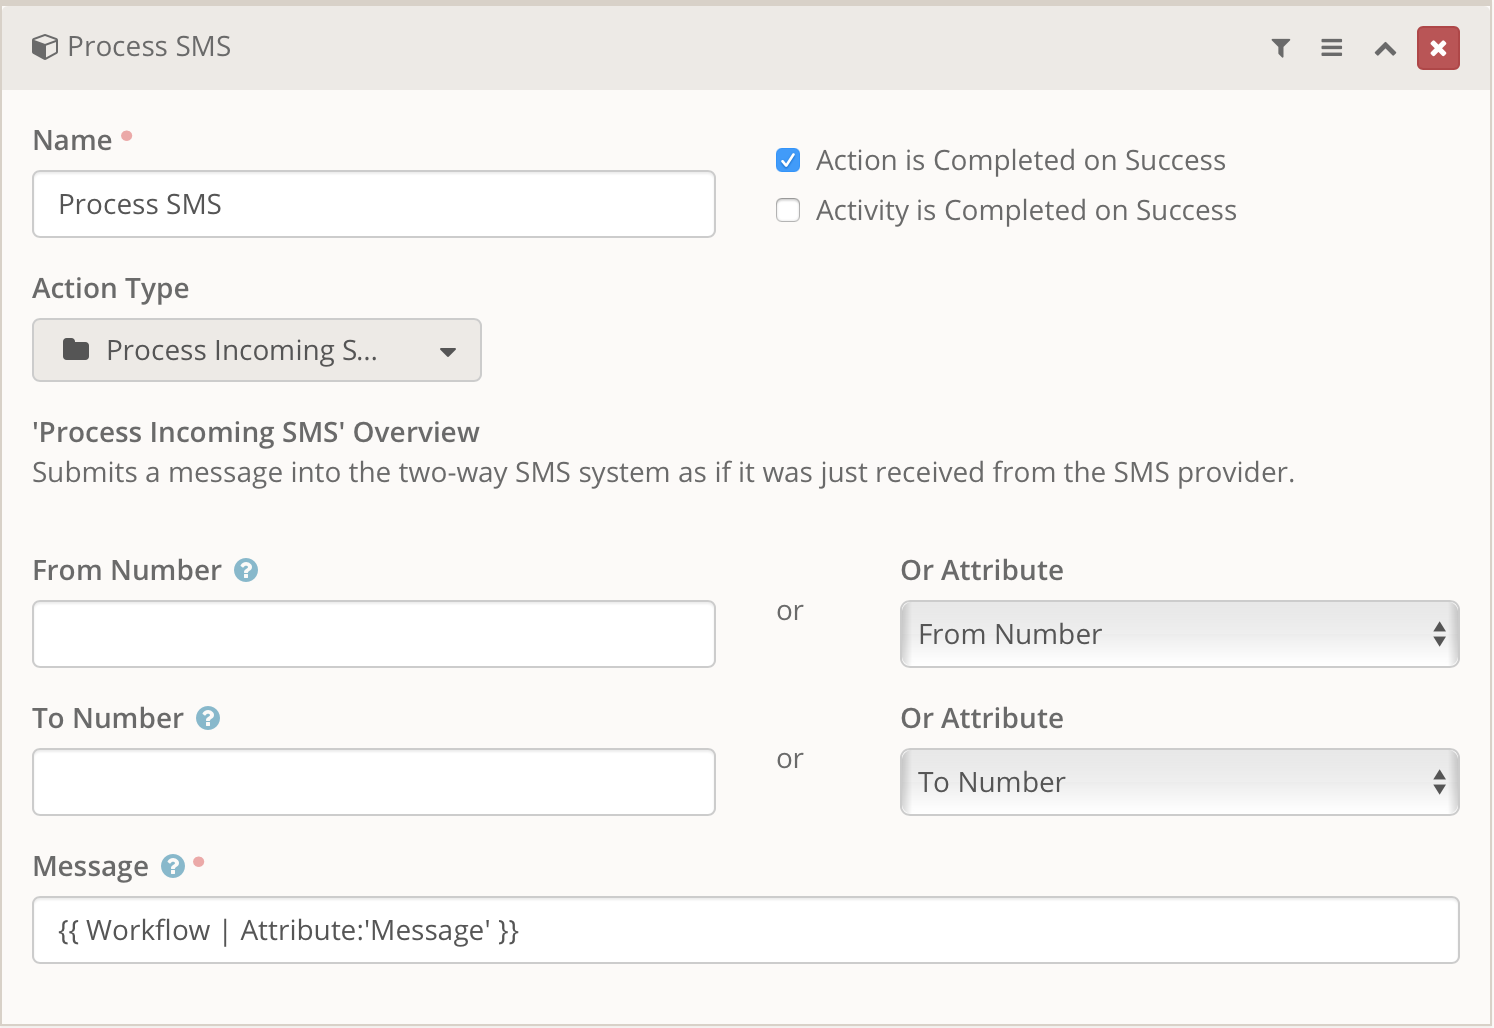
Process Incoming SMS
Rock is great at handling SMS. It has built-in two-way communication and as of v7 also has built-in the ability to process an incoming SMS via a Workflow. This lets you do some pretty powerful stuff. But there was one nagging thing missing that made it a bit difficult to use. The two features could not be used together on the same number. You could either process incoming SMS messages as a Text-To-Workflow style or with the Two-Way style.
Now you can do both. Your Text-To-Workflow workflow can now make it's own decision if it should process the message as a keyword message. If not, you can use this action to send the message into the Two-Way processing system. You can even bypass SMS altogether and build a workflow that asks the user to type in a message and process it as if it came from their cell phone (you would want to make sure they have a cell phone with SMS enabled so they can get any reply, but that is up to you).
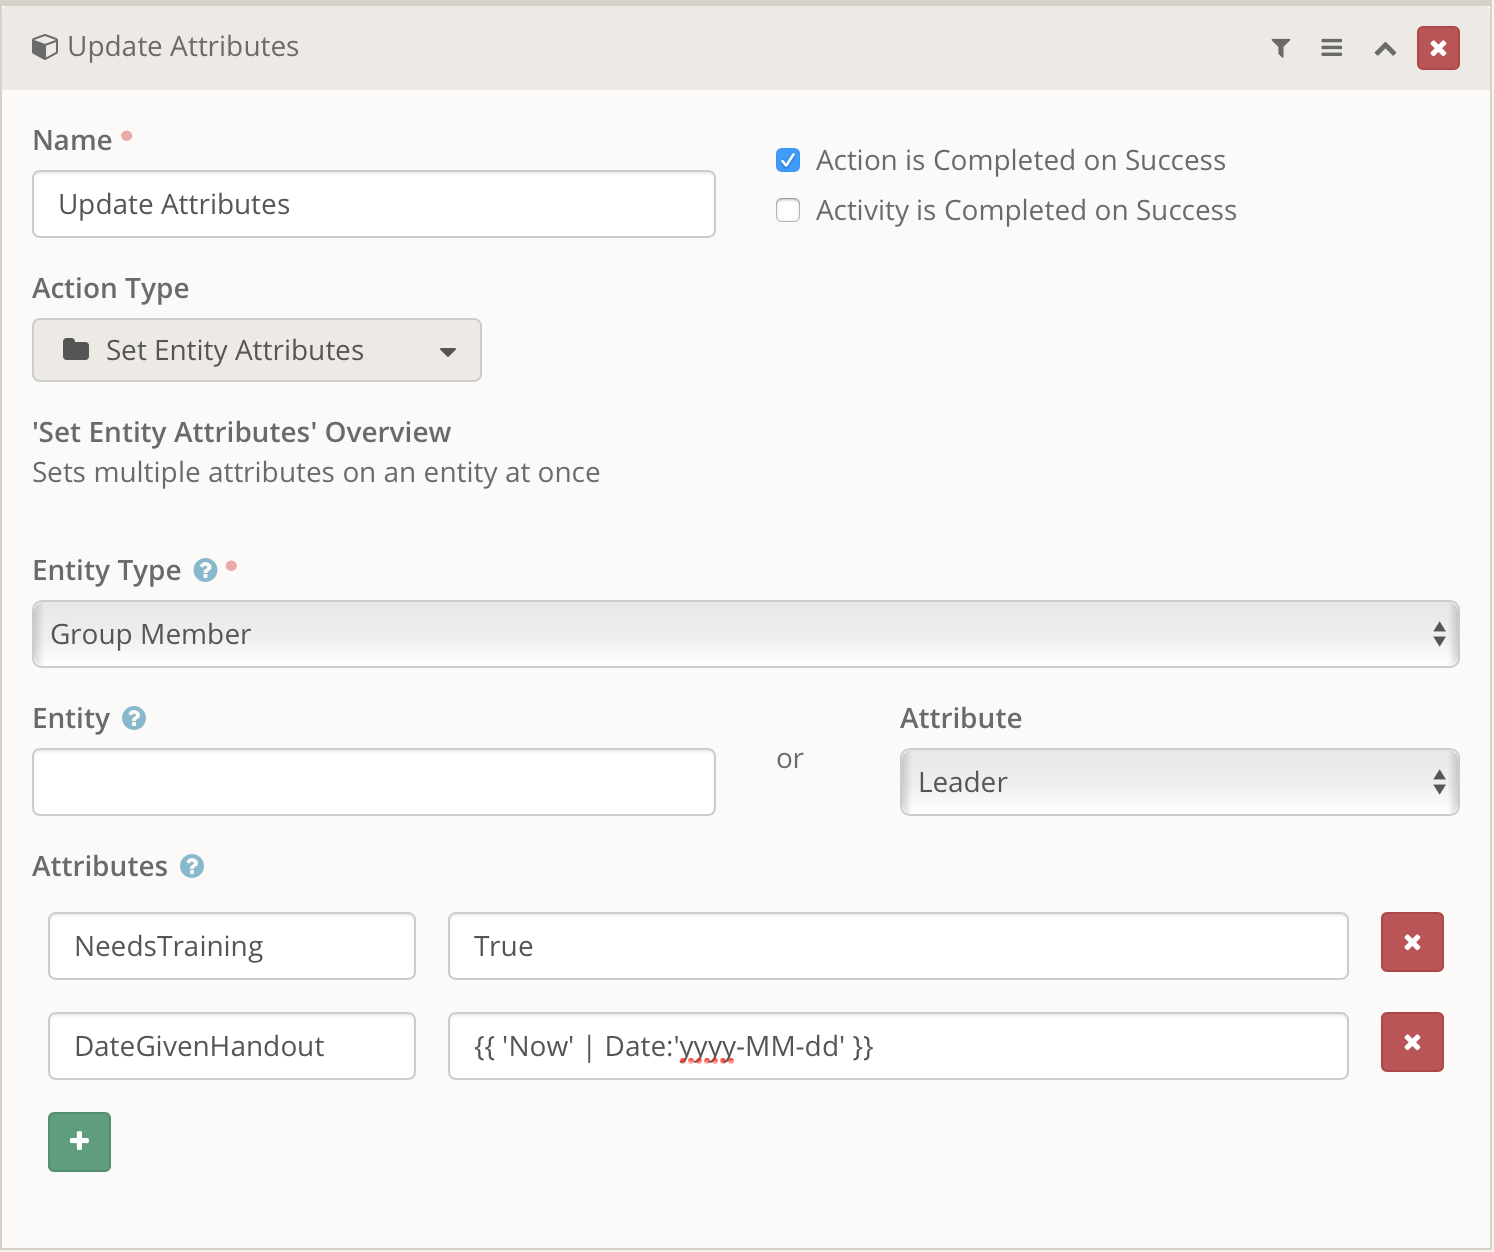
Set Entity Attributes
Okay, there is already a Entity Attribute Set action in Rock v7, so why is there another? Well the action that comes out of the box only allows you to set one attribute at a time. Imagine how many actions that would take if you needed to configure a Fundraising group. You might easily end up needing a dozen actions.
This action provides the same functionality but lets you set multiple attributes at the same time. Thus removing a huge number of actions from your workflow. At the same time it reduces the load on your database as you don't need to load the same entity repeatedly.
The Entity can be specified either by it's Guid value or it's Id value. When specifying the attribute you must use it's Key value rather than it's display name.
Set Entity Properties
First, take a quick look over the Set Entity Attributes documentation for the reason why this action exists.
Now that you understand it saves you some time because you can stack multiple set operations in one action lets talk about the real power. When you use this action you will notice that specifying an existing entity is not required. If you do not specify an existing Guid or Id value then a new entity of the selected type will be created in the database and given the property values specified.
This means you can create any entity in the database you wish. Finance Accounts, Fundraising Groups, Event Registrations, Calendar Items, the sky is the limit. When the action completes it will put the entity's Guid or Id into the attribute you specify. So if you need to set some attributes on the entity after it has been created you can use this attribute value to then call the Set Entity Attributes action.
The Entity can be specified either by it's Guid value or it's Id value. When specifying the property you must use only properties that are database backed. For example, in the case of a Group you must set the ParentGroupId and not the ParentGroup. Only the ParentGroupId is actually saved to the database.
I recommend you install the Model Map block on a page, possibly under the Power Tools page. It is very helpful when working with this plugin as it tells you the property names of the entity and if they are required or not.
The example below is of creating a new Group. To edit the properties of an existing group you would just specify the Id or Guid of the existing group under the Existing Entity.
Examples
Create a Group
In this example we cover creating a new Group. We will be setting the initial Name, Parent and Group Type, each using a slightly different method of setting the data. First, our workflow will have the following attributes defined. I will be setting default values in the first two but you would probably be presenting them on a User Entry Form and having the user fill them in.
- Group Type - This attribute has a field type of
Group Type and will contain the user-selected group type to be created. This could also be something that you set the default value for and conditionally change rather than asking the user to select the appropriate group type.
- Group Name - This attribute has a field type of
Text and contains what the user wants the new Group to be named.
- New Group - This attribute has a field type of
Group and will contain the new Guid of the group that was created. Using a field type of Group allows you to work with the group in a later action that expects a group (for example, the add member to group action).
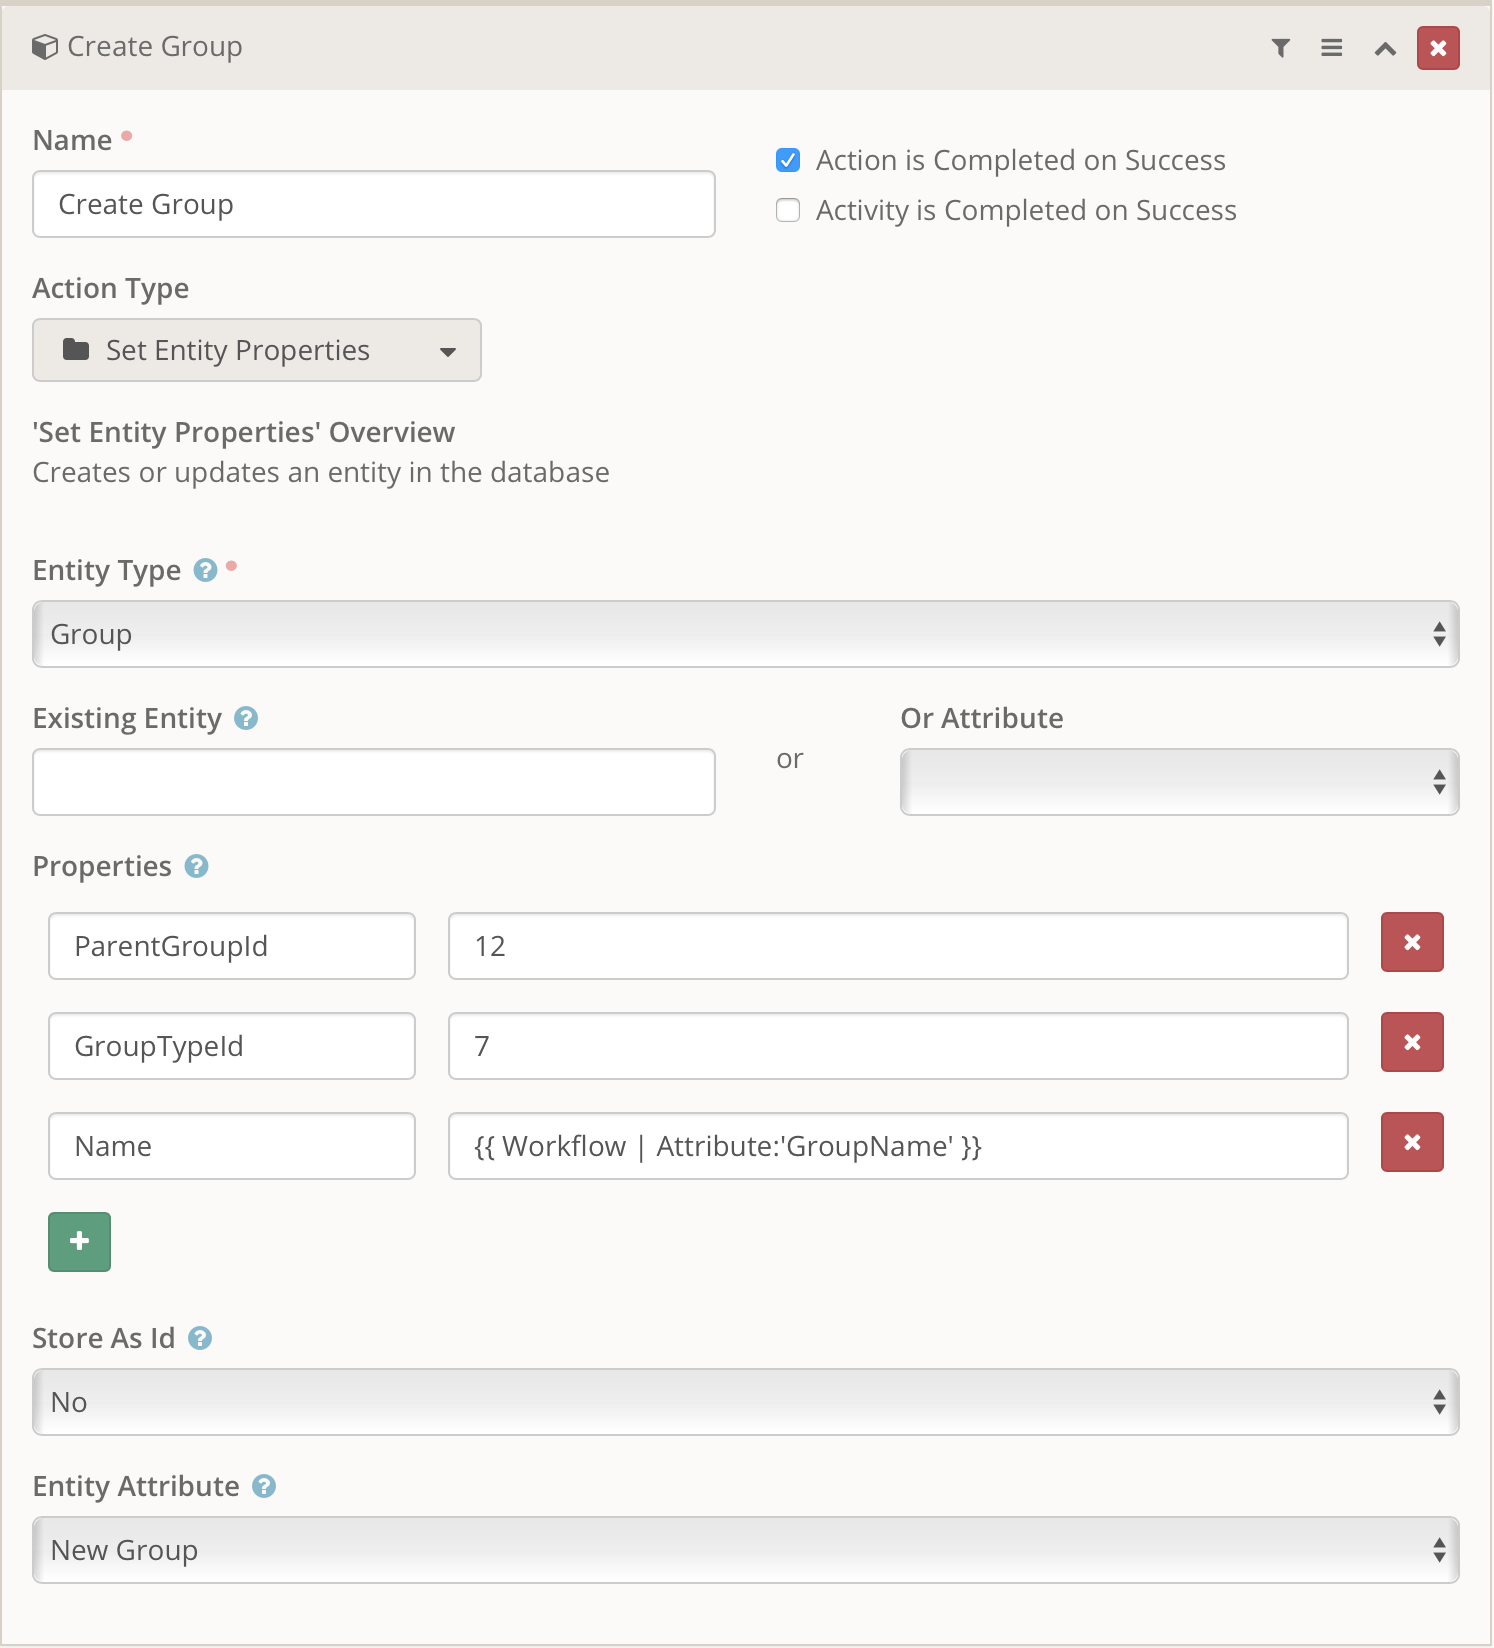
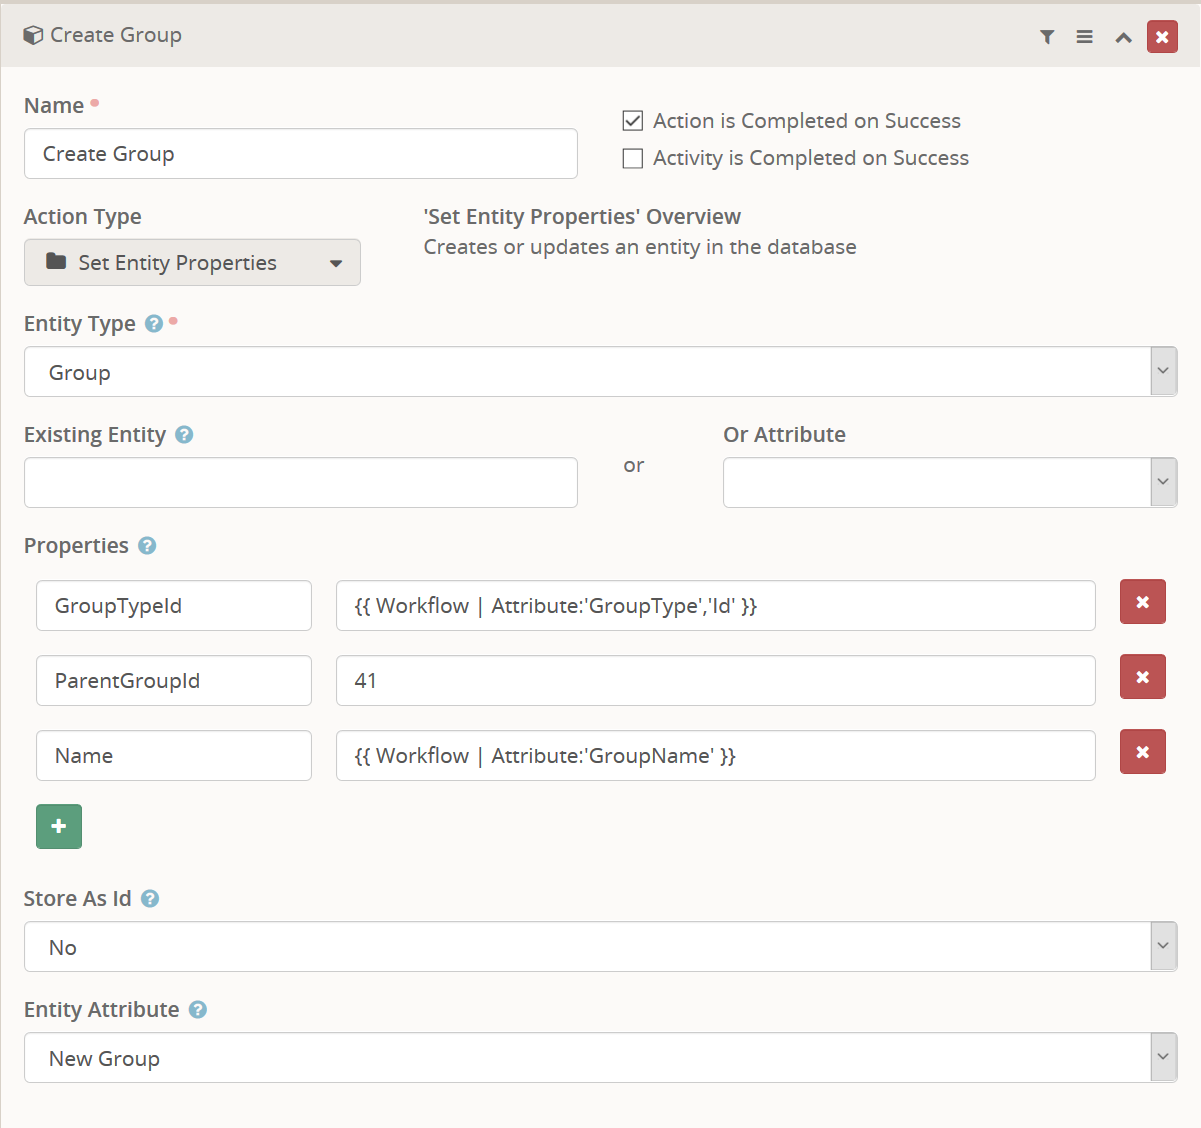
Now that we have our attributes defined, lets move on to the action of creating the group. You will need to set your Set Entity Properties action configuration values as follows:
- Entity Type = Group
- Properties
- GroupTypeId =
{{ Workflow | Attribute:'GroupType','Id' }}
- ParentGroupId =
41
- Name =
{{ Workflow | Attribute:'GroupName' }}
- Store As Id = No
- Entity Attribute = New Group
So our entity type is of course Group as that is what we want to create. We are creating a brand new Group so the Existing Entity field is left blank. We are storing the new entity identifier in the New Group attribute, and since that attribute expects a Guid value we make sure to set the Store As Id to be "No" so that it stores the Guid value.
We set the GroupTypeId property to the Id of the selected Group Type. Because the field type of the attribute we are using is whats known as an "entity attribute", we can use the syntax above to get the Id property of that group type rather than the name (which is what would normally be returned). Next we have the ParentGroupId hard coded to 41, which on my system is the Id of the "General Groups" top level group. Finally, we set the Name of the new group to be whatever the user has entered in the Group Name attribute.
Our final action should look something like what we have below.
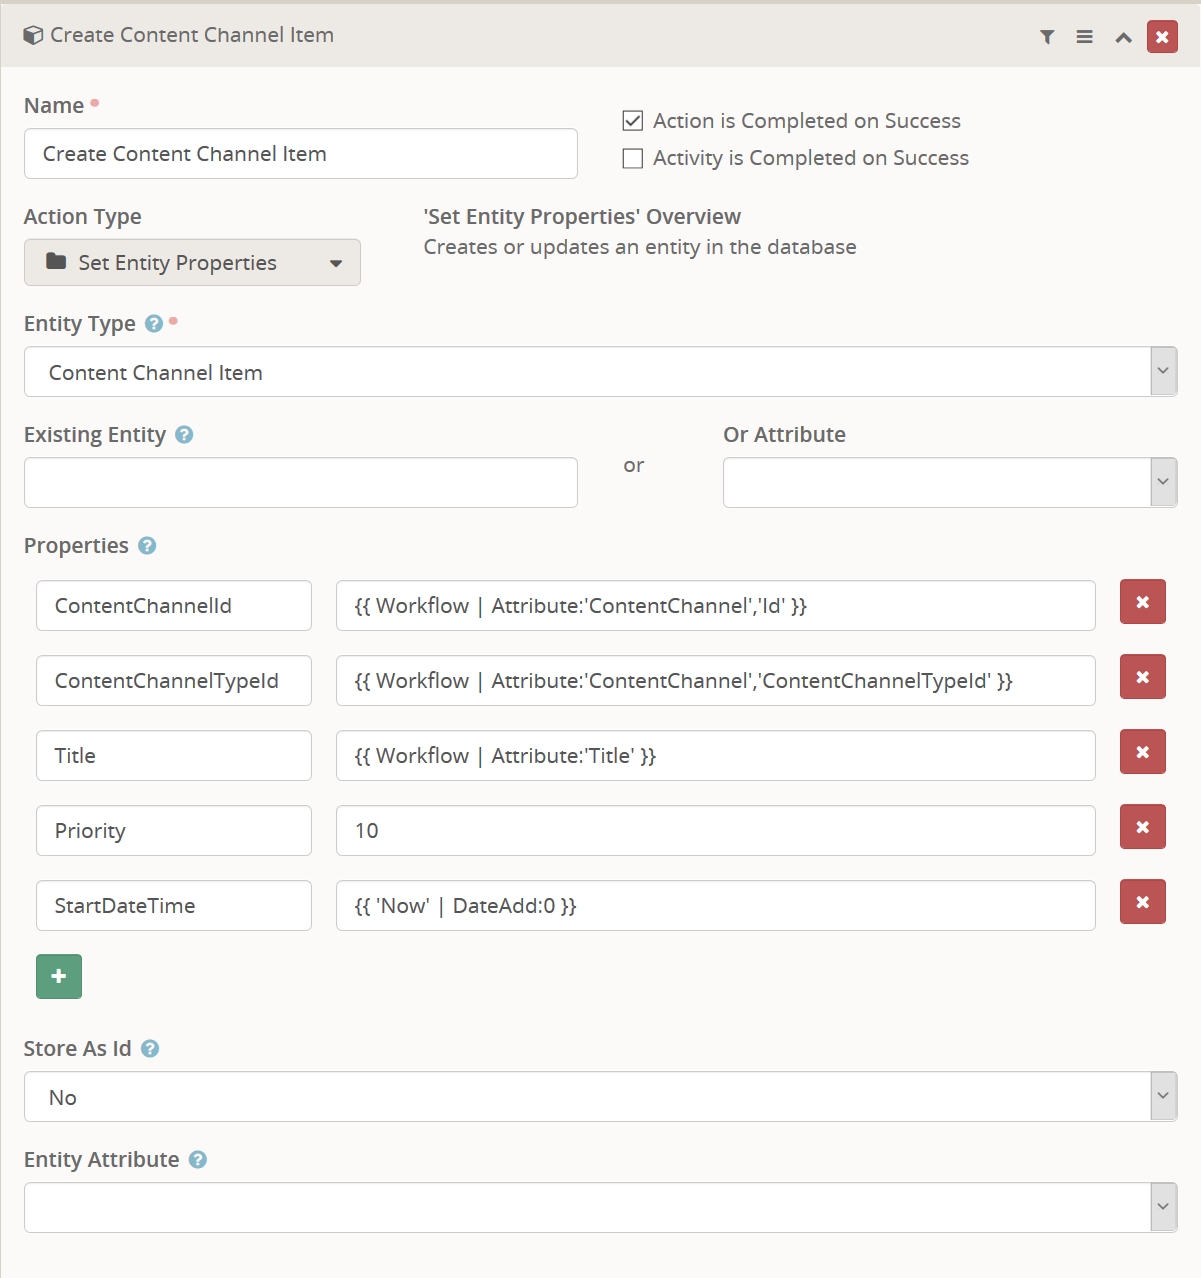
Create a Content Channel Item
In this example we tackle creating a new Content Channel Item in a workflow. Let's assume you are letting a staff person select the Content Channel and then enter the title for the new item and then the workflow will generate the rest of the data (such as the Content, dates, etc) automatically based on other information we have in attributes already. In such a situation, we would have (among others) the following attributes defined.
- Content Channel - This attribute has a field type of
Content Channel and will contain the user-selected content channel the new item will be placed in.
- Title - This attribute has a field type of
Text and contains what the user wants the new item to be titled.
Notice we do not have an attribute defined to store the new Content Channel Item identifier. In this case we are omitting it as an example of needing to simply create a new item without making any further changes or references to it. Now that we have our attributes defined, lets move on to the action of creating the Content Channel Item. You will need to set your Set Entity Properties action configuration values as follows:
- Entity Type = Content Channel Item
- Properties
- ContentChannelId =
{{ Workflow | Attribute:'ContentChannel','Id' }}
- ContentChannelTypeId =
{{ Workflow | Attribute:'ContentChannel','ContentChannelTypeId' }}
- Title =
{{ Workflow | Attribute:'Title' }}
- Priority = 10
- StartDateTime =
{{ 'Now' | DateAdd:0 }}
- Store As Id = No
So our entity type is of course Content Channel Item as that is what we want to create. We are creating a brand new item so the Existing Entity field is left blank. We are not storing the new entity identifier so that is left blank. The Store As Id makes no difference, but that is the default value shown above. For the properties of the new entity...
We set the ContentChannelId property to the Id of the selected Content Channel. Because the field type of the attribute we are using is whats known as an "entity attribute", we can use the syntax above to get the Id property of that content channel rather than the name (which is what would normally be returned). Next we have to get the ContentChannelTypeId property a value, we use the same kind of syntax to get the ContentChannelTypeId of the Content Channel attribute/object.
Next we set the Title to use the value entered by the user for the title of the new item. After that we set the Priority to the hard coded value of 10 and the StartDateTime to be the current date time. The syntax {{ 'Now' | DateAdd:0 }} is a trick to get the current date and time without having to manually format it. We are adding "0" to the current timestamp and it returns a string to that can be used to set the date property.
Our final action should look something like what we have below.