Export Data
You will find this page under Admin Tools > Installed Plugins > Data Toolkit.
This page allows you to export any Rock entity to either a CSV or JSON
formatted file. When you first select an Entity Type it will
automatically configure all the properties of that entity type as
columns to be exported with their default values. Don't worry, you can
modify this set of columns. You can re-order the columns, add new
columns or remove columns entirely. Once you have your export configured
you can even save it as a preset if you think you will use it again
later.
Here is an example of the export page that is using a preset to
define a sub-set of columns when exporting the Defined Type entity:
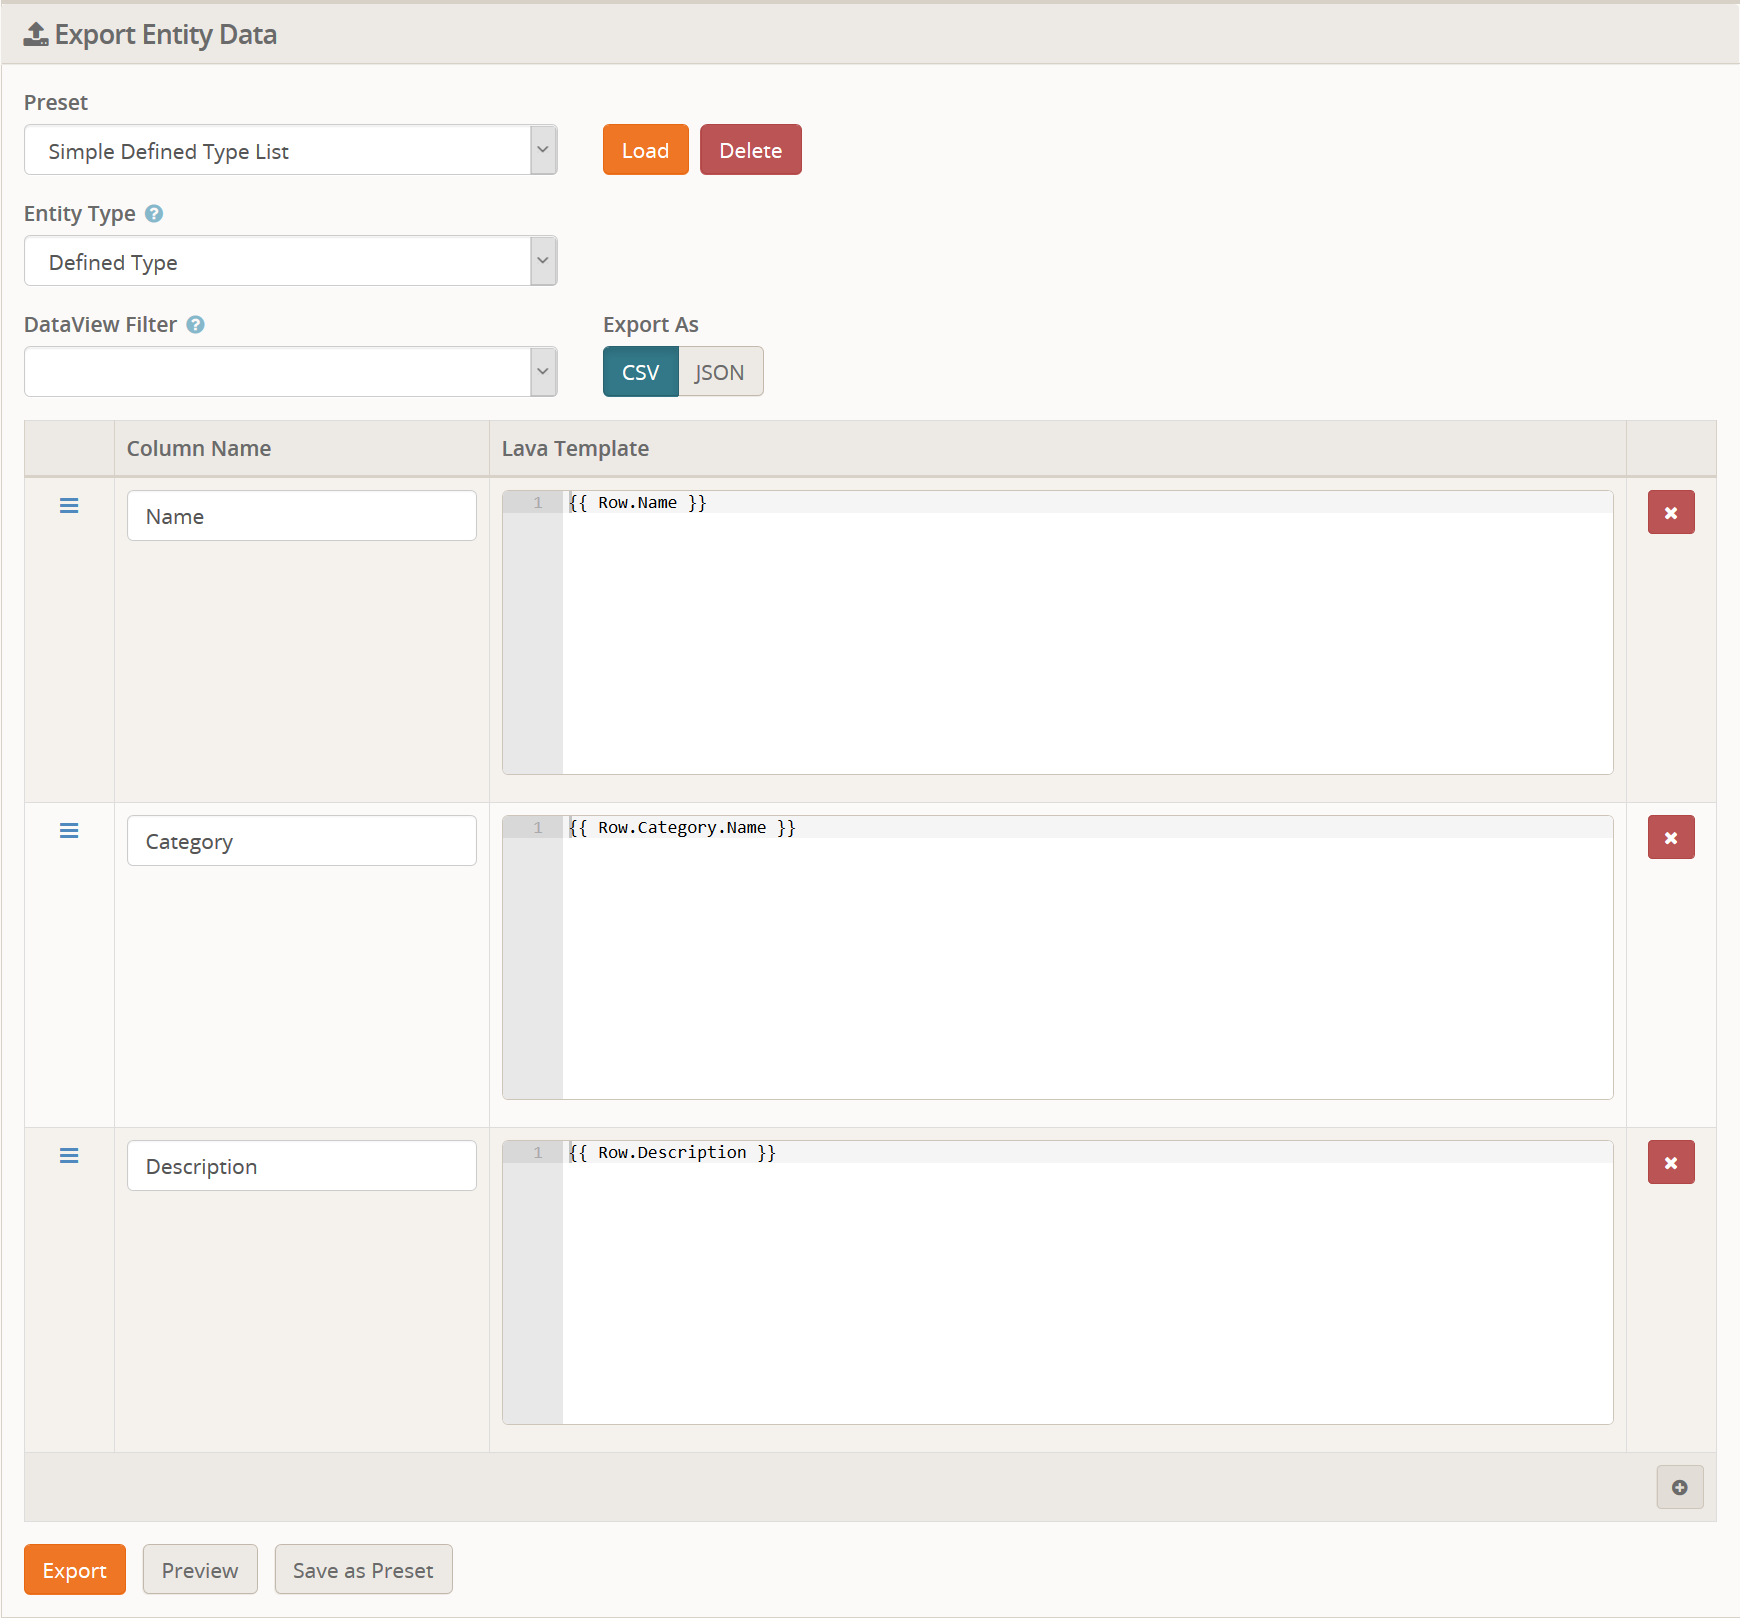
As you can see, we are only exporting three columns, even though
there are more available. Specfically, you will notice that we are not
exporting the Id or Guid properties, among some others. Another thing to note is the use of Lava in the Category
column. The Defined Type entity stores the Category Id, but that isn't
very useful to us. So we use Lava to reference the Category and it's
name.
Hopefully that screenshot has wet your appetite for what you an do with this.
Export Options
Preset
You can have any number of presets configured, so feel free to add as
many as you want. A preset will restore the Entity Type, DataView
filter, Export As, and the column list. So your entire configuration can
be saved and re-used later without having to remember any specific
settings.
Entity Type
This is what you want to export. In our example, we are exporting a list of Defined Types.
DataView Filter
Yep, you read that right. Let's say you wanted to export all the
Small Group records. A Small Group is a type of Group, but so is a
family and a dozen other things you don't care about. In this case, you
would create a Data View that filters your Groups to only those you
actually want to export. This isn't just limited to Groups, you could
for example create a Data View to filter the Defined Types to a specific
category, you are only exporting one categories worth of data.
Export As
This one is pretty straight forward. You can export as either CSV
(Comma Separated Values) or as JSON. 99% of the time you are probably
going to export as CSV, but if you ever need to export as JSON, you can!
Columns
This is where things get really interesting. By default, the list of
columns will be populated for you to export all the data for an entity
type. You probably don't need everything so if you want to trim things
down a bit you can remove columns you don't need. You can also add new
columns. For example, say you wanted to have both the Category Id and the Category Name. It's a single property in the database, but you can create two columns, one for each.
As we mentioned, you can use Lava to customize the export. Every item you are exporting is the Row
- just like if you were doing a merge template. Therefore, to export
the category id of the Defined Type, you would use the Lava {{ Row.CategoryId }}. Since Lava can also traverse objects you can get the category name by using {{ Row.Category.Name }}.
But what if you need to do more? Say you need to supply a default
category name if one doesn't exist? Sure thing, just use standard Lava.
{% if Row.Category and Row.Category != null %}{{ Row.Category.Name }}{% else %}Default{% endif %}
In order to make your life easier, we pass the merged Lava data through the Trim() method with removes any white-space at the beginning or end of the string. This should help when doing complex lava.
One final thing to note about the Lava, there is a block setting
which allows you to specify which Lava Commands are enabled for use. By
default none are enabled for security reasons, but you can enable any
Lava command you want and use it, even the web request (though why you
would I don't know).
Exporting
The Preview button will give you a preview of what the first 10 rows
of data will look like. This displays as a Rock grid so it is simply a
way to check your Lava and make sure it's doing what you expect before
you export out the entire 3,000 items of your selection.
Once you are happy with the preview of the data, click the Export
button to begin exporting. You will get an on-screen progress of how
many rows it needs to export and how far along it is. When it's done you
will be provided with a button to download the data file.
Import Data
You will find this page under Admin Tools > Installed Plugins > Data Toolkit.
This page allows you to import any Rock entity from either a CSV or
JSON formatted file. This can either be a file generated from the Export
Data page or a file that came from a 3rd party solution.
CSV files are the wild west. The format of them is pretty loose, but
we think we have covered most of the bases. If you are having issues,
you might try the https://csvlint.io/ site and see if it thinks your file is valid.
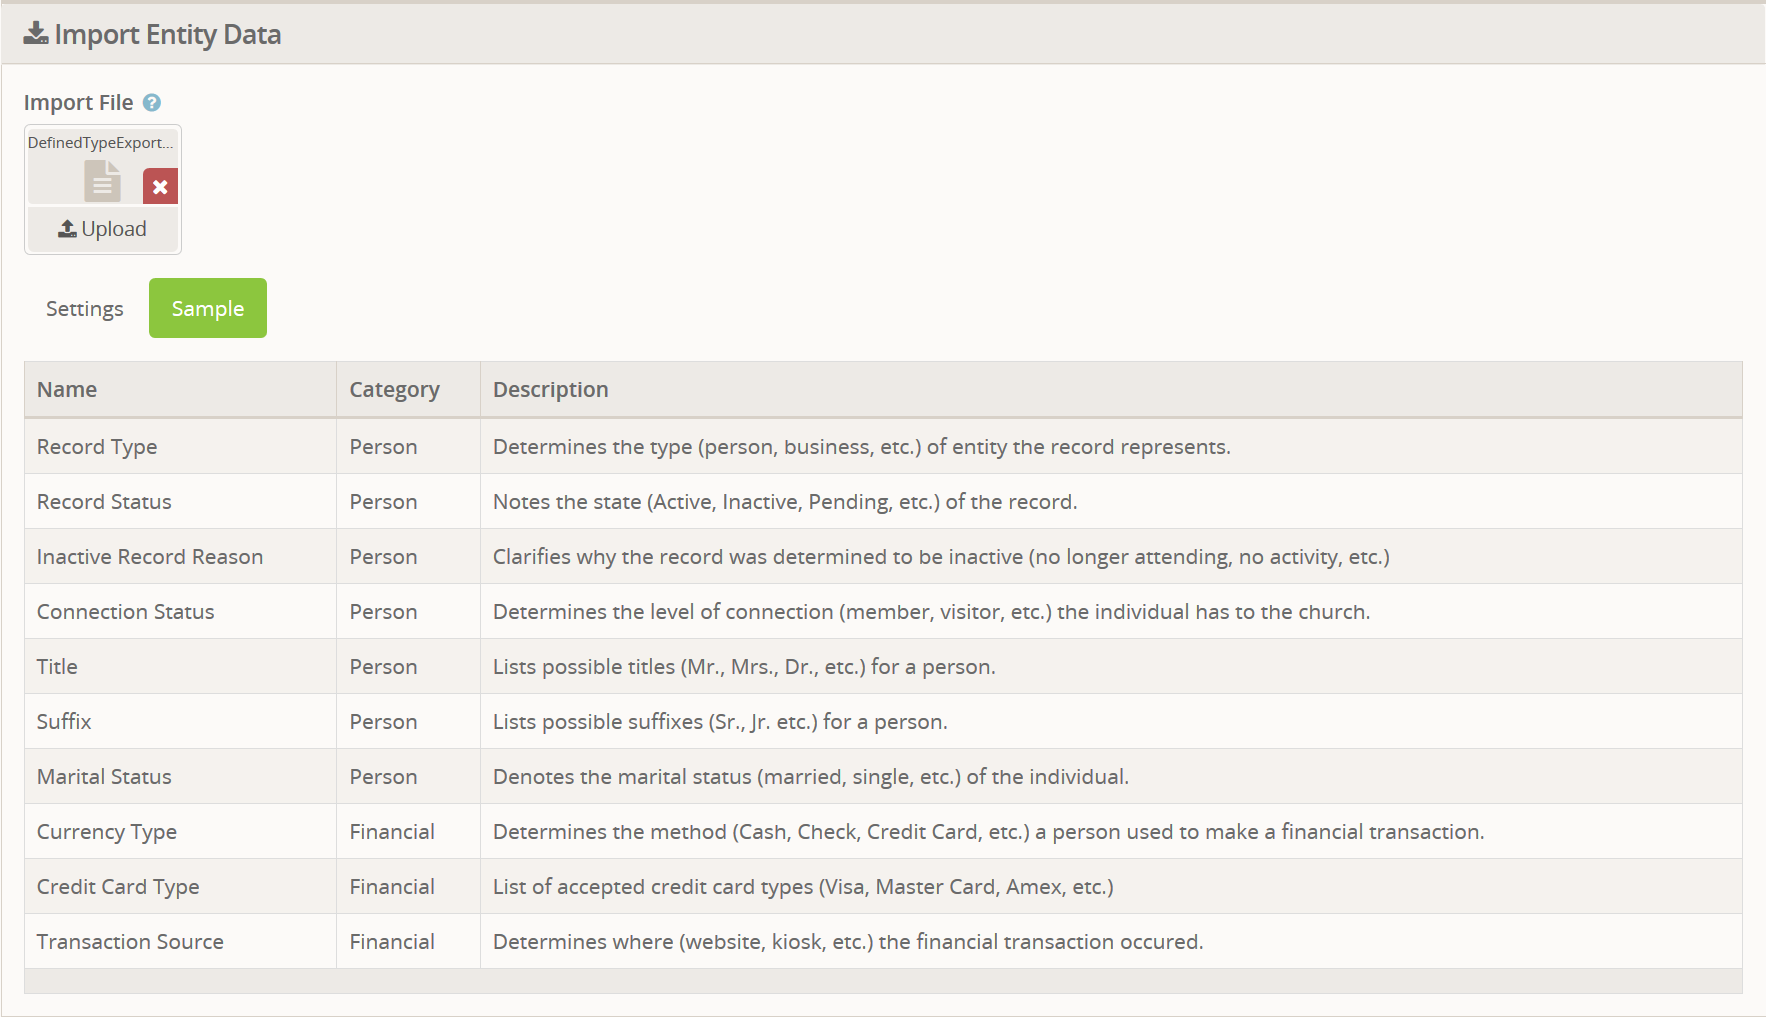
When you first upload a file it will be scanned so that it knows what columns are available. If you click the Sample
tab, you can see a sample of the first 10 rows of the file as well as
the column names it identified. This can help you to know that your file
is (probably) one that can be imported. A sample from our previous
export might look like this:
Import Settings
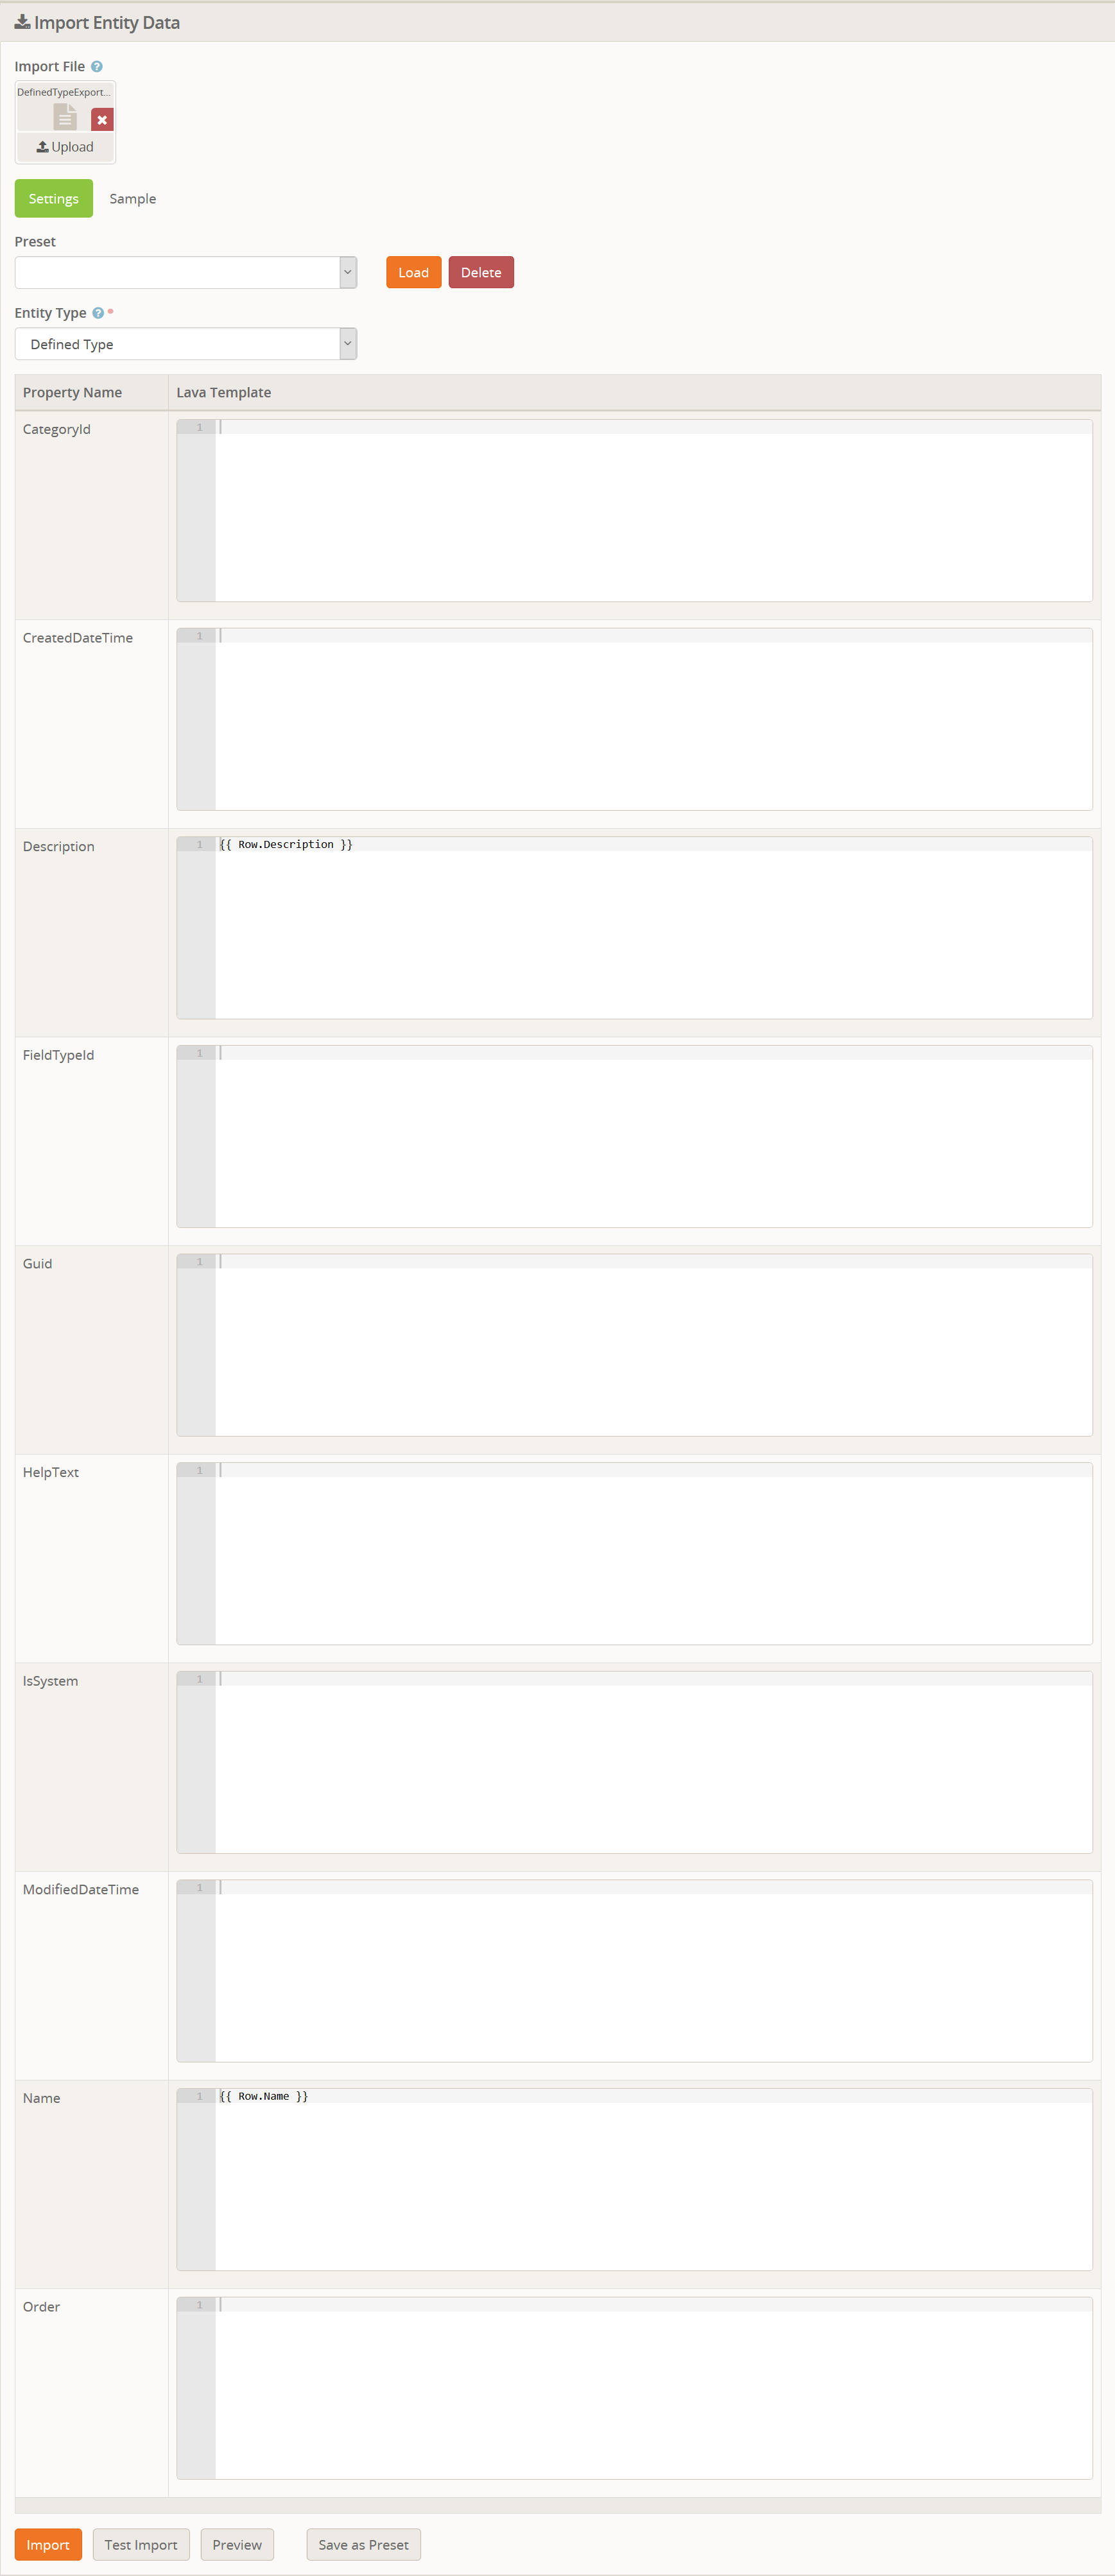
The screenshot for this is huge, so I will include it at the end for reference.
Preset
You can have any number of presets configured, so feel free to add as
many as you want. A preset will restore the Entity Type and the column
settings. So your entire configuration can be saved and re-used later
without having to remember any specific settings.
Entity Type
This is what you want to import. In our example, we are importing a file of Defined Types that we previously exported.
Columns
Things are a bit more hectic on import, from a visual standpoint.
Every property of the selected entity will be listed. You cannot
re-order them and you cannot delete them. If you do not want a value set
then leave the Lava Template blank and it will be ignored.
The Lava Template works the same as it does for the Export page. That
is, each row of data being imported is referred to by the lava variable
Row. So if you want to reference the Name column, you would use the Lava syntax of {{ Row.Name }}.
As with the export page, you can use any valid Lava including filters
and entity commands (if you enable them in the block settings).
When you select the Entity Type, it will automatically fill in the
Lava Templates for any properties that match a column name in the data
to be imported. If you look at the screenshot below, you will notice
that it only filled in the Name and Description even though our file included a third column for the Category. The reason for that is the data file used the column name of Category whereas the property name is CategoryId.
If you wanted to import everything into a single category, you could just type in the Id number of the category for the CategoryId
property. If you wanted it to be dynamic, you could write up some Lava
with Entity Commands to search for a category that matches the name in
the Row data.
For another example, lets say you have two files. One for the
Categories and one for the actual data. The first file has a unique
identifier for the category which is referenced in a column in the data
file. On import, you could assign this unique identifier to the ForeignId column. Then when importing the data file you could use entity commands to locate that category and snag the Rock Id of it.
Importing
Okay, now back to the fun part. Actually importing the data. Once again there is a Preview
button that will give you a preview of the top 10 rows of data that
would be imported. This is different than the Sample we looked at
previously. This preview is after any Lava merging happens and it shows
what the Entity will look like after the data has been imported
into it. It's not a perfect preview, but it should again help give you
an idea as to whether your Lava is correct.
Next, we recommend you run the Test Import. This is
identical to a full import, but it does everything in what is called a
"transaction". Once the test import is finished it rolls back the
transaction so the database is in the state it was before you imported.
This will let you see if there are any errors during the import without
actually running it.
Finally, when you are ready to really import everything you can click the Import
button and it will begin the import process. This will do everything
the exact same as the Test import did, but when it's done it will commit
those changes to disk. If any single entity (row) cannot be imported
because of an error, the entire import will be aborted - including any
rows that were already imported. This means if you are importing 100
rows and row 53 has an error, then 0 (zero, none, not any at all) rows
will have been imported to the database. Fix the error and you can try
again.
With either a test import or a live import, if an error is
encountered it will provide details about what the reported error was as
well as a JSON representation of the row that failed to import. This
should help you track down the specific row in the file and figure out
what is wrong.
Note
There is currently no way to skip some rows on import. The entire file will be imported. For example, if you export from another system a CSV file that contains 10 rows and import that you will have 10 entities in Rock. If you then export another file that has 20 rows, 10 of which are the same as was previously exported, and you then import that second file into Rock, you will have 30 entities in Rock. We are considering a method to allow you to detect and skip duplicates but please let us know if that would be useful to you.