SQL Endpoints allow you to build custom API endpoints that use SQL to
process the request. Usually these would be SELECT type queries so you
can return a JSON object of data, but you can also do INSERT and UPDATE
statements.
Configuration
SQL Endpoints are configured in a new Defined Type called SQL API Endpoints.
Value
All endpoints will be accessed by a URL such as http://rock.rocksolidchurchdemo.com/WebHooks/SQLEndpoint.ashx/XYZ, where XYZ
is what you define the endpoint URL (Value) to be. Any hostname that
resolves to your Rock site can be used. To gain the benefits of tracking
the currently logged in person you will want to use the same host name that your user is logged into. The easiest way to achieve this is just
make your AJAX url /Webhooks/SQLEndpoint.ashx/XYZ.
So you know how you can setup routes to Rock pages, like /Person/{PersonId}
and it will go to that specific person's page? You can do the same with
these SQL Endpoints. So if you set the Value of the endpoint to /attendance/{MetricId} then requesting the endpoint at /Webhooks/SQLEndpoint.ashx/attendance/123 will provide a SQL parameter named @MetricId for your SQL statement with the value of 123.
Method
99% of the time you can probably just leave this blank and everything
will work the way you expect. But if you want to limit this SQL to only
execute for a specific HTTP Verb, you can specify that verb here.
Normally, endpoints that are asking for data from the database use GET and calls that are adding data to the database use POST or PUT. The DELETE
verb is used, as you can guess, to delete data from the database. But
there is nothing preventing you from running a SQL DELETE statement with
a GET verb.
SQL
This is, of course, where you can define your SQL to be executed. There will always be two parameters defined for you.
- @PersonId - If the user requesting access to this endpoint is logged into Rock then this will contain the Id of that Person. Otherwise it will contain the value
- @Body - If you use a
POST, PUT or PATCH request then you are probably sending data along with the request. This data will be made available as-is in the form of the @Body parameter. See below for some creative uses of this value.
Security Roles
Security is important. You want to be able to limit access to
specific data. Defined Values do not natively support security settings
so instead you can select the security roles that you want to limit
access to. If you leave this field blank then all users will be able to
access it. The user must match only one of the security roles selected
to be granted access.
One gotcha is that there is currently no way to specify "any
authenticated user". You either have to allow full anonymous access or
limit to a security role.
Optional Parameters
This is where things start to get juicy. You'll want to look over
some of the examples to see a bigger picture of how to make use of
these, but we'll cover some of the technical details right now. Required
Parameters are those that you define in the Value as part
of the route. Optional Parameters are those you want to allow the
request to specify via query string parameters. As such, they are
optional but will always be defined for your SQL code. If they are not
provided in the URL then the default value you specify will be used
instead.
To make life easier for you, we do a little automatic conversion on
optional parameters. If the value can be converted to a decimal or
integer value then it will be converted before being passed along to
your SQL. This means if you pass 123 as a query string parameter, it will be converted to an integer value of 123. If, however, you specify a value of 123g it will be left as a string because it cannot be converted to either an integer or decimal.
One final feature of optional parameters is that they can be used to
receive multiple values. For example, say we want to allow the requester
to specify which schedule's to limit the attendance data to, but we
want them to be able to specify multiple schedules at one time. In SQL
syntax this would be WHERE ScheduleId IN (@ScheduleId). If
you specify a parameter multiple times in the query string it will be
processed as an array of values. So if you sent a query string of ?ScheduleId=4&ScheduleID=7 then you would effectively end up with this SQL: WHERE ScheduleId IN (4,7).
Note
When specifying the names of the optional parameters, do not include a leading @ character. That will be added automatically.
Examples
Weekend Service Attendance
Okay, lets assume you have a number of metrics for holding Adult
Attendance, High School, Middle School, etc. all the way down to
Nursery. Let's call these Metric Ids 720, 721, 722, 723 and 724. Each
metric has two partitions. One for campus and one for Schedule. We want
to create an endpoint that allows us to retrieve attendance data from
those metrics.

SELECT
    [MV].[MetricID],
    [MV].[YValue] AS [Value],
    [MV].[MetricValueDateTime] AS [DateTime],
    [C].[Name] + ' ' + [S].[Name] AS [Name],
    [C].[Name] AS [Campus],
    [S].[Name] AS [Schedule]
    FROM [MetricValue] AS [MV]
    INNER JOIN [Metric] AS [M] ON [M].[Id] = [MV].[MetricId]
    INNER JOIN [MetricPartition] AS [MPCampus] ON [MPCampus].[MetricId] = [M].[Id] AND [MPCampus].[EntityTypeId] = 67
    INNER JOIN [MetricValuePartition] AS [MVCampus] ON [MVCampus].[MetricValueId] = [MV].[Id] AND [MVCampus].[MetricPartitionId] = [MPCampus].[Id]
    INNER JOIN [Campus] AS [C] ON [C].[Id] = [MVCampus].[EntityId]
    INNER JOIN [MetricPartition] AS [MPSchedule] ON [MPSchedule].[MetricId] = [M].[Id] AND [MPSchedule].[EntityTypeId] = 54
    INNER JOIN [MetricValuePartition] AS [MVSchedule] ON [MVSchedule].[MetricValueId] = [MV].[Id] AND [MVSchedule].[MetricPartitionId] = [MPSchedule].[Id]
    INNER JOIN [Schedule] AS [S] ON [S].[Id] = [MVSchedule].[EntityId]
    WHERE [MV].[MetricId] IN (720, 721, 722, 723, 724)
      AND [MV].[MetricId] IN (@Metric)
      AND (@Schedule = '' OR [S].[Id] IN (@Schedule))
      AND (@Campus = '' OR [C].[Name] IN (@Campus))
      AND [MV].[MetricValueDateTime] >= DATEADD(MONTH, -@Months, GETDATE())
    ORDER BY [MV].[MetricValueDateTime]
The query up until the WHERE statement should be pretty straight
forward. We are doing various joins so that we can get the campus and
schedule partitions associated with the metric values. We take that data
and return enough information to be able to work with the data and know
what campus, schedule and metric the value came from.
For this example, lets assume the route is /attendance and we have defined the following optional parameters and their default values.
- Metric = 720
- Schedule = empty string
- Campus = empty string
- Months = 12
Now, the first thing we do in the WHERE clause is limit our results
to a pre-defined set of metric Ids. This is to prevent the user from
passing in another metric Id that we did not intend them to have access
to. Then we filter again based on what the user provided, which if they
did not provide a Metric value then the default of 720 is used.
The next to clauses further filter along the Campus and Schedule
parameters. If the user did not provide any values for these then a
blank string is used which the filter uses to indicate "show all".
Finally we further filter by limiting to the past few months, which by
default is 12.
So, to make this easier let's provide a few sample query strings and
the resulting WHERE clause. I'm going to specify the WHERE clauses with
the parameter values resolved, but rest assured they are actually passed
as parameters so there is no worry about the user trying to specify a
DROP statement hidden in there somewhere.
http://rock.rocksolidchurchdemo.com/Webhooks/SQLEndpoint.ashx/attendance?Metric=720&Metric=721&Campus=Houston
WHERE [MV].[MetricId] IN (720, 721, 722, 723, 724)
      AND [MV].[MetricId] IN (720,721)
      AND ('' = '' OR [S].[Id] IN (''))
      AND ('Houston' = '' OR [C].[Name] IN ('Houston'))
      AND [MV].[MetricValueDateTime] >= DATEADD(MONTH, -12, GETDATE())
As you can see, we filter down to values from the Metrics 720 and 721, and only from the "Houston" campus.
http://rock.rocksolidchurchdemo.com/Webhooks/SQLEndpoint.ashx/attendance?Campus=Houston&Campus=Antonio&Months=24
WHERE [MV].[MetricId] IN (720, 721, 722, 723, 724)
      AND [MV].[MetricId] IN (720)
      AND ('' = '' OR [S].[Id] IN (''))
      AND ('Houston' = '' OR [C].[Name] IN ('Houston', 'Antonio'))
      AND [MV].[MetricValueDateTime] >= DATEADD(MONTH, -24, GETDATE())
In this query, we are using the default metric Id of 720. But we are
requesting values for the campuses "Houston" and "Antonio". We also
requested 24 months of data instead of the default 12 months. If you
will notice, the campus line checks for 'Houston' = '' even
though we specified two values. This has to do with the way we provide
the values and detect uses of multi-value checks like the IN keyword. If you want to know the specifics of why this happens, you can read the technical reasons in a later section.
http://rock.rocksolidchurchdemo.com/Webhooks/SQLEndpoint.ashx/attendance?Metric=720&Metric=721&Metric=722&Schedule=3&Schedule=4
WHERE [MV].[MetricId] IN (720, 721, 722, 723, 724)
      AND [MV].[MetricId] IN (720, 721, 722)
      AND (3 = '' OR [S].[Id] IN (3,4))
      AND ('' = '' OR [C].[Name] IN (''))
      AND [MV].[MetricValueDateTime] >= DATEADD(MONTH, -12, GETDATE())
In this final query, we want the values of 3 metrics and 2 schedules.
For example, these two schedule Ids might coincide to our Sunday
morning services, excluding the Saturday night service.
Since you are not limited to simply retrieving data from the database, here is an example of using an INSERT and UPDATE statement to set the value of a person's attributes.
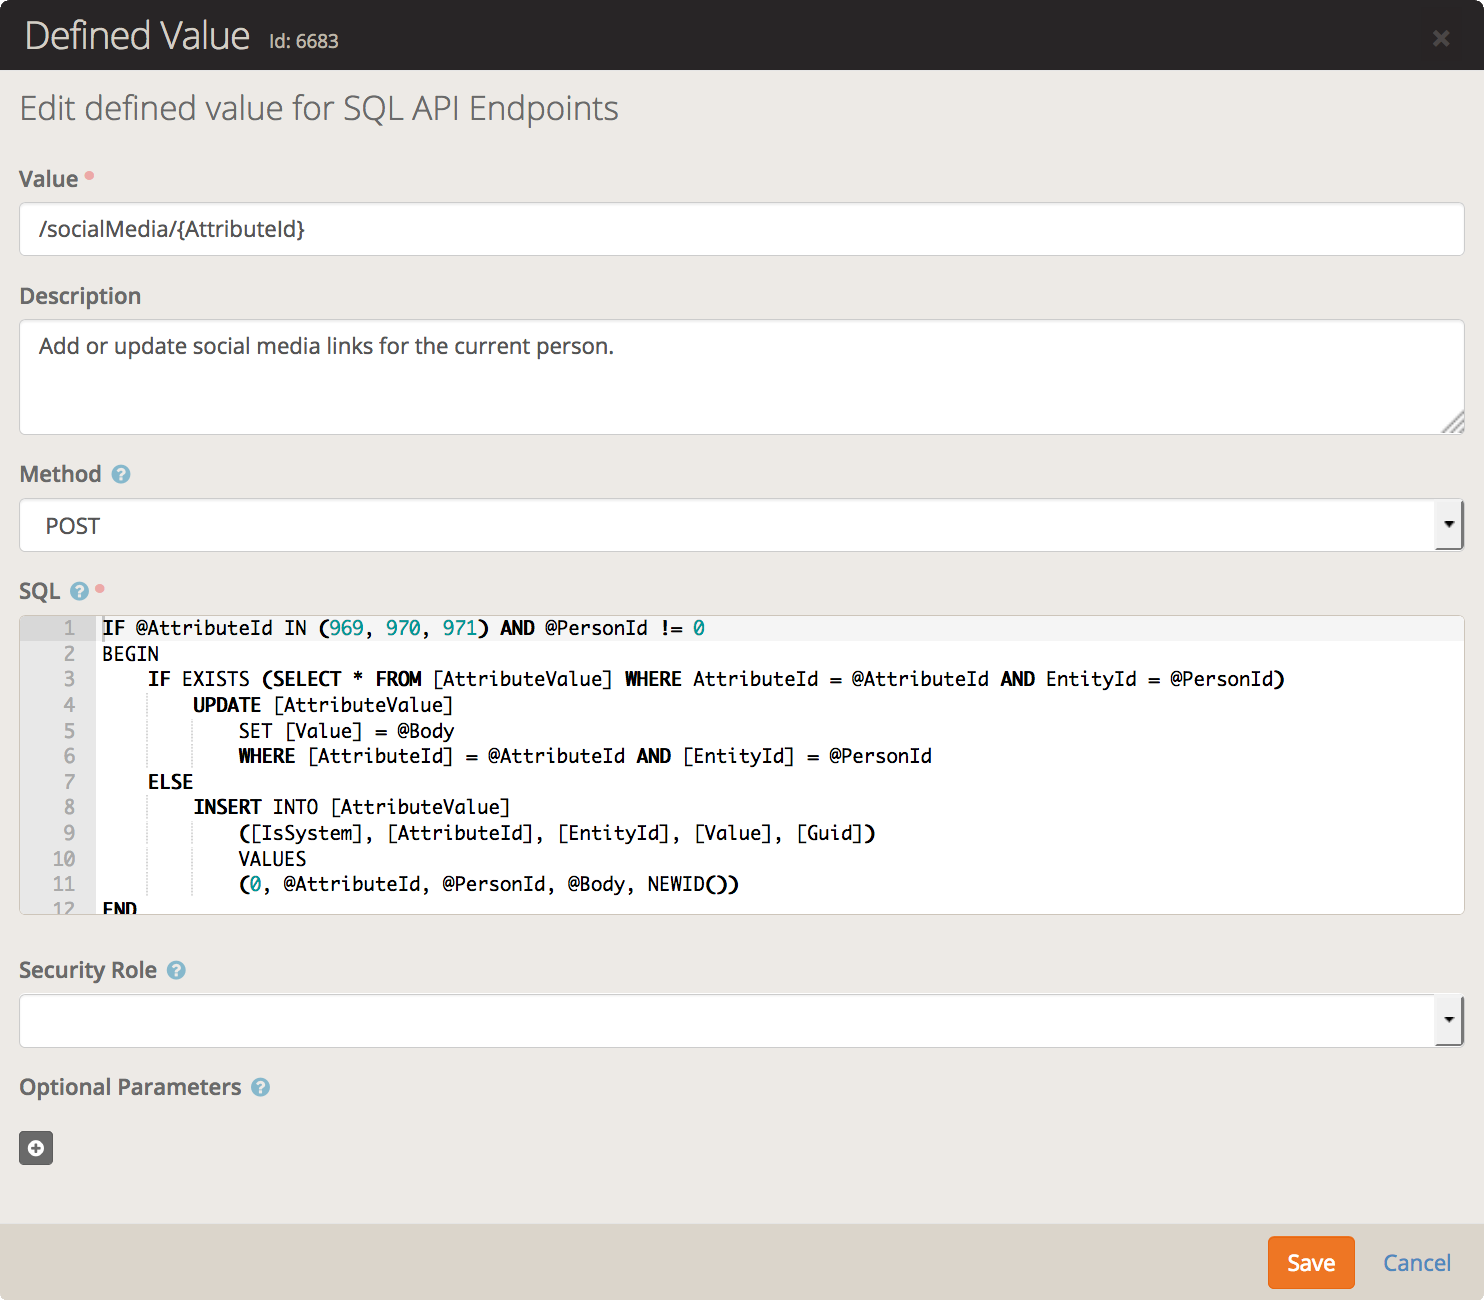
IF @AttributeId IN (969, 970, 971) AND @PersonId != 0
BEGIN
    IF EXISTS (SELECT * FROM [AttributeValue] WHERE AttributeId = @AttributeId AND EntityId = @PersonId)
        UPDATE [AttributeValue]
            SET [Value] = @Body
            WHERE [AttributeId] = @AttributeId AND [EntityId] = @PersonId
    ELSE
        INSERT INTO [AttributeValue]
            ([IsSystem], [AttributeId], [EntityId], [Value], [Guid])
            VALUES
            (0, @AttributeId, @PersonId, @Body, NEWID())
END
First off, we check to make sure the specified attribute is an
allowed one. On our system, those three attribute Ids are for the
Twitter, Facebook and Instagram attributes. We also check to ensure the
user is logged in. Next we check if an AttributeValue already exists. If
so then we issue an UPDATE statement to update the existing value. If not then we issue an INSERT statement to create a new attribute value.
Now notice the @Body parameter is being used but hasn't
been defined. This is defined for every request and contains any data
sent along with a POST, PUT or PATCH request. Let's examine a jQuery
request to update the Twitter attribute.
$.post('/Webhooks/SQLEndpoint.ashx/socialMedia/970', 'myTwitterAccount');
For this request, the @AttributeId will be 970 and the @Body will be myTwitterAccount.
So we just showed how you can update a single attribute at a time.
What if we wanted to update all three with a single request? If you are
running SQL Server 2016+ or Azure SQL then you can do just that.
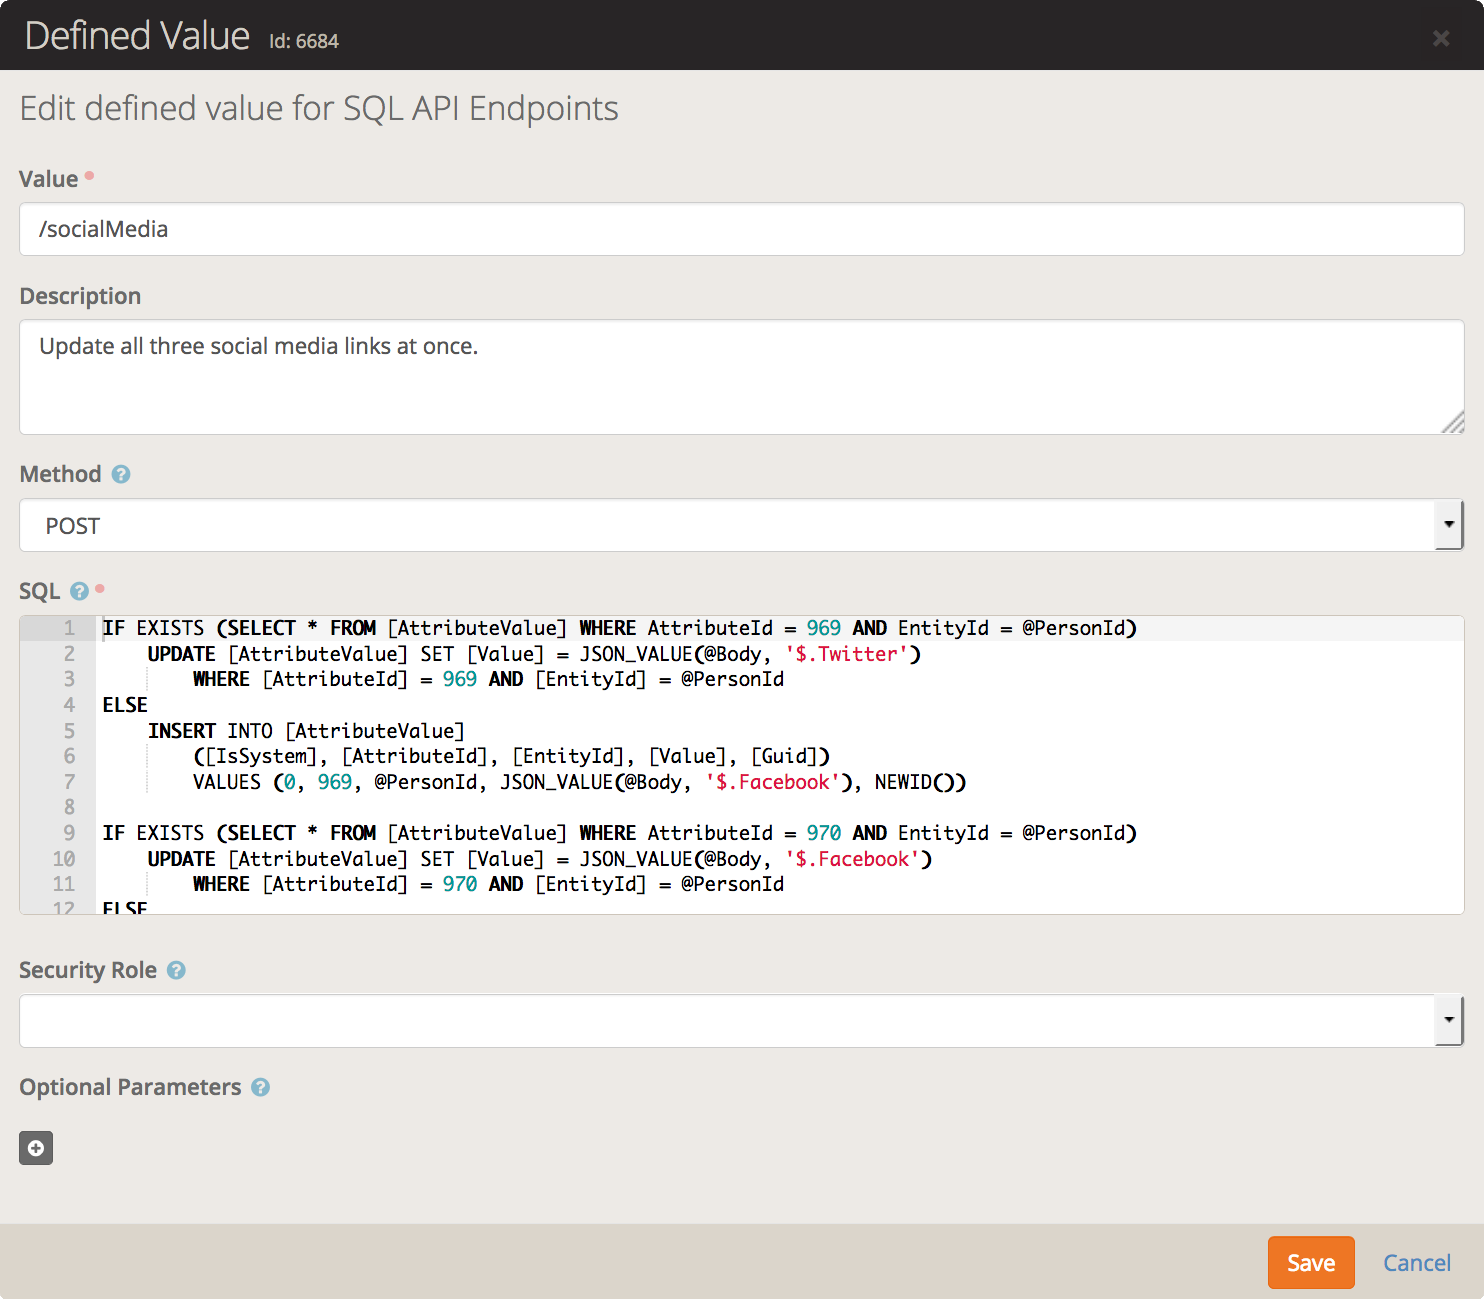
IF EXISTS (SELECT * FROM [AttributeValue] WHERE AttributeId = 969 AND EntityId = @PersonId)
    UPDATE [AttributeValue]
        SET [Value] = JSON_VALUE(@Body, '$.Twitter')
        WHERE [AttributeId] = 969 AND [EntityId] = @PersonId
ELSE
    INSERT INTO [AttributeValue]
        ([IsSystem], [AttributeId], [EntityId], [Value], [Guid])
        VALUES (0, 969, @PersonId, JSON_VALUE(@Body, '$.Facebook'), NEWID())

IF EXISTS (SELECT * FROM [AttributeValue] WHERE AttributeId = 970 AND EntityId = @PersonId)
    UPDATE [AttributeValue]
        SET [Value] = JSON_VALUE(@Body, '$.Facebook')
        WHERE [AttributeId] = 970 AND [EntityId] = @PersonId
ELSE
    INSERT INTO [AttributeValue]
        ([IsSystem], [AttributeId], [EntityId], [Value], [Guid])
        VALUES (0, 970, @PersonId, JSON_VALUE(@Body, '$.Twitter'), NEWID())

IF EXISTS (SELECT * FROM [AttributeValue] WHERE AttributeId = 969 AND EntityId = @PersonId)
    UPDATE [AttributeValue]
        SET [Value] = JSON_VALUE(@Body, '$.Twitter')
        WHERE [AttributeId] = 971 AND [EntityId] = @PersonId
ELSE
    INSERT INTO [AttributeValue]
        ([IsSystem], [AttributeId], [EntityId], [Value], [Guid])
        VALUES (0, 971, @PersonId, JSON_VALUE(@Body, '$.Twitter'), NEWID())
So what we have done is taken the guts of the previous example and
duplicated it a few times. Then we modified each one to be for a
hard-coded attribute. Notice we are now using a statement such as JSON_VALUE(@Body, '$.Twitter')
to get our value. This is a new function available in SQL Server 2016+
and Azure SQL. It lets us process a JSON encoded string (@Body) and
extract a single value from the tree path. The path can be pretty
complex, so go read up on it and it's related functions!
$.post('/Webhooks/SQLEndpoint.ashx/socialMedia', JSON.stringify({Twitter: 'tw', Facebook: 'fb', Instagram: 'ig'}));
The above creates a JSON object and then converts it to a string
format. This JSON-encoded string will be passed to our SQL statement as
the @Body parameter. Which, as you saw above, we can then
parse on the fly. If we really wanted to be fancy above we could have
included various checks to make sure the JSON values existed before
making any changes, but this is a simplistic example.